Season extension · Guide 107
Build a Hand-Turned Row-Cover Storage Winder
A removable spindle between two broad supports for winding clean, dry garden fabric.
01 / See the shape
View the project
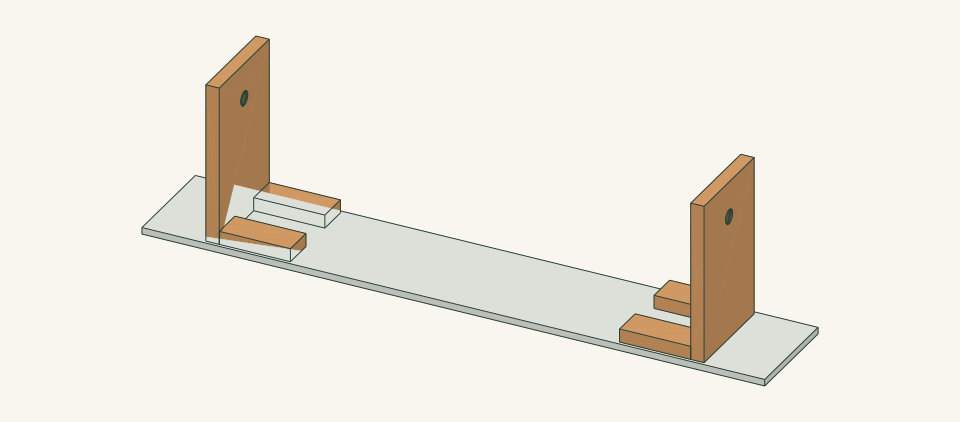
Loading the 3D view…
Drag to turn. Pinch or use + / − to zoom. The written step covers workholding and tool use.
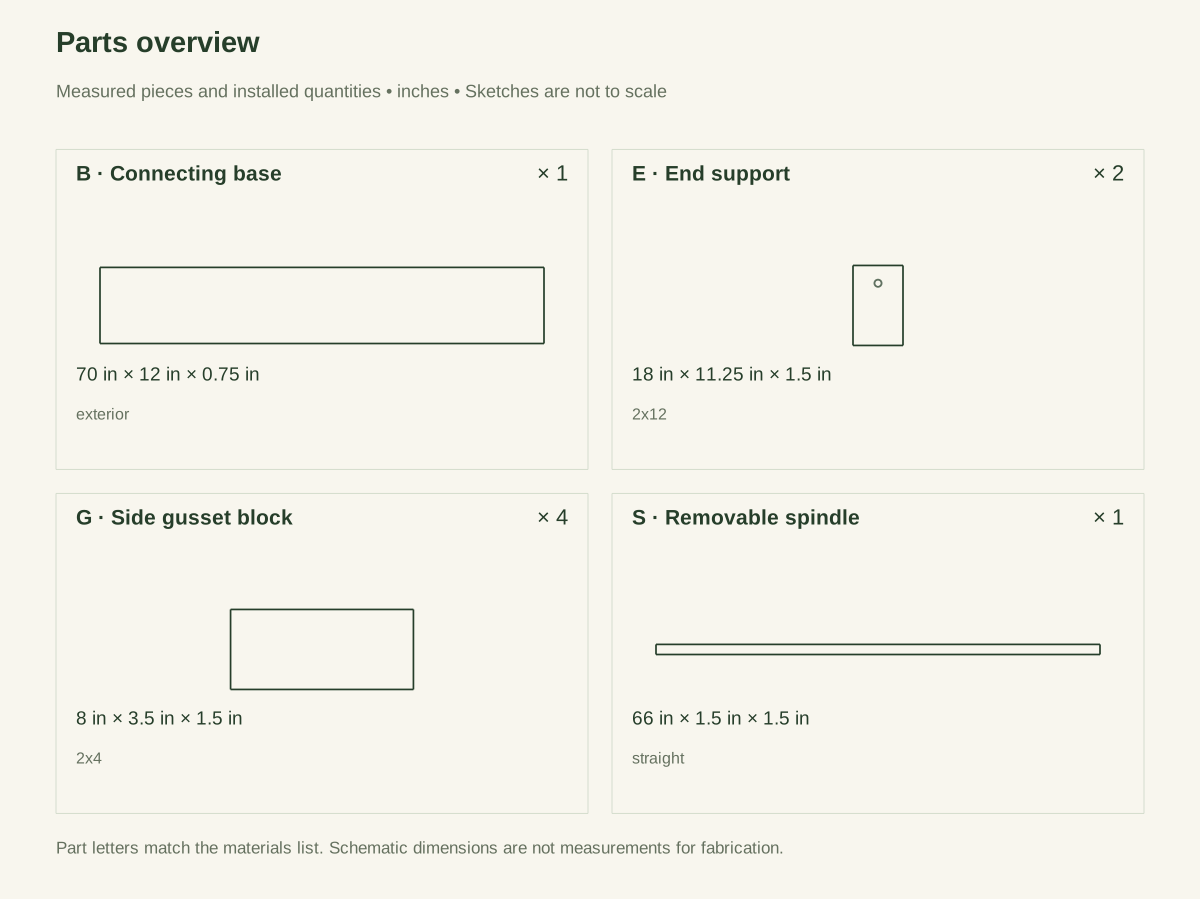
Scroll or swipe the enlarged drawing to read its dimensions. Choose Fit to see the whole drawing again.
Build a Hand-Turned Row-Cover Storage Winder. Check the dimensions and build steps before cutting.
02 / Plan your build
Before you start
Wind clean, dry row cover onto a smooth removable spindle instead of packing it in a tangled bag. Two end supports sit on a long base. Five inches of spindle extend beyond each support so stop collars and bare hand grips have separate space. No crank, motor or tensioning device is included.
Where it goes
A level clear indoor floor or long bench, with room for two adults to handle dry fabric and no trip line across a passage.
Footprint: 70 × 12-inch base; allow room around both spindle ends for two adults to wind and remove dry fabric.
What to expect
Measure accurately, make supported square cuts and drill clamped joints. Plan 4–6 hours; cleaning/drying the cover is separate.
A planning estimate for the hands-on work, once the materials are bought and the tools are set up. It has not been timed on a finished build.
Check the spot
- A level clear indoor floor or long bench, with room for two adults to handle dry fabric and no trip line across a passage.
- Measure the usable stock before marking. Keep the assembly area flat and large enough to clamp the work without reaching across a moving cutter.
Stop and check first if…
- Stop if a part splits, a fixing strips, or the assembled object rocks. Unload it before opening a joint.
- Do not substitute an unknown material section or make the object taller or wider without checking every affected part and joint.
Work safely
- Keep both hands on bare spindle outside the collars; never put fingers between a collar and support. Wear no loose sleeves, hanging jewelry or gloves while turning. Stop rotation before touching a snag or fitting storage ties.
- Wind only dry lightweight fabric slowly with two adults. Keep the long base out of walkways, support the roll during removal and never use the spindle for lifting or tensioning.
Budget
We have not put a price on this one yet. Lumber and hardware prices change by store and season, so price the list under What you need at your local supplier before you buy.
03 / Gather and cut
What you need
B — Connecting base
1 piece
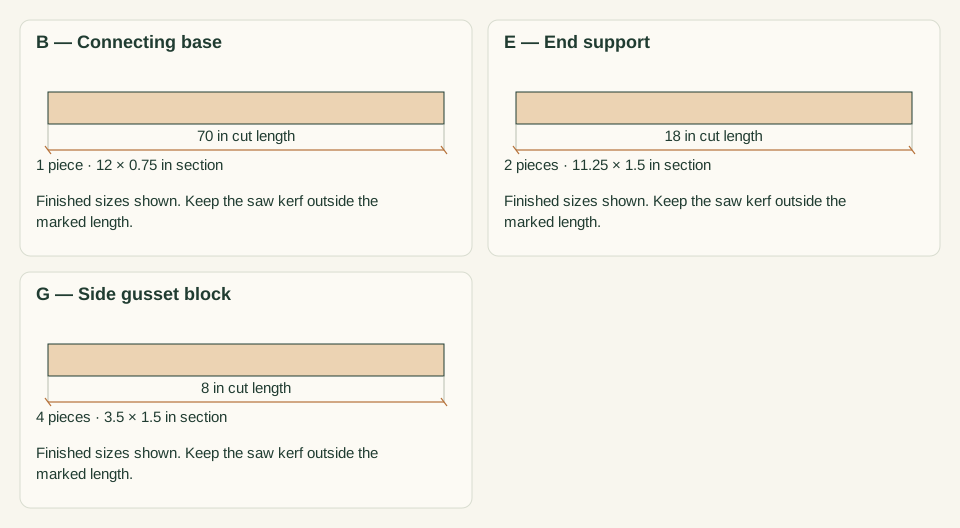
Exterior plywood, actual 0.75 in. Buy a plywood sheet at least 72 × 24 × 0.75 in and cut a 70 × 12-inch base with kerf and trim.
Measure your boards before cutting. Build to the finished sizes written here, not the nominal lumber label.
E — End support
2 pieces
Sound surfaced 2 × 12, actual 1.5 × 11.25. One 2 × 12 × 4-ft board, two 18-inch cuts.
Measure your boards before cutting. Build to the finished sizes written here, not the nominal lumber label.
G — Side gusset block
4 pieces
Surfaced 2 × 4, actual 1.5 × 3.5; full rectangular support blocks. One 2 × 4 × 4-ft board.
Measure your boards before cutting. Build to the finished sizes written here, not the nominal lumber label.
S — Removable spindle
1 piece
Straight smooth 1.5-in-diameter hardwood dowel. Buy one straight 1.5-inch-diameter × 72-inch hardwood dowel; cut 66 usable inches.
Reference cut list uses a 1.5 × 1.5 bounding section; the part is round.
Support screws
16 items
#10 × 2.5-in wood screws Purchase at least 16; keep spare hardware separate from the installed count.
Use one consistent product and follow its pilot and driving instructions.
Base screws
12 items
#8 × 2-in wood screws Purchase at least 12; keep spare hardware separate from the installed count.
Use one consistent product and follow its pilot and driving instructions.
Spindle collars
2 items
Two smooth clamp-on 1.5-inch shaft collars, each at most 0.5 inch wide, fitted outside the supports Buy two matching collars and the exact adjustment tool their maker specifies.
No sharp projecting screw or improvised cross nail; remove one collar before withdrawing the spindle.
Fabric storage ties
2 items
Two wide soft reusable ties for the dry roll Buy two wide soft reusable ties long enough to go around the completed roll without tight compression.
Ties are fitted only after winding; keep loose tails away from the bearing holes.
Cut list
| Piece | How many | Cut length | Note |
|---|---|---|---|
| B — Connecting base | 1 | 70 × 12 × 0.75 in | Finished length × width × thickness; square ends unless the detail says otherwise. |
| E — End support | 2 | 18 × 11.25 × 1.5 in | Finished length × width × thickness; square ends unless the detail says otherwise. |
| G — Side gusset block | 4 | 8 × 3.5 × 1.5 in | Finished length × width × thickness; square ends unless the detail says otherwise. |
| S — Removable spindle | 1 | 66 × 1.5 × 1.5 in | Finished length × width × thickness; square ends unless the detail says otherwise. |
Tools
- Tape or rule, square and sharp pencil
- Clamps, a flat bench and sacrificial backing
- Suitable guarded saw for the specified stock
- Drill/driver, depth stop and bits matched to the chosen screws
- Fine abrasive and a dust brush
- 1.625-inch boring bit, clamped drill guide and backing; collar adjustment tool; scissors only if the cover maker permits trimming
Protective gear
- Eye protection during cutting and drilling
- Hearing protection and dust collection appropriate to the actual tools
- Closed footwear; keep loose clothing and gloves away from rotating cutters
04 / Put it together
Build steps
- 01
Fold the dry cover to fit
Clean and fully dry the cover under its own care instructions. Measure its width. Fold it LENGTHWISE into even layers no wider than 51 inches, without stretching it, so it has at least 1 inch free on each side in the 53-inch support gap. Do not roll wet heavy fabric, rope under tension or a bundle that will not fit.
Close-up · Whole model shows the complete part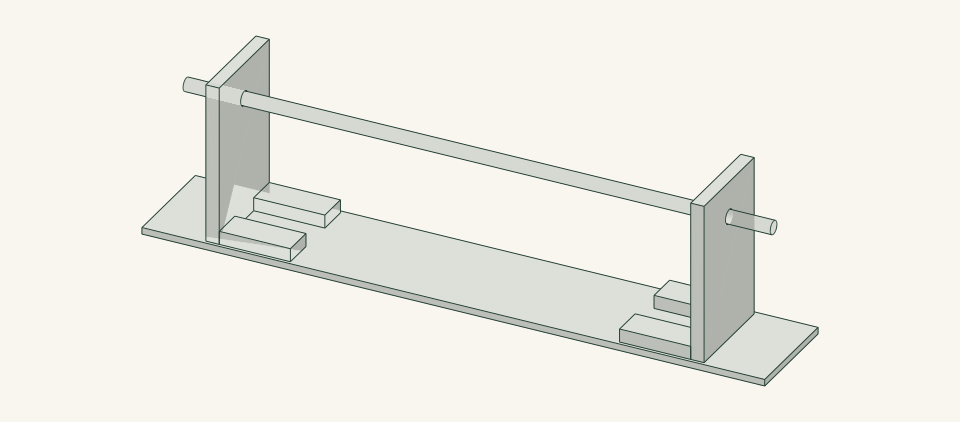
Loading the 3D view…
Drag to turn. Pinch or use + / − to zoom. The written step covers workholding and tool use.
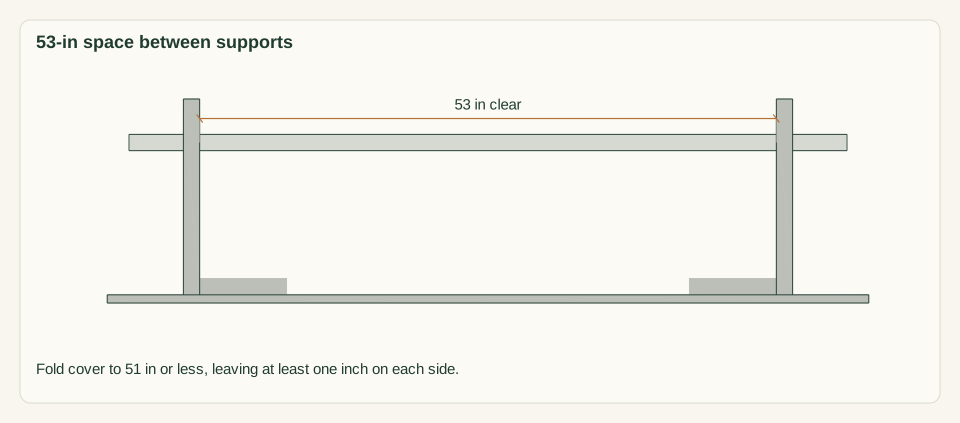
Scroll or swipe the enlarged drawing to read its dimensions. Choose Fit to see the whole drawing again.
Fold the dry cover lengthwise to fit the clear support span. The final object is a size reference only.
Check: The folded cover is dry, at most 51 inches wide and clear of both supports.
- 02
Cut base, end boards and support blocks
Cut the 70 × 12-inch base, two 18-inch end supports and four 8-inch blocks from the stated actual sections. Mark the base front-left corner as the starting point. Match both upright lengths and reject splits near the planned bearing holes.
Close-up · Whole model shows the complete part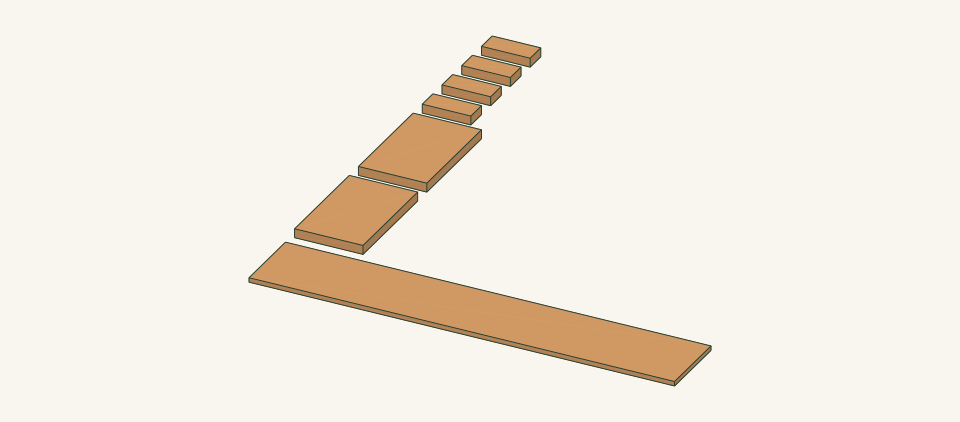
Loading the 3D view…
Drag to turn. Pinch or use + / − to zoom. The written step covers workholding and tool use.
Scroll or swipe the enlarged drawing to read its dimensions. Choose Fit to see the whole drawing again.
Cut the base, end-support blanks and four support blocks. The end boards have no bores at this stage.
Check: End supports match and the base is flat with no damaged mounting edges.
- 03
Mark the bearing centers
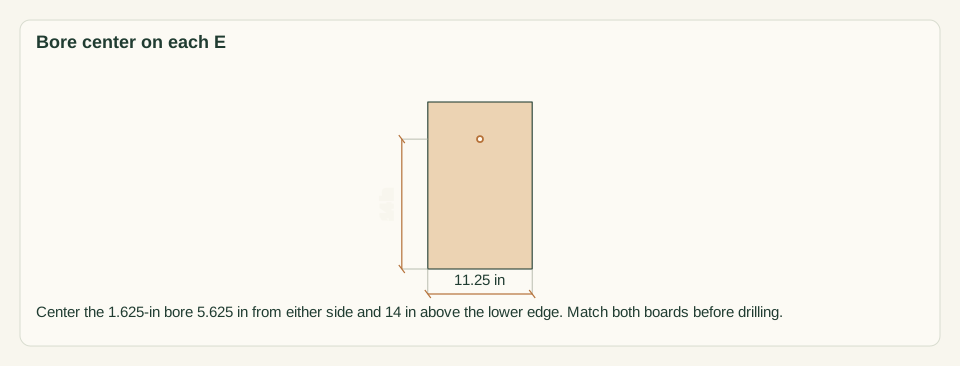
On each 18-inch support, mark the centerline across its 11.25-inch width. Mark bore center 14 inches above its lower edge, giving global z 14.75 after the base. Pair the supports to verify identical centers.
Close-up · Whole model shows the complete part
Loading the 3D view…
Drag to turn. Pinch or use + / − to zoom. The written step covers workholding and tool use.
Scroll or swipe the enlarged drawing to read its dimensions. Choose Fit to see the whole drawing again.
Mark both supported end-board blanks from the same side and lower-edge references.
Check: Both bore centers align exactly before drilling.
- 04
Drill supported bearing holes
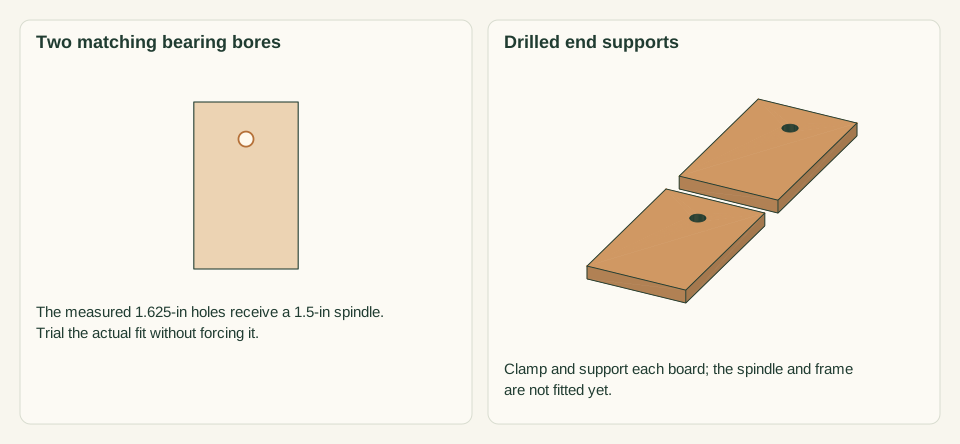
Clamp each support over backing and drill a 1.625-inch bore with a suitable bit and stable setup. Trial the 1.5-inch spindle in both holes and ease only enough for free turning. Do not enlarge one side by forcing the dowel.
Close-up · Whole model shows the complete part
Loading the 3D view…
Drag to turn. Pinch or use + / − to zoom. The written step covers workholding and tool use.
Scroll or swipe the enlarged drawing to read its dimensions. Choose Fit to see the whole drawing again.
Drill the paired bearing holes with backing. These loose end supports now contain the actual source through-bores.
Check: The spindle turns freely without cracked webs or jagged bearing edges.
- 05
Fit the end-support blocks
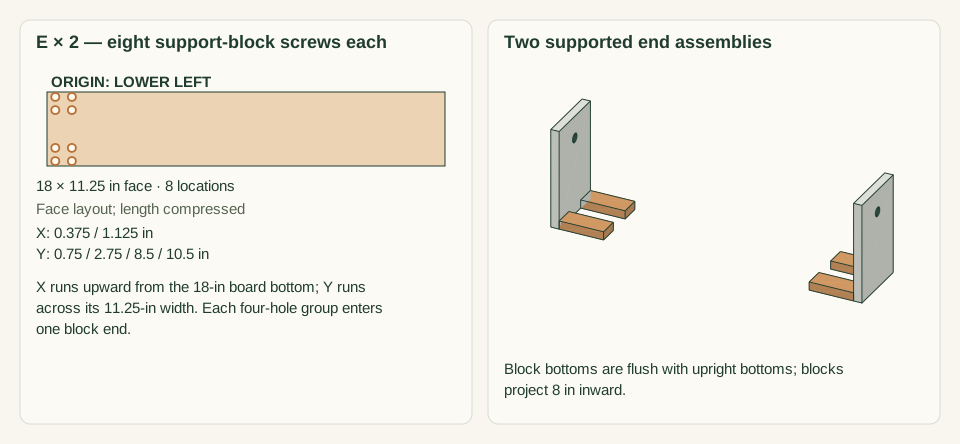
Clamp two 8-inch support blocks to the INNER face of each upright. Their bottom faces are flush with the upright bottom. One block has its front edge flush with the upright front; the other has its rear edge flush with the upright rear, both projecting 8 inches inward. On each block end mark a centered four-hole rectangle, 2 inches across its 3.5-inch width and 0.75 inch across its 1.5-inch height. Drill upright clearances and block-end pilots. Fit four #10 × 2.5-inch screws per block, sixteen total.
Close-up · Whole model shows the complete part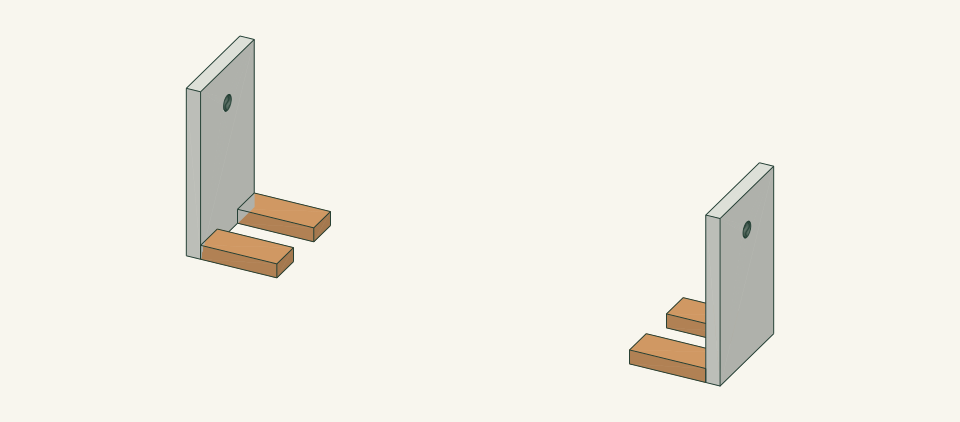
Loading the 3D view…
Drag to turn. Pinch or use + / − to zoom. The written step covers workholding and tool use.
Scroll or swipe the enlarged drawing to read its dimensions. Choose Fit to see the whole drawing again.
Attach two projecting support blocks to each upright’s inside face before fixing the assemblies to the base.
Check: Both end assemblies stand square while supported and have no split mounting block.
- 06
Locate and fix the end supports
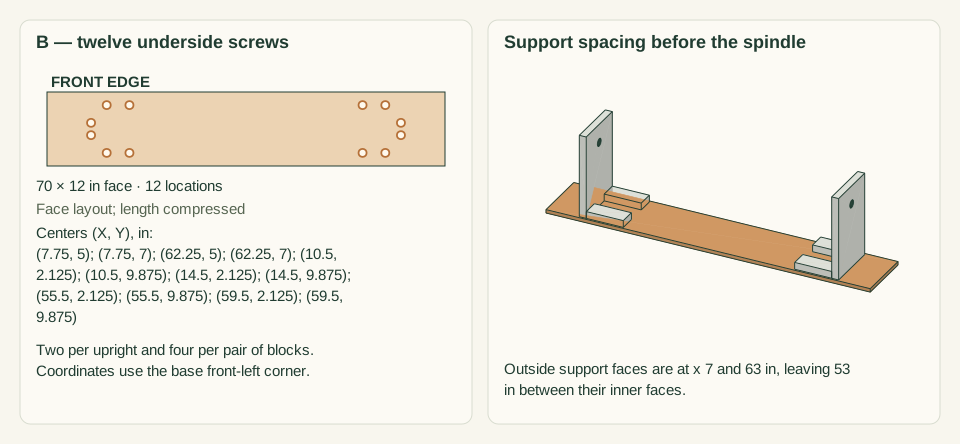
Place support outer faces 7 and 63 inches from the base left edge, their fronts 0.375 inch from the base front. Clamp square. Mark six underside #8 × 2-inch screws per end: two under each upright at x 7.75 or 62.25, y 5 and 7; four under the blocks at x 10.5/14.5 on the left or 55.5/59.5 on the right, each at y 2.125 and 9.875. Drill base clearances and wood pilots. With the frame clamped to the base, install all twelve screws with their underside heads flush.
Close-up · Whole model shows the complete part
Loading the 3D view…
Drag to turn. Pinch or use + / − to zoom. The written step covers workholding and tool use.
Scroll or swipe the enlarged drawing to read its dimensions. Choose Fit to see the whole drawing again.
Place the end assemblies at their measured stations and fasten from the underside of the base into supported wood.
Check: All 12 screws enter supported wood, clear of the horizontal block screws; inner gap is 53 inches.
- 07
Fit the longer spindle and collars
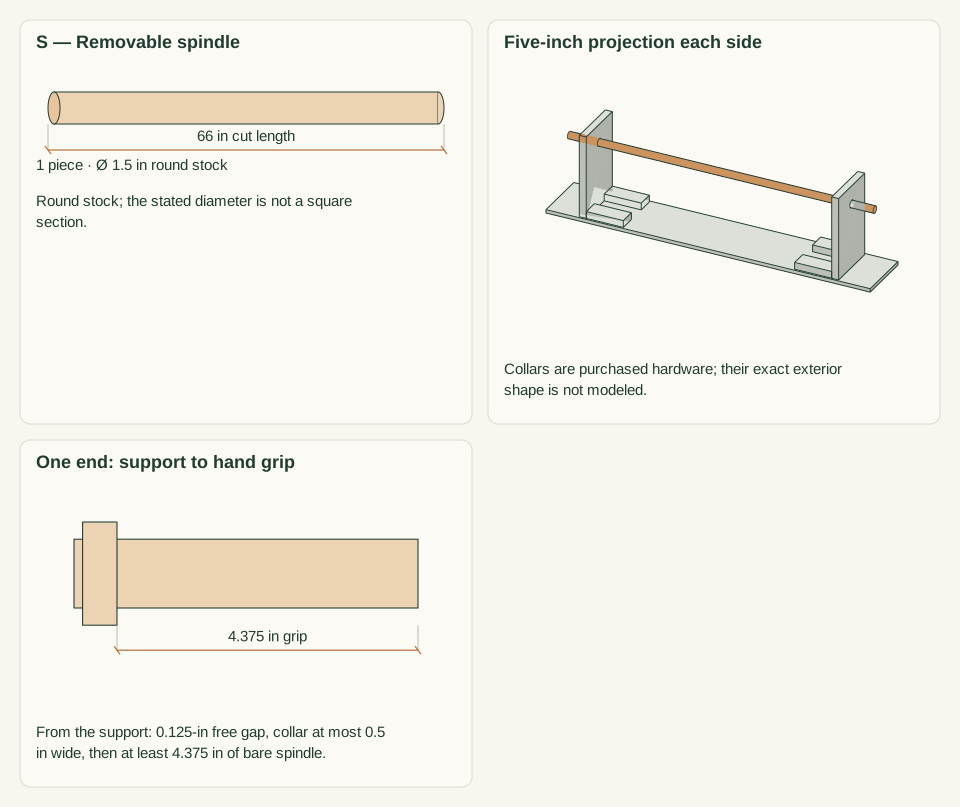
Cut and smooth a 66-inch dowel. Feed it through both bores and center it with 5 inches beyond each outer support face. Fit collars no wider than 0.5 inch outside the supports, leaving a 1/8-inch turning gap between each collar and wood. Tighten to the collar maker’s instructions. At least 4.375 inches of bare dowel remain outside each collar as a hand grip.
Close-up · Whole model shows the complete part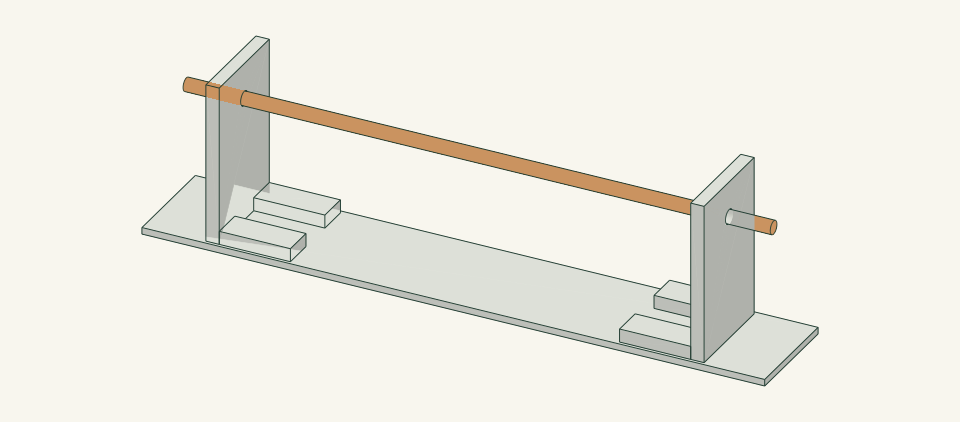
Loading the 3D view…
Drag to turn. Pinch or use + / − to zoom. The written step covers workholding and tool use.
Scroll or swipe the enlarged drawing to read its dimensions. Choose Fit to see the whole drawing again.
Feed the 66-in spindle through both bores and keep the collar gap separate from the bare hand grip.
Check: Neither collar rubs the wood; both exposed hand grips remain clear of rotating hardware.
- 08
Trial a short dry winding
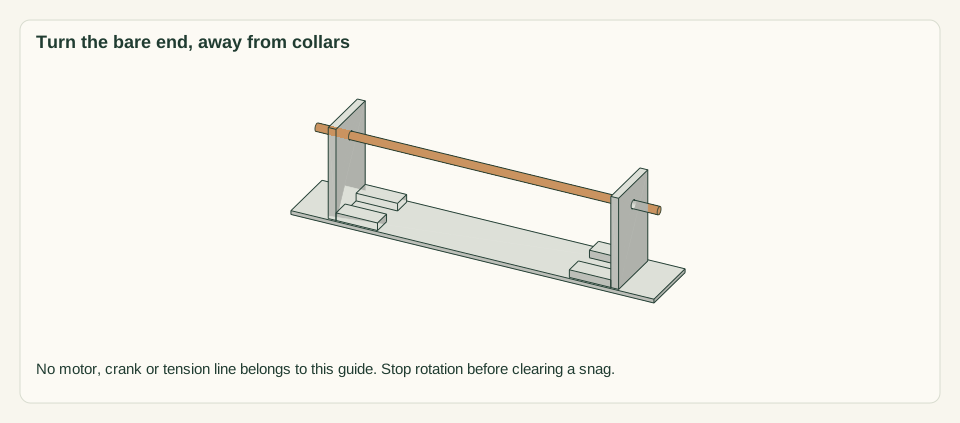
Use two adults: one feeds the folded dry fabric evenly and one slowly turns an exposed bare spindle end. Keep hands outside the collars and away from the bearing holes. Begin with a short fold around the dowel, not a tied tension line. Stop for bending, loose supports or any snag; no motor or crank is used.
Close-up · Whole model shows the complete part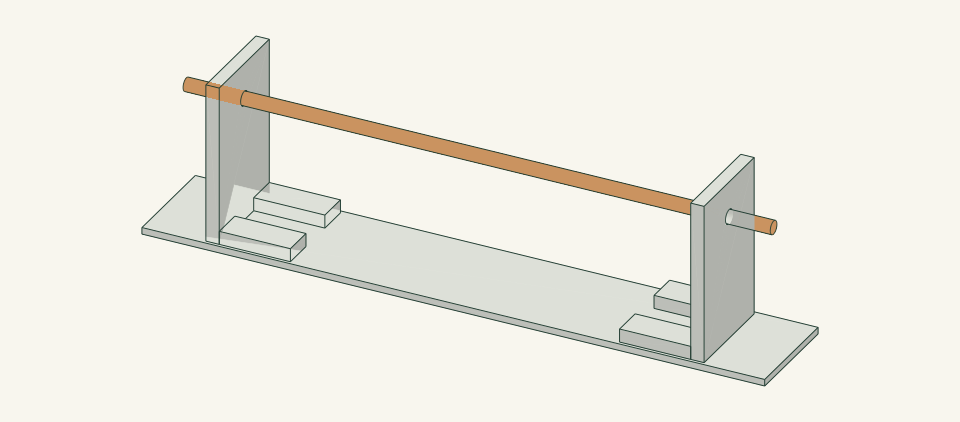
Loading the 3D view…
Drag to turn. Pinch or use + / − to zoom. The written step covers workholding and tool use.
Scroll or swipe the enlarged drawing to read its dimensions. Choose Fit to see the whole drawing again.
One person feeds dry fabric while another turns the exposed spindle slowly. The highlighted spindle is the only rotating component.
Check: Winding is slow and controlled without a motor, crank or stored tension.
- 09
Secure the finished roll
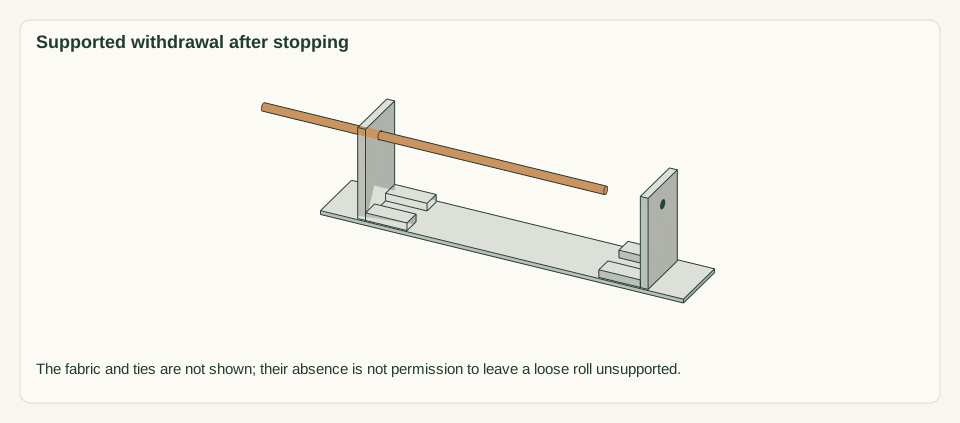
Stop all rotation before fitting soft storage ties around the dry roll. Keep ties loose enough not to damage the cover. Support the roll while removing one collar and withdrawing the spindle if taking the roll off.
Close-up · Whole model shows the complete part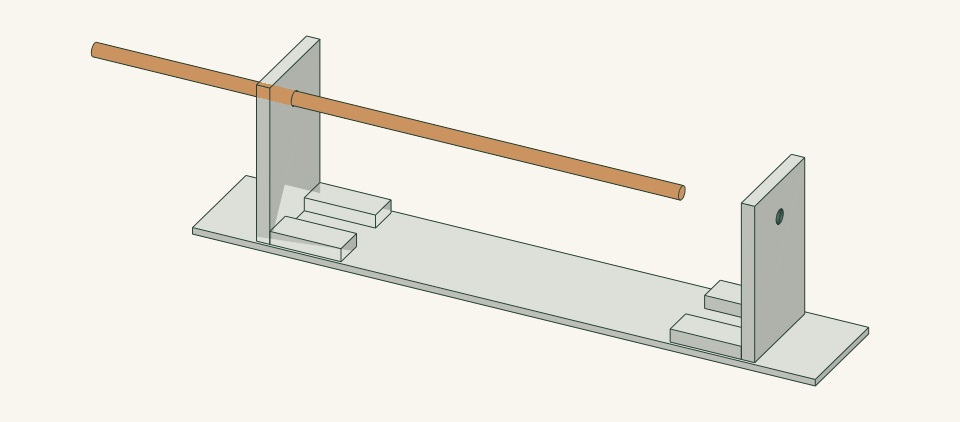
Loading the 3D view…
Drag to turn. Pinch or use + / − to zoom. The written step covers workholding and tool use.
Scroll or swipe the enlarged drawing to read its dimensions. Choose Fit to see the whole drawing again.
Stop rotation and support the roll before removing a collar or withdrawing the spindle. The shifted shaft shows removal direction only.
Check: The roll is controlled throughout removal and no loaded support is pulled sideways.
- 10
Store and inspect
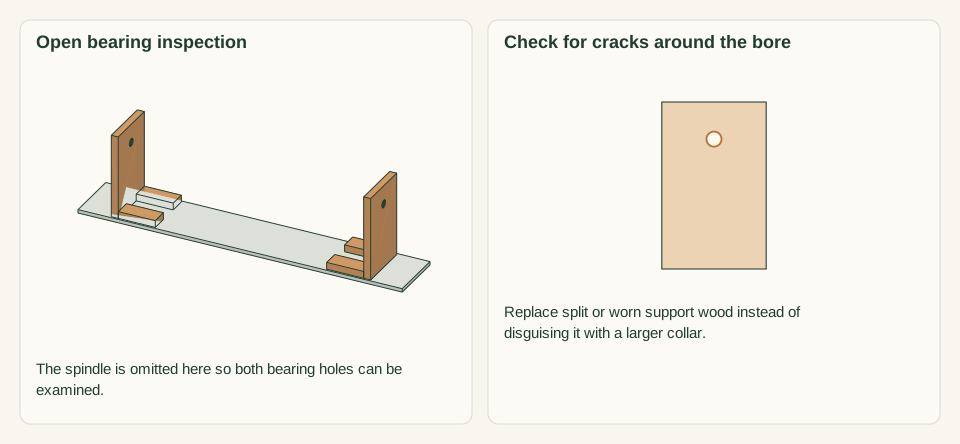
Store dry fabric away from sunlight according to its care guidance. Check bores, collars, support blocks and base screws before the next use. Replace a split or badly worn support rather than hiding it with a larger collar.
Close-up · Whole model shows the complete partLoading the 3D view…
Drag to turn. Pinch or use + / − to zoom. The written step covers workholding and tool use.
Scroll or swipe the enlarged drawing to read its dimensions. Choose Fit to see the whole drawing again.
Inspect the unloaded bearings, blocks and base fixings before storing or reusing the winder.
Check: No loose collar, bearing crack or wet fabric remains on the winder.


05 / Keep it sound
Care
After the build
- Do not add a motor, large crank or tensioning brake. The design is for slowly gathering dry lightweight cover by hand.
- A roll’s permissible mass is not established here; stop for deflection or instability rather than treating those observations as a proof test.
Check it each season
- Inspect connections and hand-contact edges before use. Unload before tightening or replacing parts; replace a cracked member rather than adding a screw beside the crack.
- Brush off debris, wipe only as needed and dry with air around the joints. Store dry when the item is not in use.
If something looks wrong
- Spindle rubs one bore
- Unload and compare support alignment; do not force the shaft through a skewed frame.
- Support moves while winding
- Stop, unload and inspect base/block connections before use.
- Fabric catches a screw
- Stop rotation and remove the snag while unloaded; smooth or replace the offending hardware.
- Roll is too wide or heavy
- Use a different handling method; do not remove a support or wind wet cover.
Keep exploring
More season extension guides