Garden storage · Guide 88
Build a Low Six-Cubby Plant-Pot Organizer
A low braced cubby for empty pots, with clear compartments and accessible stops.
01 / See the shape
View the project
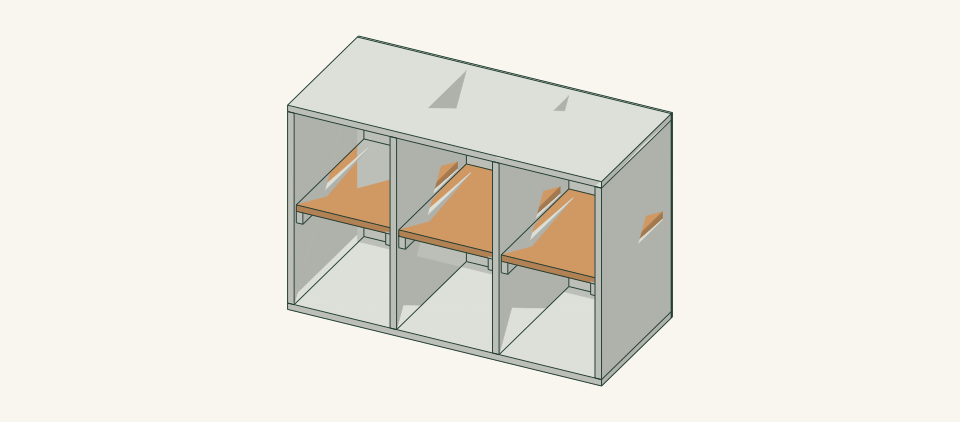
Loading the 3D view…
Drag to turn. Pinch or use + / − to zoom. The written step covers workholding and tool use.
Scroll or swipe the enlarged drawing to read its dimensions. Choose Fit to see the whole drawing again.
Build a Low Six-Cubby Plant-Pot Organizer. Check the dimensions and build steps before cutting.
02 / Plan your build
Before you start
Small pots are easier to find when each stack has a defined compartment. This low organizer separates six groups of empty pots and keeps the open front clear for retrieval. The back panel braces the cabinet; use a suitable restraint where children, pets or the actual stacks could tip it.
Where it goes
A dry level indoor or covered work area; empty pots only, no filled planters, overhead installation or climbing.
Footprint: 36 × 16.25 in frame size; allow room around it to work and for anything that projects.
What to expect
Measure accurately, make supported square cuts and drill clamped joints. Plan 5–7 hours.
A planning estimate for the hands-on work, once the materials are bought and the tools are set up. It has not been timed on a finished build.
Check the spot
- A dry level indoor or covered work area; empty pots only, no filled planters, overhead installation or climbing.
- Measure the usable stock before marking. Keep the assembly area flat and large enough to clamp the work without reaching across a moving cutter.
Stop and check first if…
- Stop if a part splits, a fixing strips, or the assembled object rocks. Unload it before opening a joint.
- Do not substitute an unknown material section or make the object taller or wider without checking every affected part and joint.
Work safely
- Support the plywood on both sides of every cut and keep hands out of the blade path. Wear eye protection when handling brittle ceramic pots; discard broken sharp pieces safely.
- This low unit can still tip. Use the selected restraints where people, pets or stored pots can upset it. Never climb on it or put filled planters on top; remove one short stack at a time.
Budget
We have not put a price on this one yet. Lumber and hardware prices change by store and season, so price the list under What you need at your local supplier before you buy.
03 / Gather and cut
What you need
H — Top and bottom panel
2 pieces
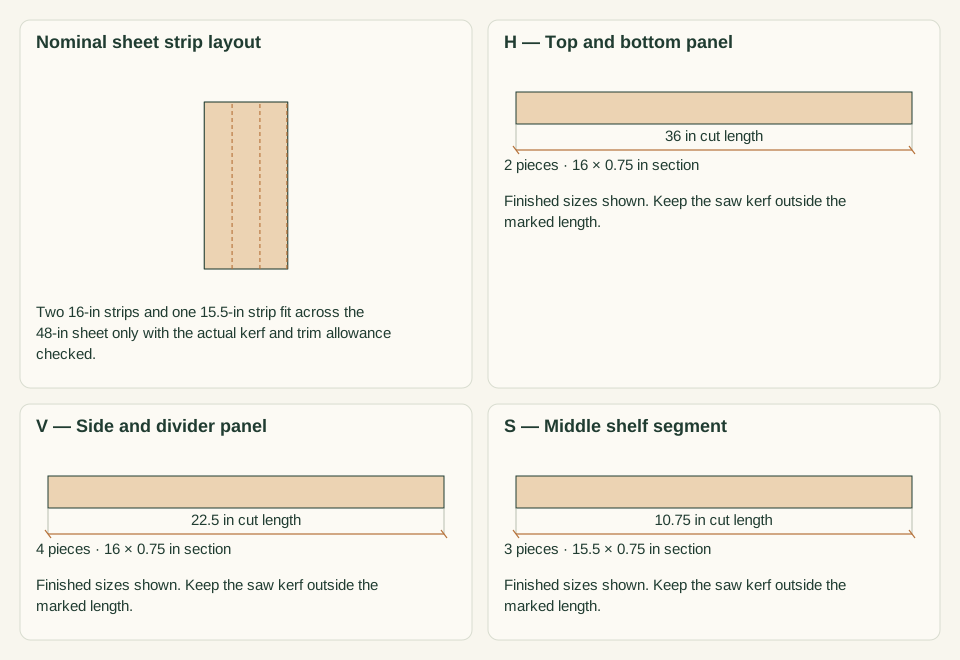
Exterior-rated plywood, actual 0.75 in. Buy one 48 × 96 × 0.75-inch sheet for H, V and S. Lay out two 16-inch-wide strips and one 15.5-inch strip with actual kerf and trim.
Measure your boards before cutting. Build to the finished sizes written here, not the nominal lumber label.
V — Side and divider panel
4 pieces
Same 0.75-in plywood. Included in H: one 16-inch strip yields four 22.5-inch pieces; the other yields both 36-inch H panels. The 15.5-inch strip yields the shelves.
Measure your boards before cutting. Build to the finished sizes written here, not the nominal lumber label.
S — Middle shelf segment
3 pieces
Same 0.75-in plywood. Cut three 10.75 × 15.5-inch shelves from the plywood sheet listed for H; retain 0.125-inch side clearance.
Measure your boards before cutting. Build to the finished sizes written here, not the nominal lumber label.
C — Shelf cleat
6 pieces
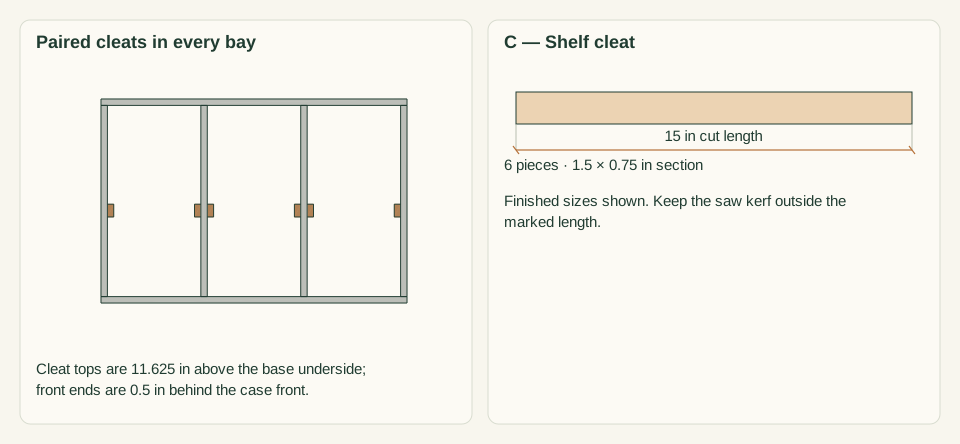
Solid wood 1 × 2, actual 0.75 × 1.5. One 1 × 2 × 8-ft board, six 15-inch cuts plus kerf.
Measure your boards before cutting. Build to the finished sizes written here, not the nominal lumber label.
B — Back panel
1 piece
Exterior plywood, actual 0.25 in. Buy one 48 × 48 × 0.25-inch plywood panel and cut the 36 × 24-inch back with trim allowance.
Measure your boards before cutting. Build to the finished sizes written here, not the nominal lumber label.
Case screws
32 items
#8 × 1.75-in exterior wood screws Purchase at least 32; keep spare hardware separate from the installed count.
Use one consistent product and follow its pilot and driving instructions.
Cleat screws
18 items
#6 × 1.25-in wood screws Purchase at least 18; keep spare hardware separate from the installed count.
Use one consistent product and follow its pilot and driving instructions.
Back screws
20 items
#6 × 1-in screws Purchase at least 20; keep spare hardware separate from the installed count.
Use one consistent product and follow its pilot and driving instructions.
Tip restraints
2 items
Two suitable cabinet restraints matched to actual wall framing when required by the location Buy two complete cabinet-restraint sets suited to the actual cabinet and verified wall framing, including their specified fixings.
Select and install the restraint before use where tipping exposure exists; do not rely on pot weight as ballast.
Cut list
| Piece | How many | Cut length | Note |
|---|---|---|---|
| H — Top and bottom panel | 2 | 36 × 16 × 0.75 in | Finished length × width × thickness; square ends unless the detail says otherwise. |
| V — Side and divider panel | 4 | 22.5 × 16 × 0.75 in | Finished length × width × thickness; square ends unless the detail says otherwise. |
| S — Middle shelf segment | 3 | 10.75 × 15.5 × 0.75 in | Finished length × width × thickness; square ends unless the detail says otherwise. |
| C — Shelf cleat | 6 | 15 × 1.5 × 0.75 in | Finished length × width × thickness; square ends unless the detail says otherwise. |
| B — Back panel | 1 | 36 × 24 × 0.25 in | Finished length × width × thickness; square ends unless the detail says otherwise. |
Tools
- Tape or rule, square and sharp pencil
- Clamps, a flat bench and sacrificial backing
- Suitable guarded saw for the specified stock
- Drill/driver, depth stop and bits matched to the chosen screws
- Fine abrasive and a dust brush
- Long straightedge and supported plywood cutting setup; countersink bit; suitable wall-location and restraint installation tools
Protective gear
- Eye protection during cutting and drilling
- Hearing protection and dust collection appropriate to the actual tools
- Closed footwear; keep loose clothing and gloves away from rotating cutters
04 / Put it together
Build steps
- 01
Sort and measure the empty pots
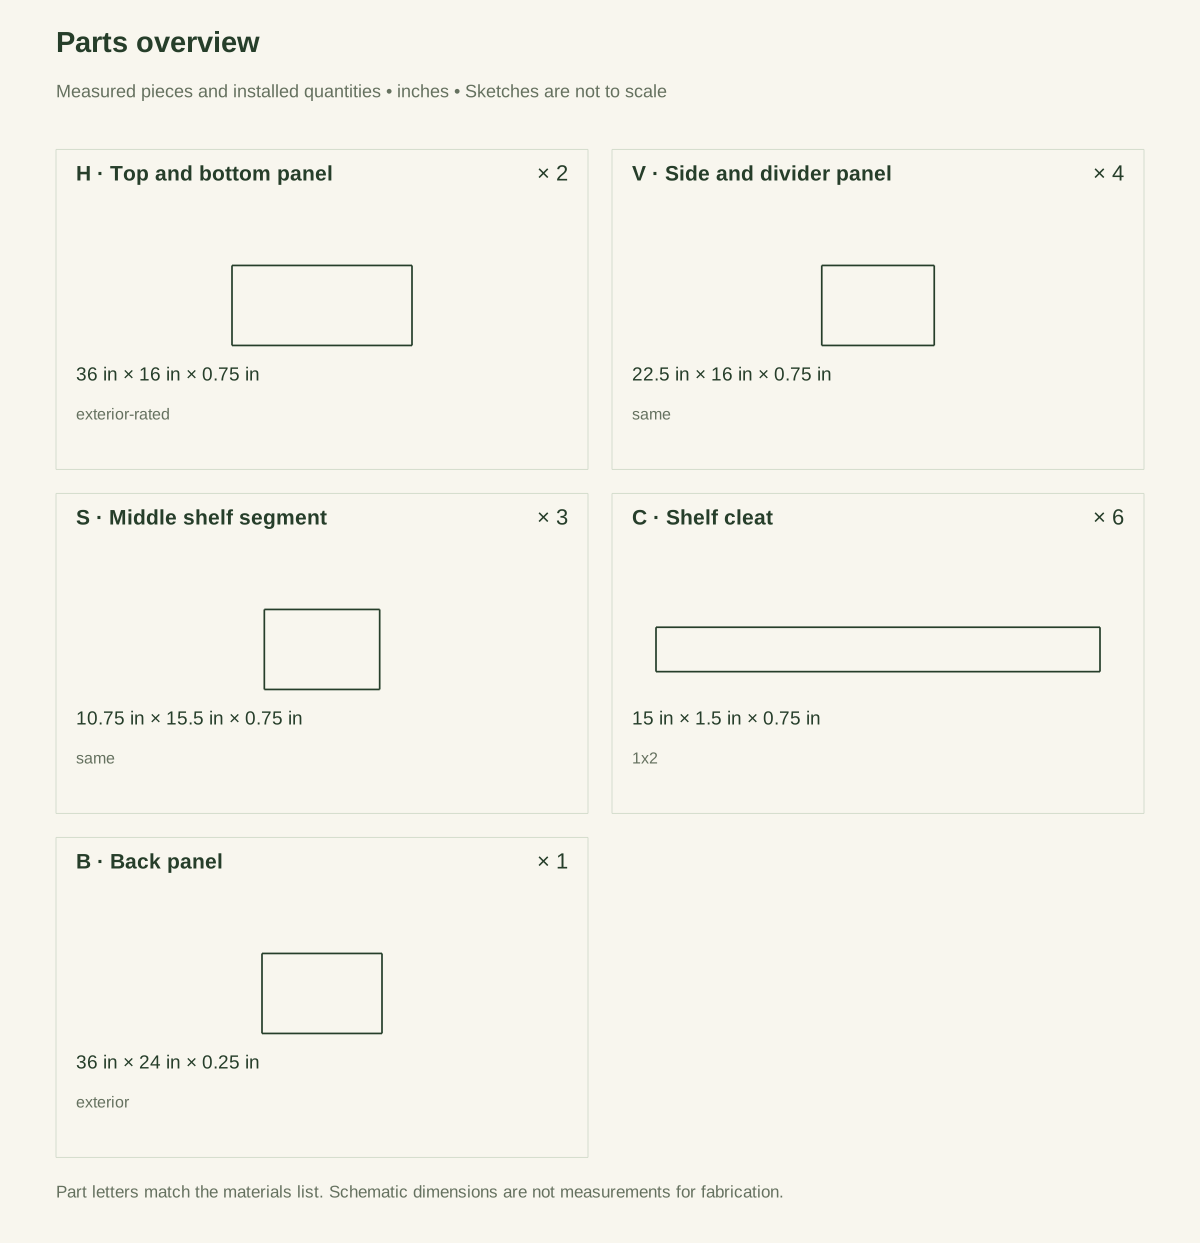
Measure each empty pot stack including the hand space needed to lift it. The bays are 11 inches wide and 10.875 inches high above and below each middle shelf. The lower bay narrows to 9.5 inches between the cleats near its ceiling. Keep stacks short enough to clear those cleats, or narrower than 9.5 inches with hand room. No filled pots or tall unstable stacks.
Close-up · Whole model shows the complete part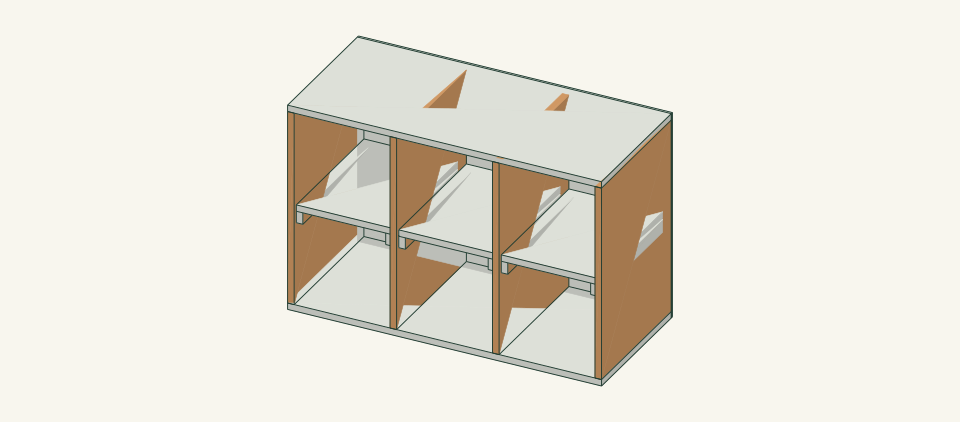
Loading the 3D view…
Drag to turn. Pinch or use + / − to zoom. The written step covers workholding and tool use.
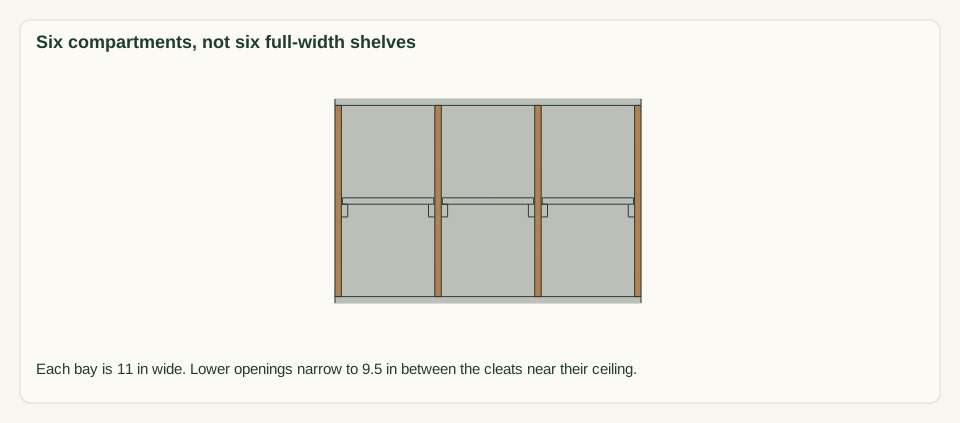
Scroll or swipe the enlarged drawing to read its dimensions. Choose Fit to see the whole drawing again.
Measure the actual empty-pot stacks and their removal space against the usable compartments.
Check: Each planned stack fits with room for a hand to remove it.
- 02
Plan the plywood cuts with kerf
Lay out two 36 × 16-inch H panels and four 22.5 × 16-inch V panels on two 16-inch-wide strips. Lay out three 10.75 × 15.5-inch shelves on a separate 15.5-inch-wide strip. Check the real 48 × 96-inch sheet allows these widths plus kerf and trimming before cutting. Use a larger sheet if it does not.
Close-up · Whole model shows the complete part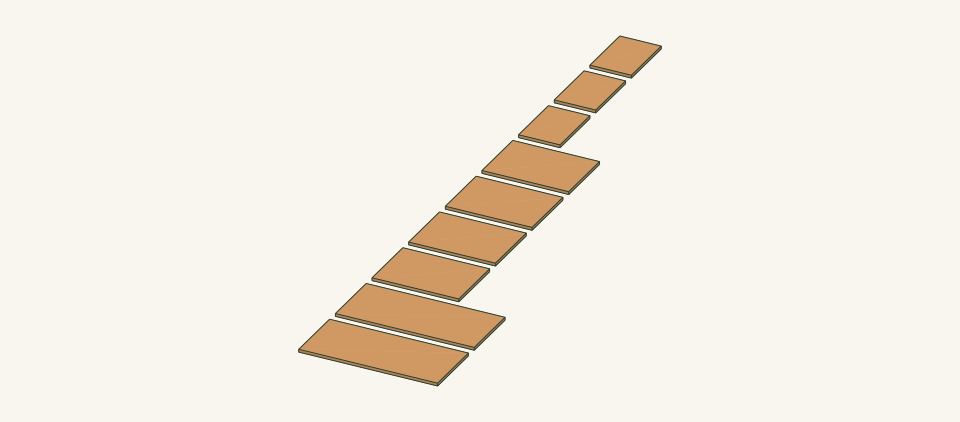
Loading the 3D view…
Drag to turn. Pinch or use + / − to zoom. The written step covers workholding and tool use.
Scroll or swipe the enlarged drawing to read its dimensions. Choose Fit to see the whole drawing again.
Lay out the plywood strips before cutting. The loose pieces represent finished components, not a zero-kerf nesting plan.
Check: No part is obtained by assuming exact edge-to-edge cuts without saw loss.
- 03
Cut and label all case panels
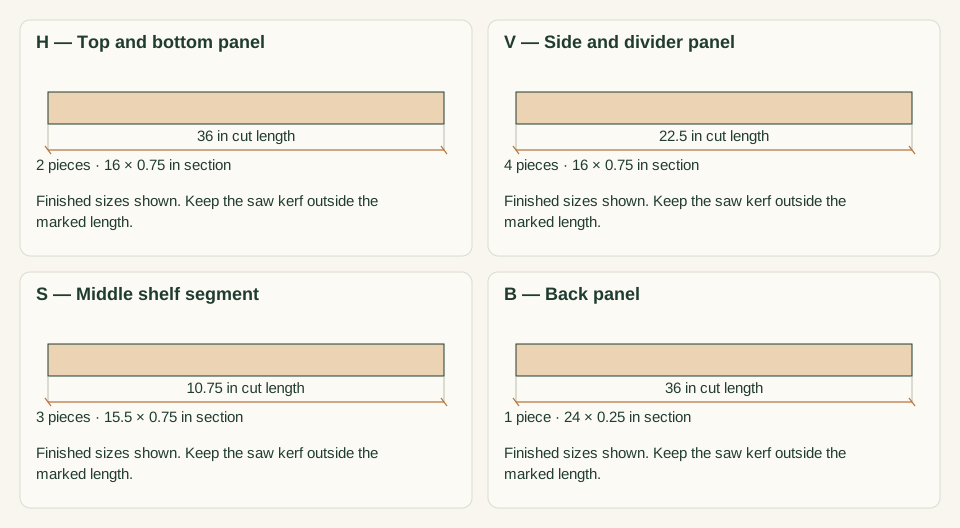
Cut the plywood over supported work, marking inside faces and front edges. Match the four vertical panels and inspect veneer edges for delamination. Set aside the thinner back panel clearly.
Close-up · Whole model shows the complete part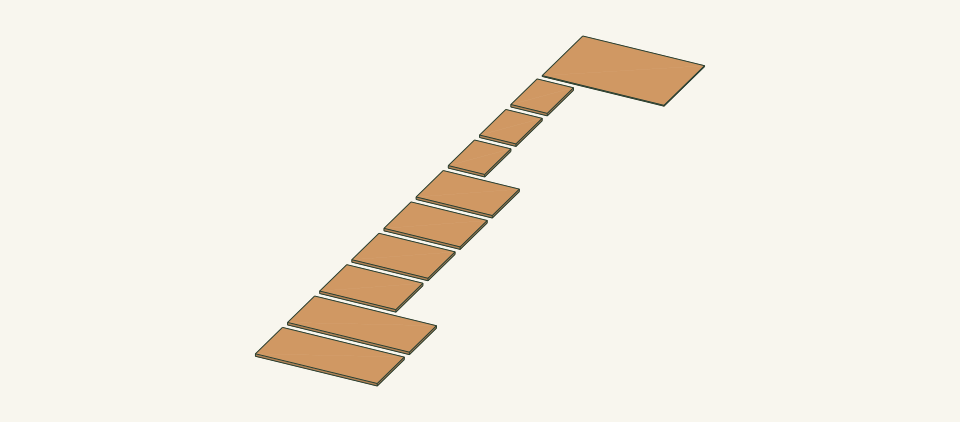
Loading the 3D view…
Drag to turn. Pinch or use + / − to zoom. The written step covers workholding and tool use.
Scroll or swipe the enlarged drawing to read its dimensions. Choose Fit to see the whole drawing again.
Cut and label the case panels and shelves. The thin back panel is a brace, not a shelf.
Check: All finished sizes match their labels and the 0.25-in back is not used as a shelf.
- 04
Mark the four vertical positions
On the lower panel mark vertical panel left faces at 0, 11.75, 23.5, 35.25 inches. Transfer the same lines to the top. Clamp the dividers upright with a square before drilling.
Close-up · Whole model shows the complete part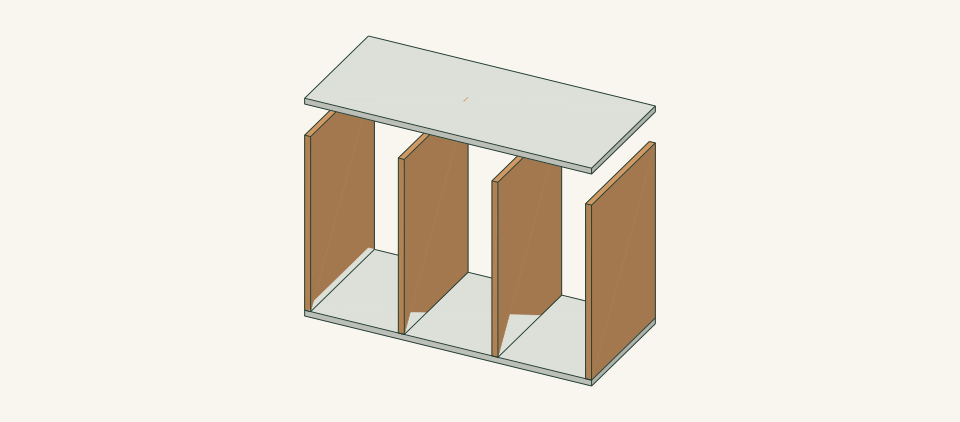
Loading the 3D view…
Drag to turn. Pinch or use + / − to zoom. The written step covers workholding and tool use.
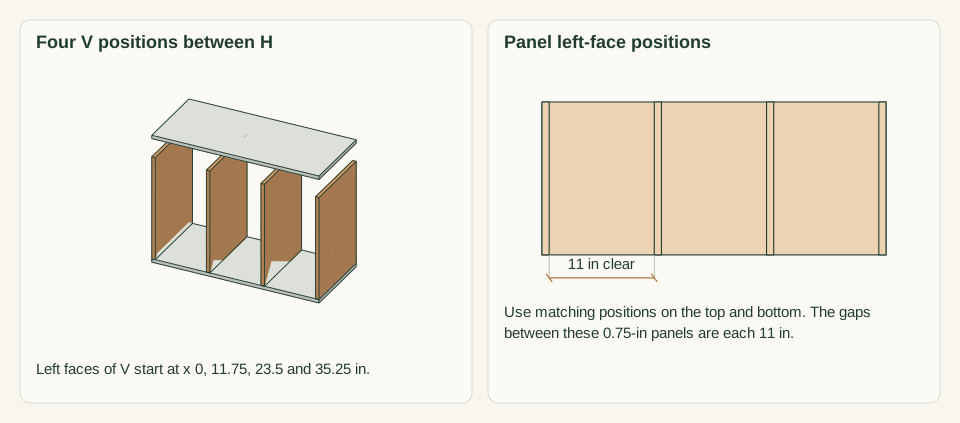
Scroll or swipe the enlarged drawing to read its dimensions. Choose Fit to see the whole drawing again.
Transfer four vertical-panel positions to both H panels. The lifted top is an illustrative view of the marks before fastening.
Check: Three clear bay widths each measure 11 inches.
- 05
Fasten the case at measured positions
On both H panels mark four columns centered over the verticals: x=0.375, 12.125, 23.875 and 35.625 inches from the left edge. On each column mark y=1.5, 5.75, 10.25 and 14.5 from the front. Clamp square, drill clearance through H only and pilots centered in each V edge. Install 32 #8 × 1.75-inch screws, sixteen through the top and sixteen through the bottom.
Close-up · Whole model shows the complete part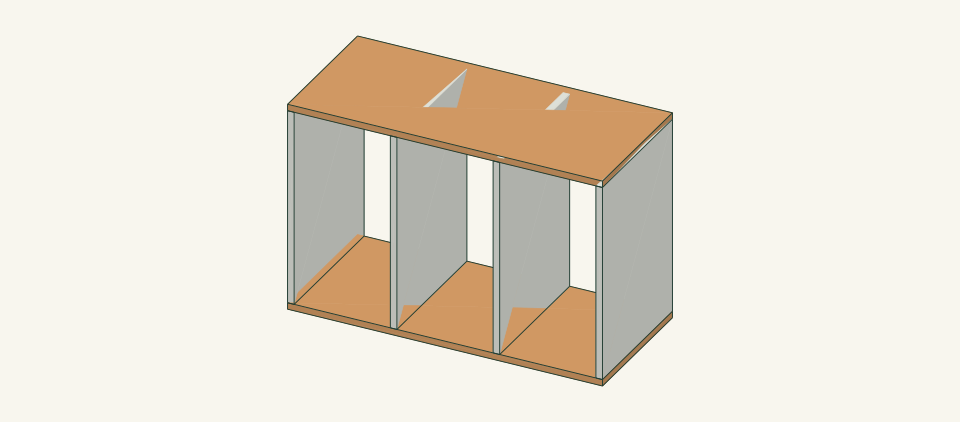
Loading the 3D view…
Drag to turn. Pinch or use + / − to zoom. The written step covers workholding and tool use.
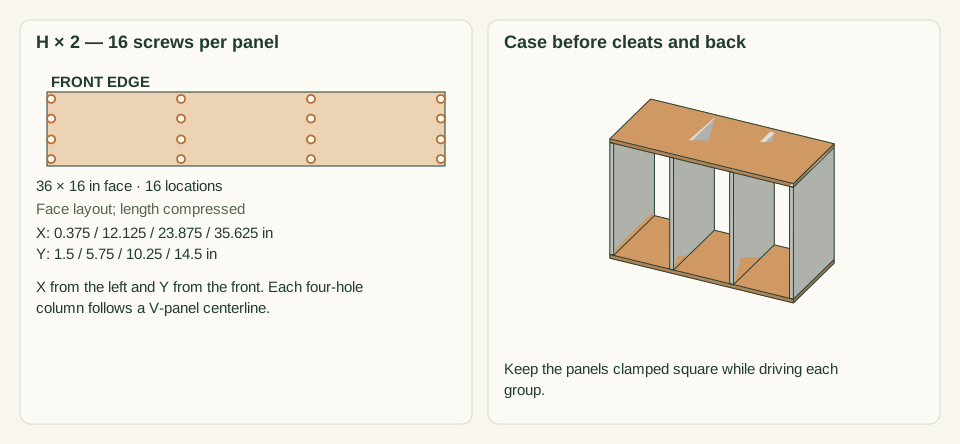
Scroll or swipe the enlarged drawing to read its dimensions. Choose Fit to see the whole drawing again.
Fasten both H panels into the centered edges of V. No shelves, cleats or back are installed yet.
Check: Every screw enters the middle of a 0.75-inch panel edge without breaking out.
- 06
Mark the shelf-support level
From the base underside mark the shelf lower face at 11.625 inches. Cleat tops align to that height. Cut six 15-inch cleats and clamp them on the inside faces, half an inch back from the front.
Close-up · Whole model shows the complete part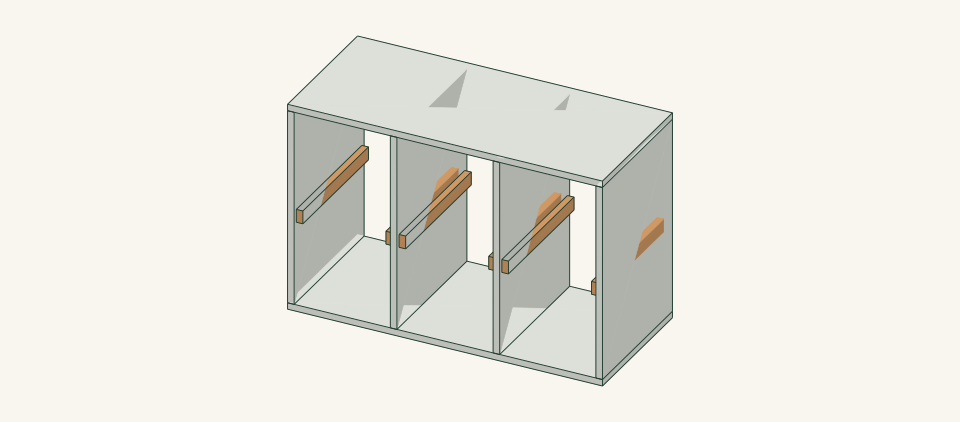
Loading the 3D view…
Drag to turn. Pinch or use + / − to zoom. The written step covers workholding and tool use.
Scroll or swipe the enlarged drawing to read its dimensions. Choose Fit to see the whole drawing again.
Clamp all six cleats at the common shelf-support plane. Their upper edges, not their screw centers, set the shelf level.
Check: All six cleat tops share the same shelf plane.
- 07
Stagger the cleat screw positions
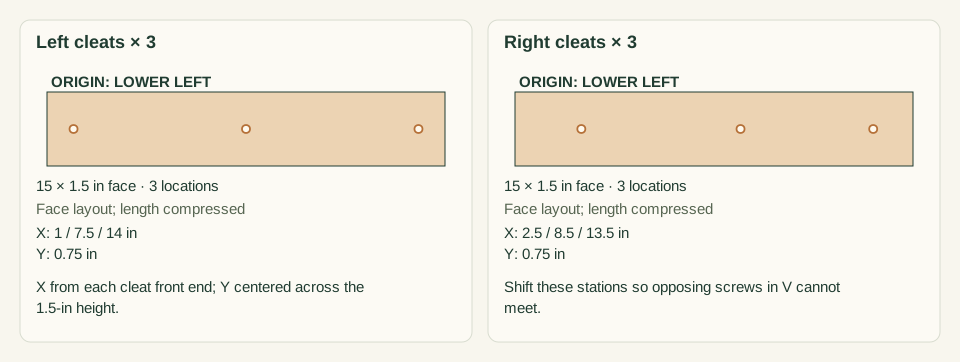
Clamp cleats with front ends 0.5 inch behind the case front and tops at 11.625 inches above the base underside. On each LEFT cleat mark three holes 1, 7.5 and 14 inches from its front end; on each RIGHT cleat use 2.5, 8.5 and 13.5. Center heights across the 1.5-inch cleat. Drill clearances through cleats and pilots into panels; fit 18 #6 × 1.25-inch screws.
Close-up · Whole model shows the complete part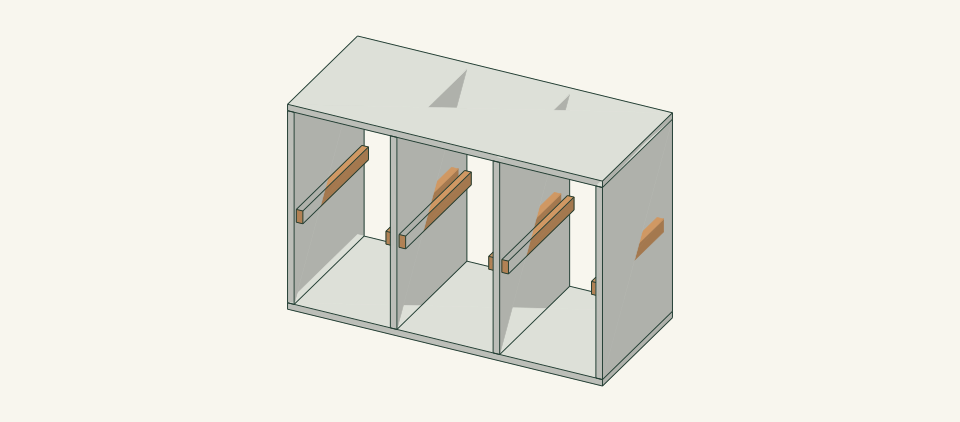
Loading the 3D view…
Drag to turn. Pinch or use + / − to zoom. The written step covers workholding and tool use.
Scroll or swipe the enlarged drawing to read its dimensions. Choose Fit to see the whole drawing again.
Use different screw stations on opposite faces of a shared divider. The two patterns deliberately do not align.
Check: Opposing screws on a shared divider have different positions; none breaks through the far face.
- 08
Square and screw on the back
Clamp the 36 × 24-inch back after matching the case diagonals. From its lower-left corner mark four columns x=0.375, 12.125, 23.875 and 35.625 inches. At each, mark heights 2, 7, 12, 17 and 22 inches. All 20 holes align with the rear edges of V panels. Drill clearances through the back and centered pilots into those edges; fit 20 #6 × 1-inch screws.
Close-up · Whole model shows the complete part
Loading the 3D view…
Drag to turn. Pinch or use + / − to zoom. The written step covers workholding and tool use.
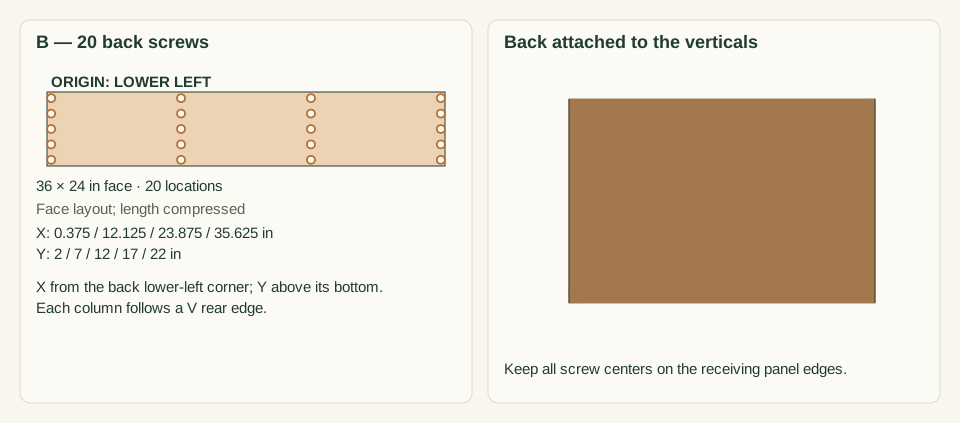
Scroll or swipe the enlarged drawing to read its dimensions. Choose Fit to see the whole drawing again.
Square the case, then fasten the back along the four V-panel rear edges. The open bays are not backing.
Check: Twenty back screws enter vertical-panel edges, not the open bays or unsupported shelf gaps.
- 09
Slide in the shelves and restrain the case
Slide each 10.75 × 15.5-inch shelf horizontally through the FRONT opening above its paired cleats, then lower it onto them. Center it with 1/8-inch side clearance and 1/4-inch front/back clearance. Each side bears 5/8 inch on a cleat. Fit suitable tip restraints to verified wall framing as their maker instructs before use where people, pets or pots could tip the unit.
Close-up · Whole model shows the complete part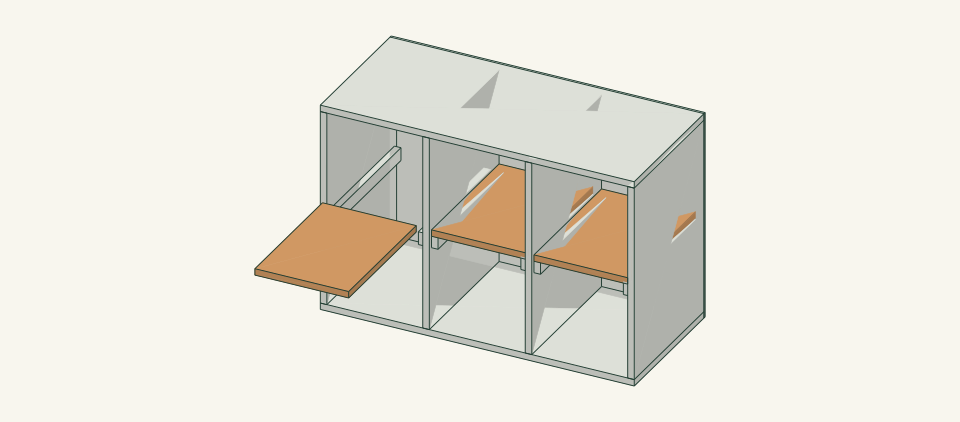
Loading the 3D view…
Drag to turn. Pinch or use + / − to zoom. The written step covers workholding and tool use.
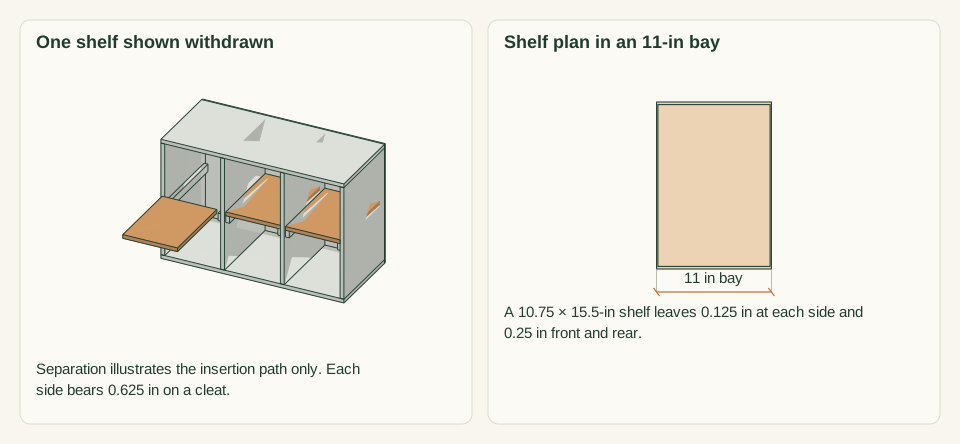
Scroll or swipe the enlarged drawing to read its dimensions. Choose Fit to see the whole drawing again.
Slide the empty shelves in from the front and lower them onto paired cleats; do not force them down through the top.
Check: All shelves slide out freely, bear on both cleats and do not wedge between dividers.
- 10
Load empty pots by compartment
Place short broad stacks low, remove one stack at a time and keep the front clear. Inspect for shelf sag, loose fixings or a tendency to tip before adding more empty pots.
Close-up · Whole model shows the complete partLoading the 3D view…
Drag to turn. Pinch or use + / − to zoom. The written step covers workholding and tool use.
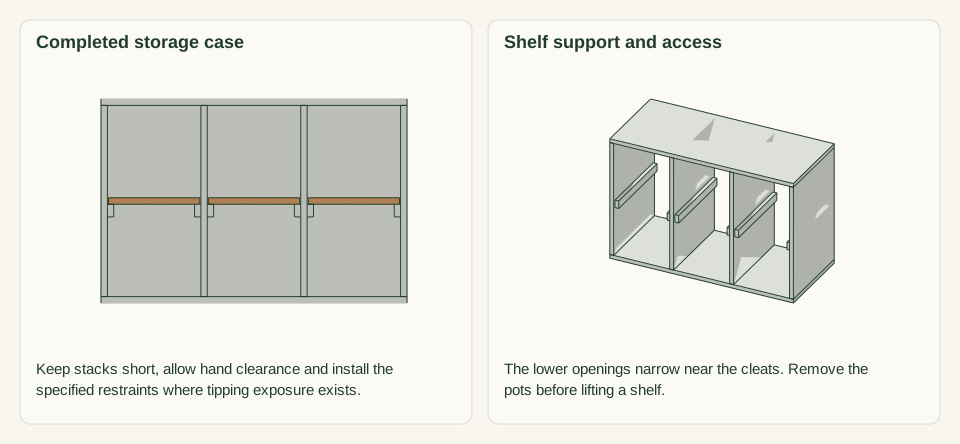
Scroll or swipe the enlarged drawing to read its dimensions. Choose Fit to see the whole drawing again.
The shelves remain removable while the back stays fitted as bracing. Store only the empty pots described in the guide.
Check: No compartment is forced full and no filled planter sits on the top.


05 / Keep it sound
Care
After the build
- This cabinet is for empty pot storage. A low height does not make climbing or top-heavy loading safe.
- Remove loose soil and labels from pots before stacking. Use only sound plastic pots; store fragile ceramic pots separately where they cannot fall or chip.
Check it each season
- Inspect connections and hand-contact edges before use. Unload before tightening or replacing parts; replace a cracked member rather than adding a screw beside the crack.
- Brush off debris, wipe only as needed and dry with air around the joints. Store dry when the item is not in use.
If something looks wrong
- Shelf rocks
- Remove it and compare both cleat elevations and panel flatness.
- Divider splits at a screw
- Unload and replace the damaged panel; confirm a centered pilot before reassembly.
- Cabinet racks
- Check missing back screws and panel damage; do not remove the brace for larger pots.
- Pots are hard to remove
- Reduce stack height/count or use a larger storage method rather than wedging pots tightly.
Keep exploring