Garden storage · Guide 83
How to Build a Ventilated Garden Harvest Crate
Build a harvest crate with rounded hand slots and a ventilated four-slat floor, then fit removable produce containers for easier cleaning.
01 / See the shape
View the project
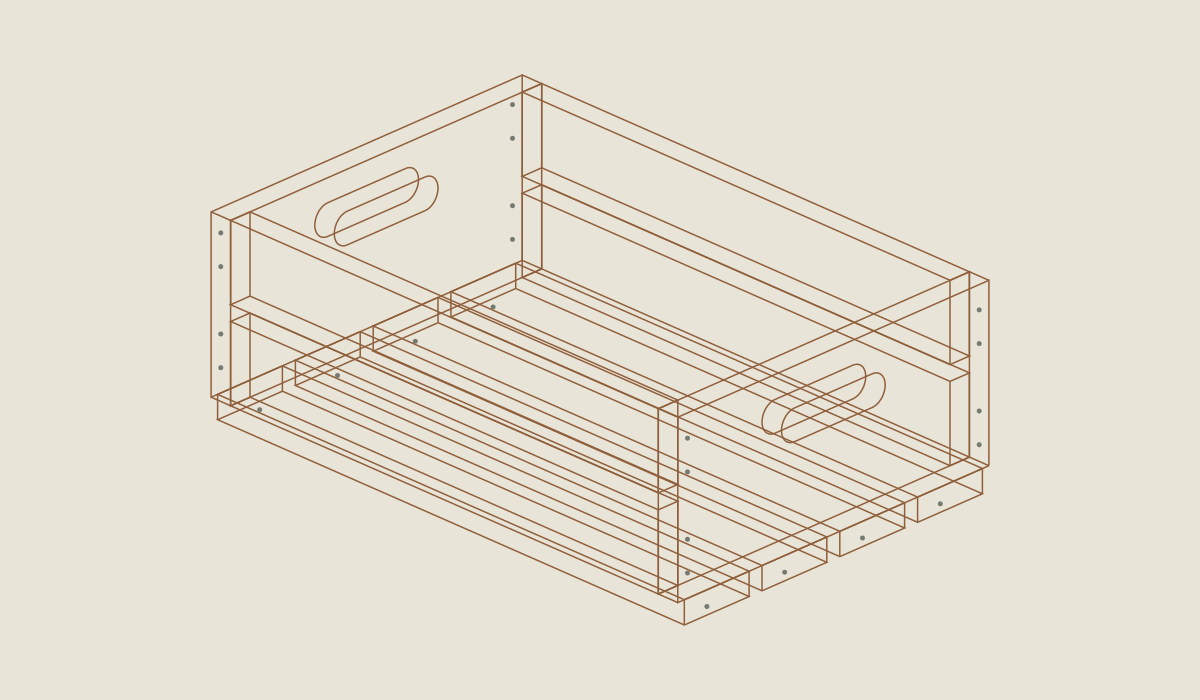
Loading the 3D view…
Drag to turn. Pinch or use + / − to zoom. The written step covers workholding and tool use.
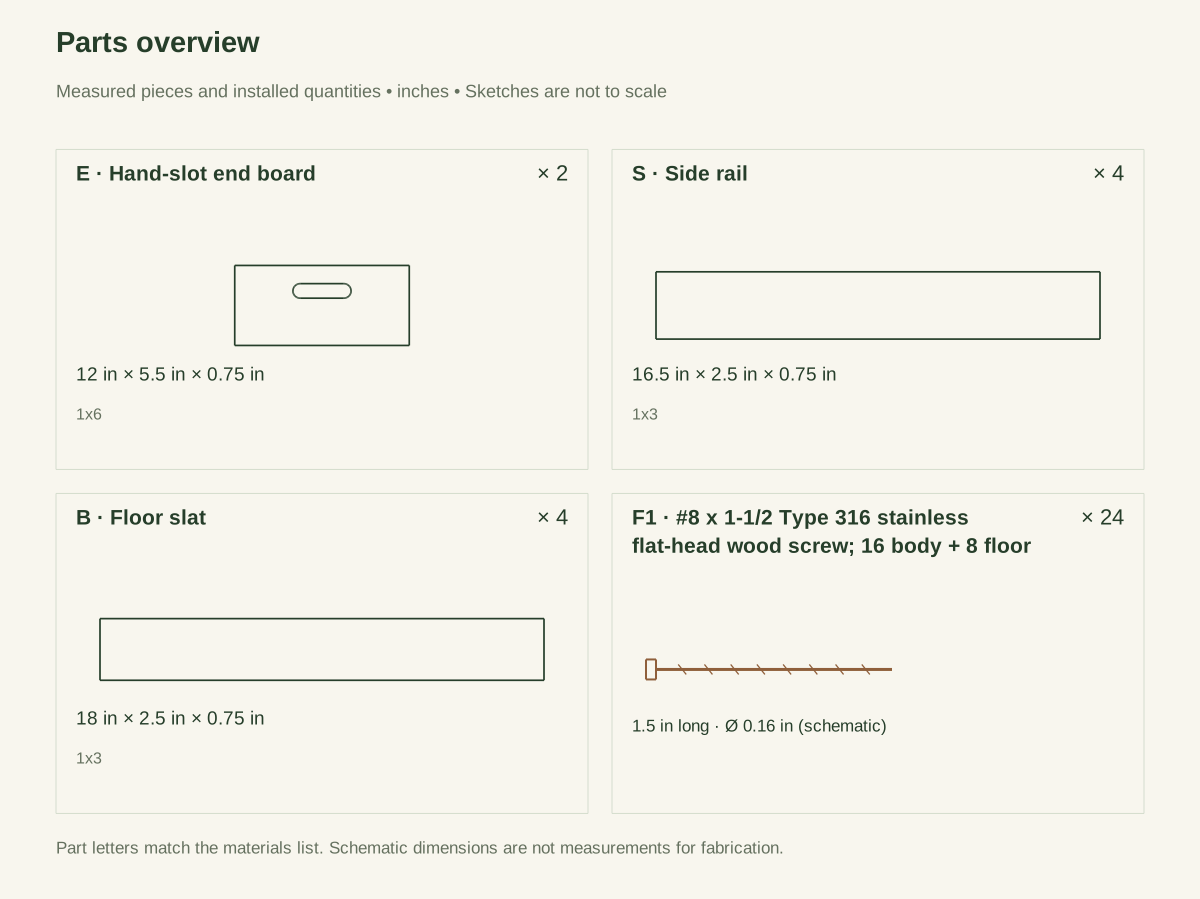
Scroll or swipe the enlarged drawing to read its dimensions. Choose Fit to see the whole drawing again.
Garden harvest crate. Check the dimensions and build steps before cutting.
02 / Plan your build
Before you start
A harvest crate works best when it gives produce a short, gentle trip from bed to sorting table. This one has solid ends with rounded hand slots, low slatted sides, and four floor boards that are easy to inspect. The corners are not decorative miters: they are simple joints with visible screws and accessible replacement parts.
Use clean, suitably sized produce containers inside the crate for delicate or small crops. The wood itself is not being certified as a hygienic food-contact surface. Avoid dropping loose berries, beans, or peas into the half-inch floor gaps. University of Minnesota Extension emphasizes avoiding bruises and unnecessary handling during harvest; the crate is intended to support that practice, not extend storage life by a claimed number of days.
Where it goes
Use on stable surfaces and store dry. Not a seat, step, child carrier, hanging basket, stackable load-bearing box, or certified food-contact container.
Footprint: 18 × 12 inches.
What to expect
Intermediate beginner: rounded slots need secure workholding and clean cuts. Plan 2–3 working hours.
A planning estimate for the hands-on work, once the materials are bought and the tools are set up. It has not been timed on a finished build.
Check the spot
- Use on stable surfaces and store dry. Not a seat, step, child carrier, hanging basket, stackable load-bearing box, or certified food-contact container.
- Measure the boards and hardware you actually bought before you cut, and set up a steady work surface. Keep other people back while you cut and drill.
Stop and check first if…
- Stop if a handle web, floor end, or joint is split, loose, sharp, or damaged.
- No lifting rating is established. Lift a modest, evenly spread load only slightly above a safe surface, stop at once for movement, cracking, discomfort, or a loose part, and never add weight to find a limit.
- Do not use MDF, unknown pallet wood, painted salvage, rough stock of a different thickness, or a liner that hides damaged wood.
Work safely
- Use a tape, square, pencil, clamps, supported saw, drill, 1-inch wood-boring bit, jigsaw or coping saw, countersink, suitable pilot and clearance bits, driver, and abrasive wrapped around a small block or dowel. Keep the end board clamped over sacrificial backing when drilling the hand-slot ends. A caught bit can spin an unsecured board; do not substitute your hand for a hold-down.
- Wear appropriate eye, hearing, and dust protection for the tool. Keep hands out of the jigsaw's underside path. Disconnect power or remove the battery before changing a blade or bit. This is a bench project: no excavation, anchoring, electrical installation, or site grading is part of the guide.
- Stop if a handle web, floor end, or joint is split, loose, sharp, or damaged.
- No lifting rating is established. Lift a modest, evenly spread load only slightly above a safe surface, stop at once for movement, cracking, discomfort, or a loose part, and never add weight to find a limit.
- Do not use MDF, unknown pallet wood, painted salvage, rough stock of a different thickness, or a liner that hides damaged wood.
Budget
We have not put a price on this one yet. Lumber and hardware prices change by store and season, so price the list under What you need at your local supplier before you buy.
03 / Gather and cut
What you need
Side and floor boards
2 boards
Clear untreated pine 1 × 3; actual 0.75 × 2.5 inches. Two 8-foot boards.
Four 16.5-inch side rails and four 18-inch floor slats. One board supplies four floor slats plus one side rail using 89.125 inches with five 1/8-inch kerfs.
End boards
1 board
Clear untreated pine 1 × 6; actual 0.75 × 5.5 inches. One 4-foot board.
Cut two 12-inch ends. Keep knots and splits out of the rounded grip slots and the 1.25-inch upper grip web.
Body and floor screws
24 screws
#8 × 1.5-inch Type 316 stainless flat-head wood screws. Package of at least 24.
Sixteen body screws plus eight floor screws. All connections remain accessible; no glue substitutes for a failed joint.
Produce containers
As needed containers
Clean, removable containers appropriate for the produce being carried. A configuration fitting the clear 16.5 × 10.5-inch interior.
Remove for inspection and cleaning. The wooden crate is not represented as a certified direct food-contact surface.
Abrasives
As needed consumable
Suitable sheets for smoothing grip slots, rims, and floor edges. Small pack.
No oil, stain, preservative, or finish is included.
Cut list
| Piece | How many | Cut length | Note |
|---|---|---|---|
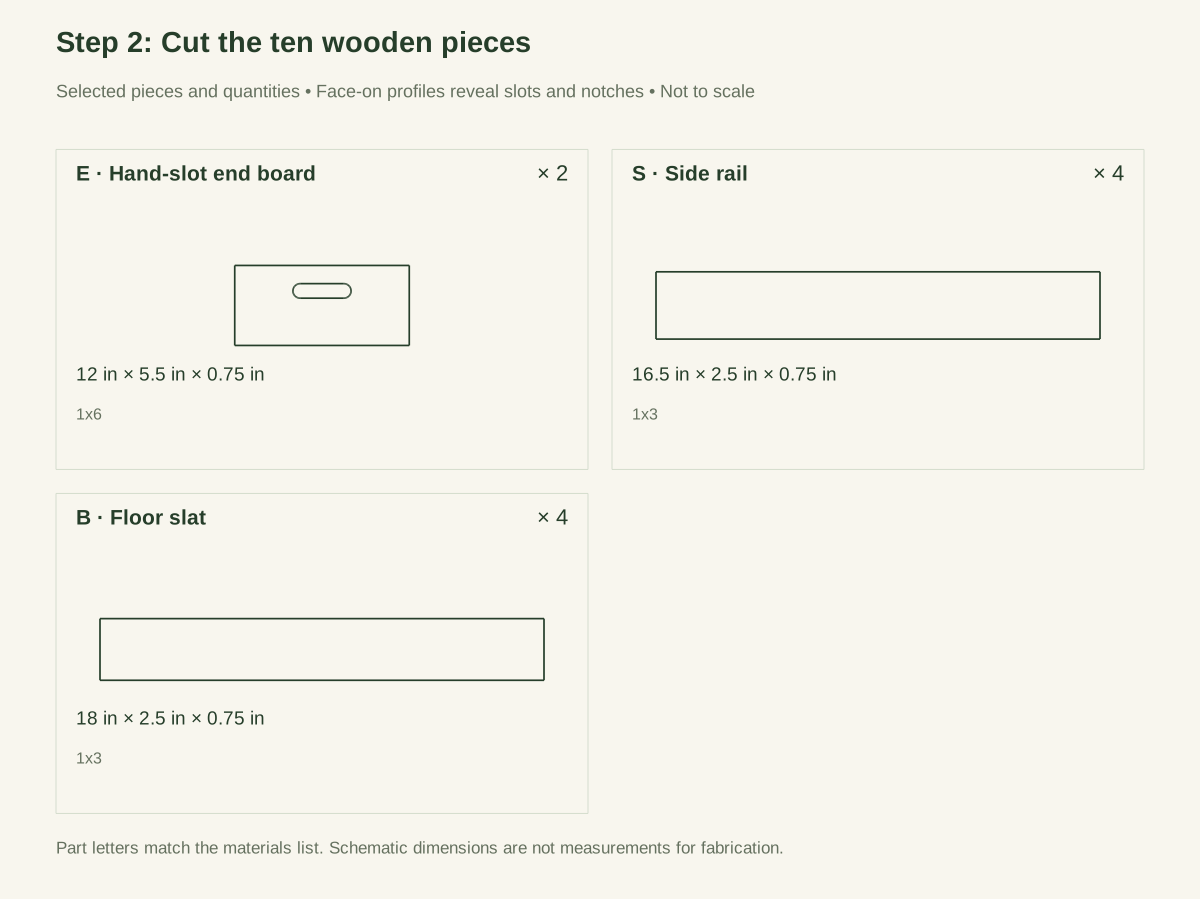
| E — Hand-slot end board | 2 | 12 in | Part E, cut from 1x6. Size: 12 × 5.5 × 0.75 in. Check the plan sheets for its reference edges and any shaped detail. |
| S — Side rail | 4 | 16.5 in | Part S, cut from 1x3. Size: 16.5 × 2.5 × 0.75 in. Check the plan sheets for its reference edges and any shaped detail. |
| B — Floor slat | 4 | 18 in | Part B, cut from 1x3. Size: 18 × 2.5 × 0.75 in. Check the plan sheets for its reference edges and any shaped detail. |
Tools
- Tape or rule, square, and pencil
- Clamps and stable supported work surface
- Suitable saw with its required guarding
- Drill/driver, selected-product pilot and clearance bits, and countersink
- Abrasives for hand-contact edges
- Suitable 1-inch wood-boring bit for the hand-slot ends
- Safely controlled coping saw or jigsaw for the slot tangents
- Sacrificial backing for restrained drilling
Protective gear
- Eye protection for cutting and drilling; match other protection to the actual tool instructions.
- Appropriate hearing protection and wood-dust control for the selected cutting method.
04 / Put it together
Build steps
- 01
Confirm the actual board dimensions
Measure thickness and face width. The 1 × 3 boards must match the 3/4 × 2-1/2 reference section; the 1 × 6 ends use 3/4 × 5-1/2. A thinner side changes the clear width, and a thinner end changes the side-rail length. Recheck the cut lengths and drawing before cutting.
Close-up · Whole model shows the complete part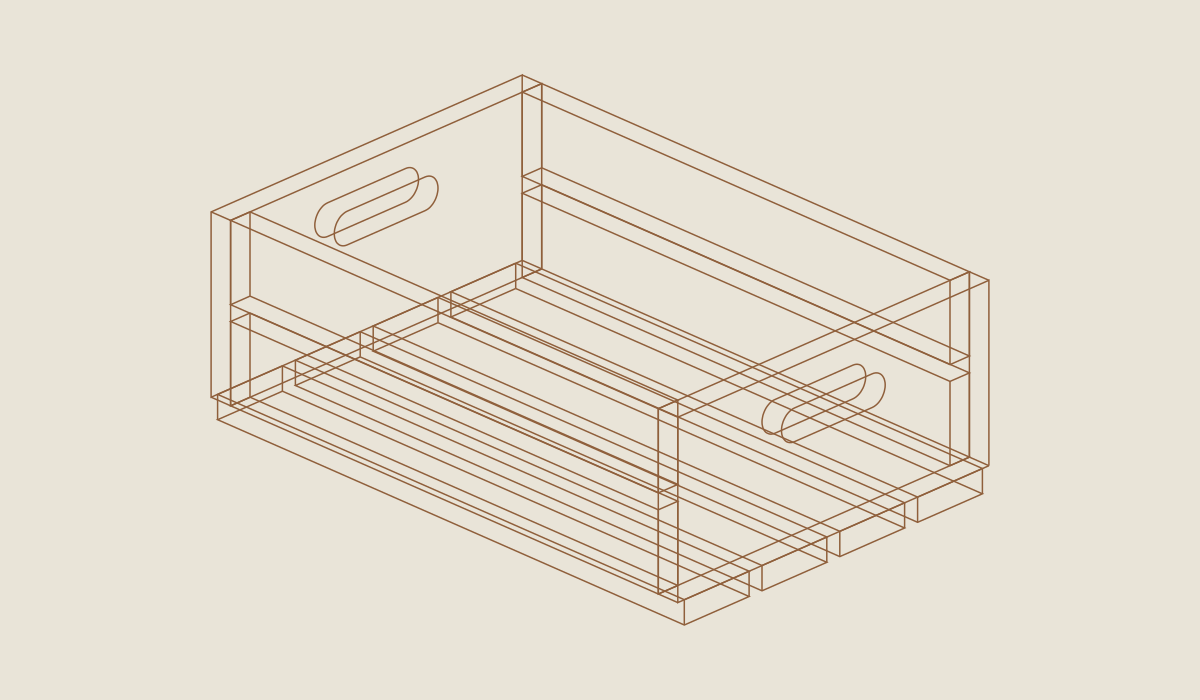
Loading the 3D view…
Drag to turn. Pinch or use + / − to zoom. The written step covers workholding and tool use.
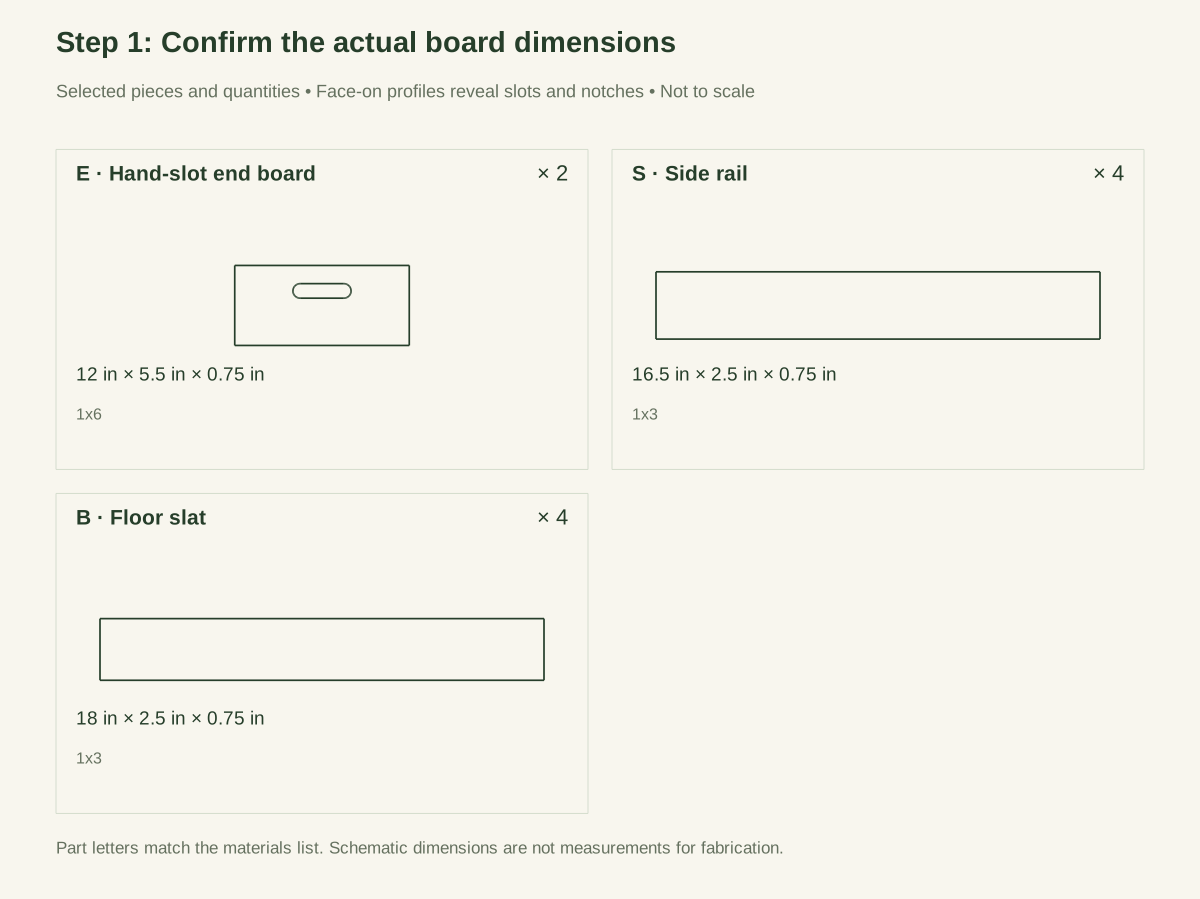
Scroll or swipe the enlarged drawing to read its dimensions. Choose Fit to see the whole drawing again.
Check: Actual 1 × 3 stock is 3/4 × 2-1/2 inches and end stock is 3/4 × 5-1/2, or the plan is reconciled before cutting.
- 02
Cut the ten wooden pieces
Cut two E, four S, and four B pieces. Mark the bottom edge and outward face of each E. Match like parts within 1/32 inch as a proposed shop target. Keep the final hand-slot area free of knots and checks; if a defect crosses that area, cut another end rather than trying to fill it.
Close-up · Whole model shows the complete part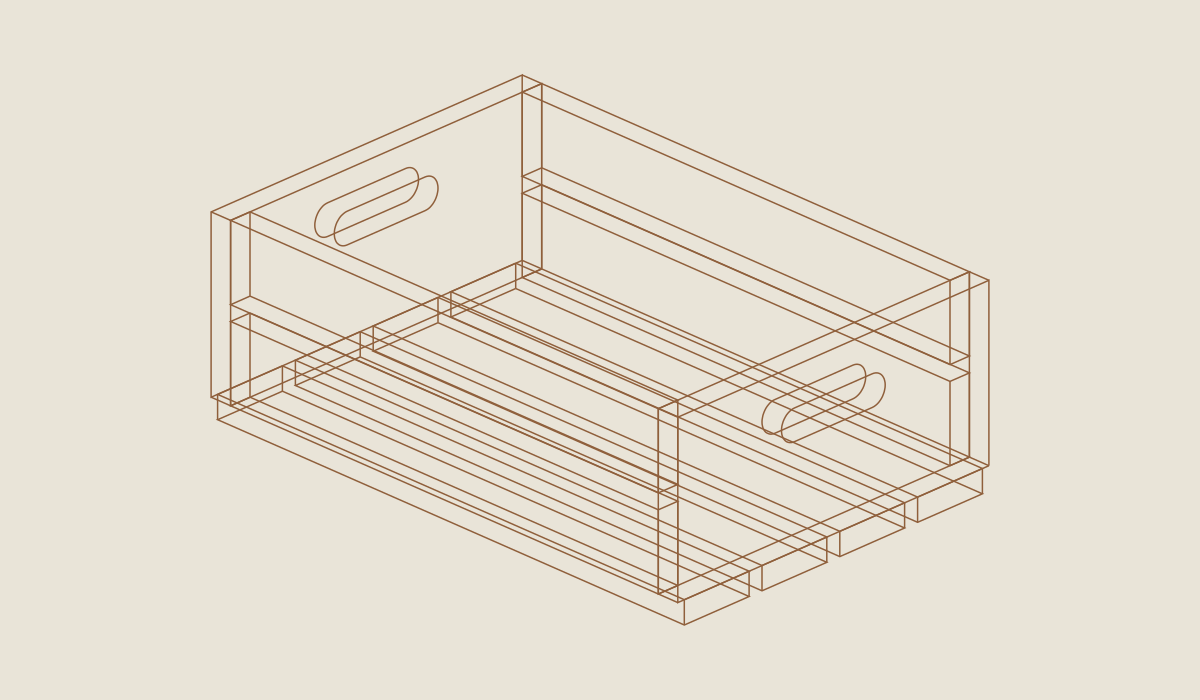
Loading the 3D view…
Drag to turn. Pinch or use + / − to zoom. The written step covers workholding and tool use.
Scroll or swipe the enlarged drawing to read its dimensions. Choose Fit to see the whole drawing again.
Check: Two ends, four side rails and four floor slats are cut; both grip areas are free of knots and splits.
- 03
Lay out identical hand slots
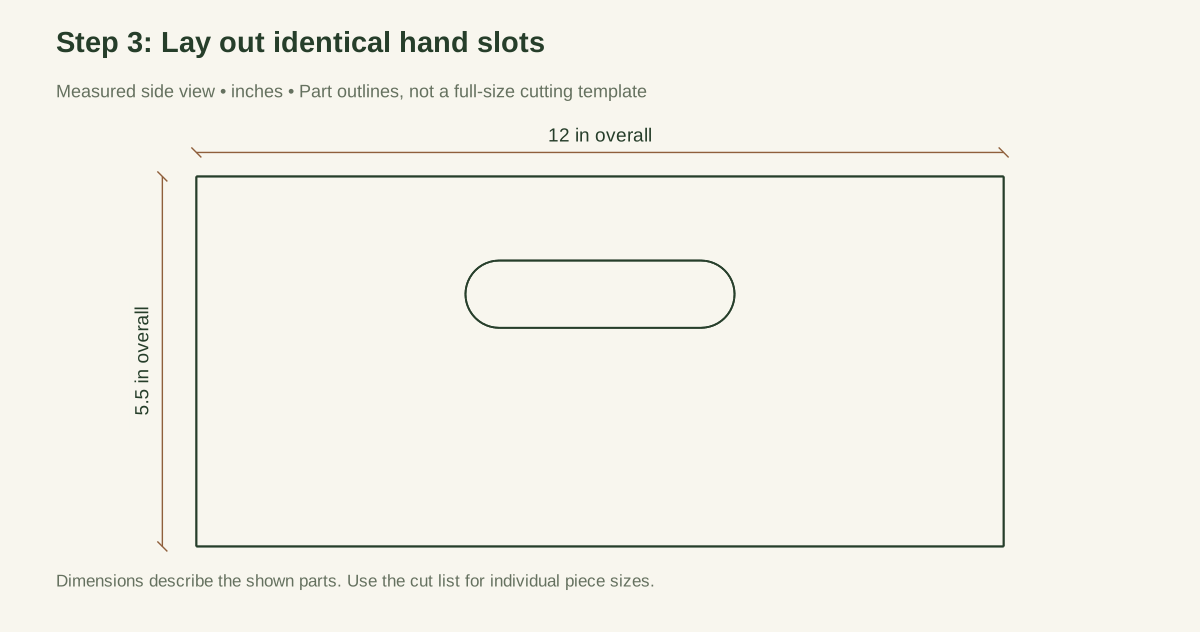
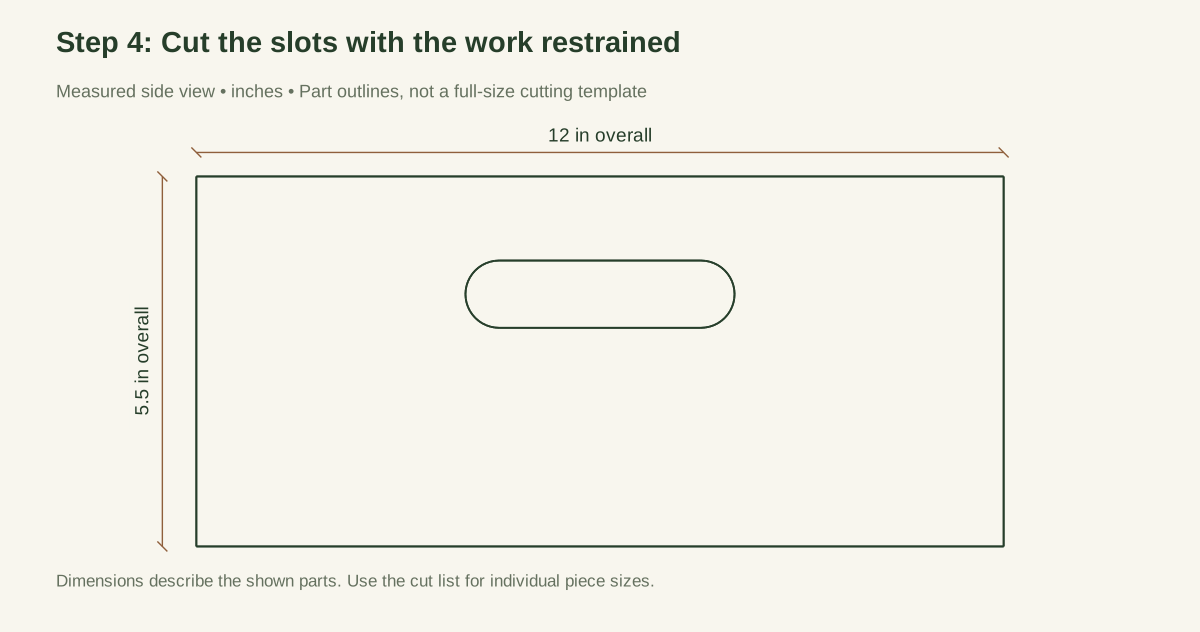
On the outward face of each E, measure from its left edge and bottom. Mark 1-inch-diameter hole centers at (4-1/2, 3-3/4) and (7-1/2, 3-3/4). Connect the holes with tangent lines at heights 3-1/4 and 4-1/4. This produces a 4 × 1 capsule-shaped opening extending from x = 4 to x = 8. The remaining wood above the slot is 1-1/4 inches.
Close-up · Whole model shows the complete part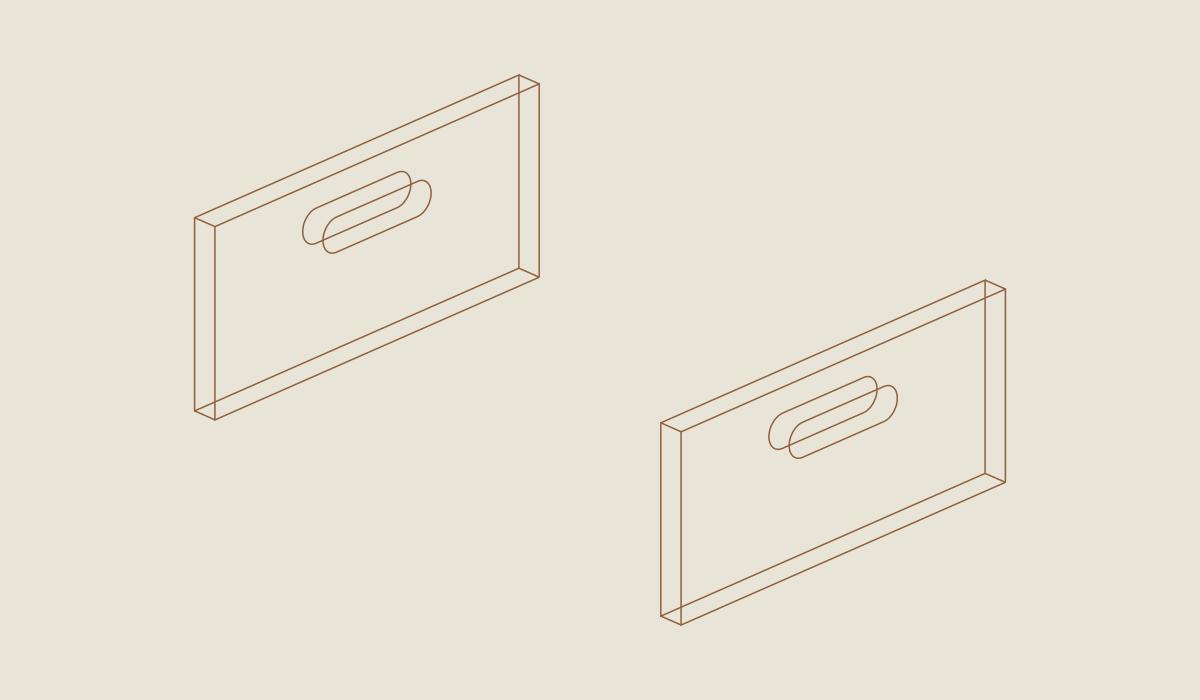
Loading the 3D view…
Drag to turn. Pinch or use + / − to zoom. The written step covers workholding and tool use.
Scroll or swipe the enlarged drawing to read its dimensions. Choose Fit to see the whole drawing again.
Both hand slots use the same datum. The visible openings show the target cut.
Check: Both hand-slot layouts use the same end-board bottom and left-edge datums; paired outlines coincide.
- 04
Cut the slots with the work restrained
Drill the two round ends over a backing board, keeping the bit square. Stop before excessive breakout; a backing board is not permission to push hard. Cut along the connecting straight lines with the part clamped and the underside clear. Remove the waste without prying against the narrow upper hand-grip web.
Close-up · Whole model shows the complete part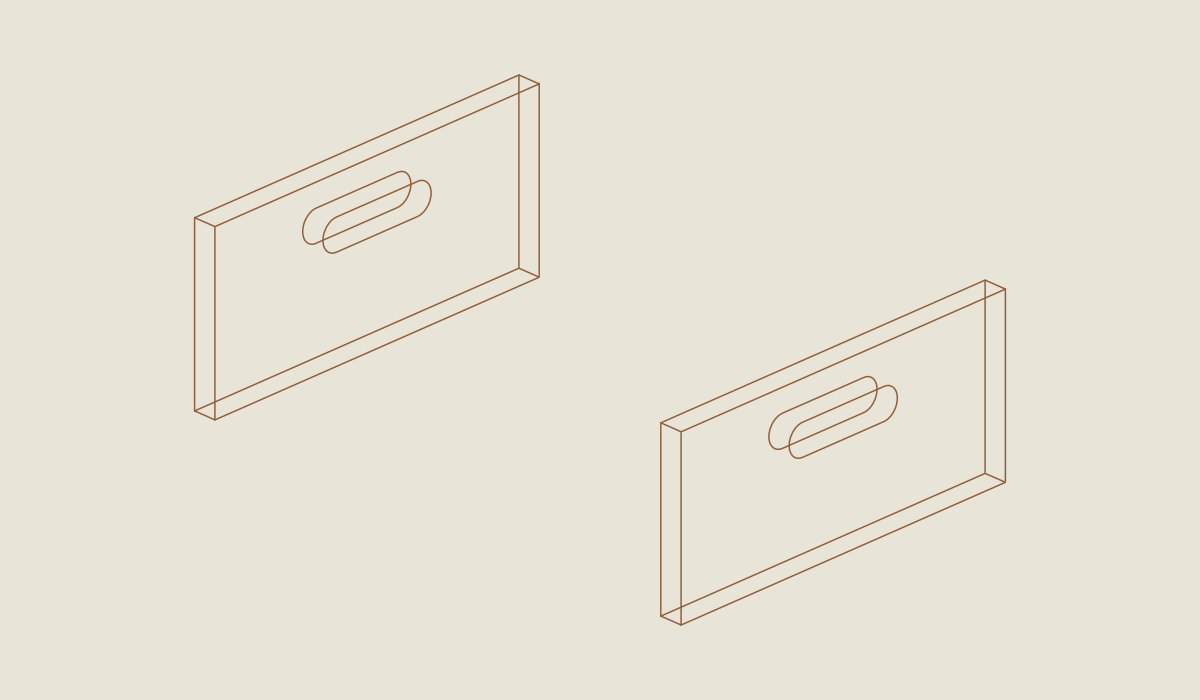
Loading the 3D view…
Drag to turn. Pinch or use + / − to zoom. The written step covers workholding and tool use.
Scroll or swipe the enlarged drawing to read its dimensions. Choose Fit to see the whole drawing again.
Check: Both slots are cut with clamped backing; the curved ends have no split or ragged breakout.
- 05
Smooth the grip before assembly
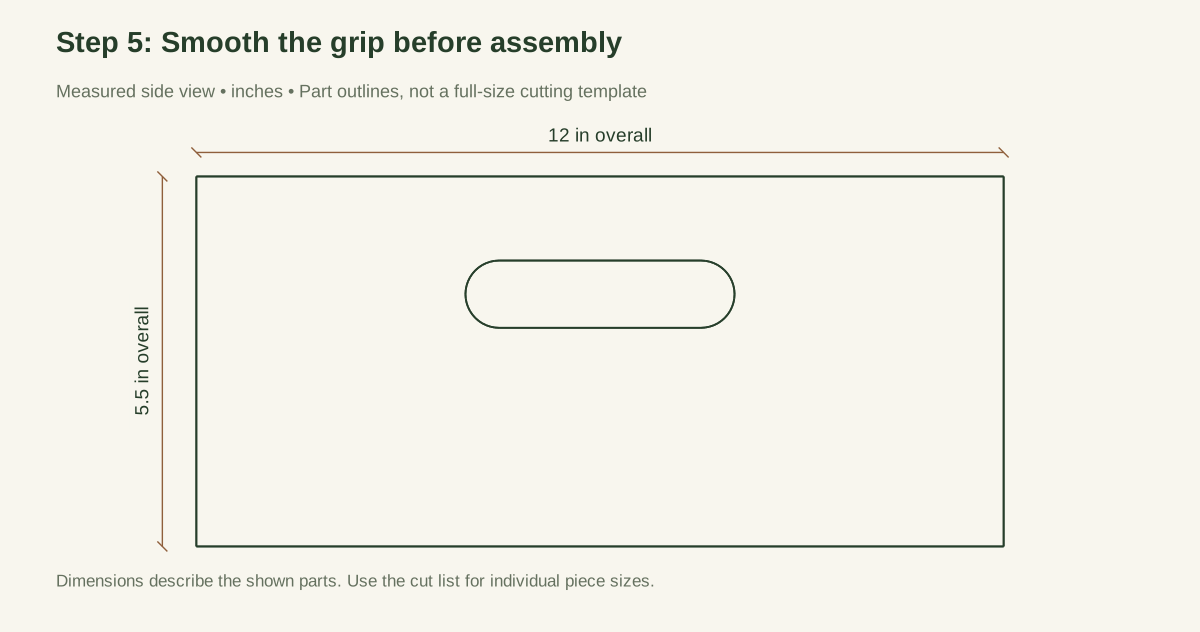
Remove saw marks and splinters inside the slot. Ease its edges slightly, keeping the full 1-1/4-inch upper web rather than sanding away a large roundover. Test the empty grip with the actual user's hand and gloves. A comfortable opening is user-specific; there is no accessibility certification. Reject an end that cracks or flexes visibly around the slot.
Close-up · Whole model shows the complete part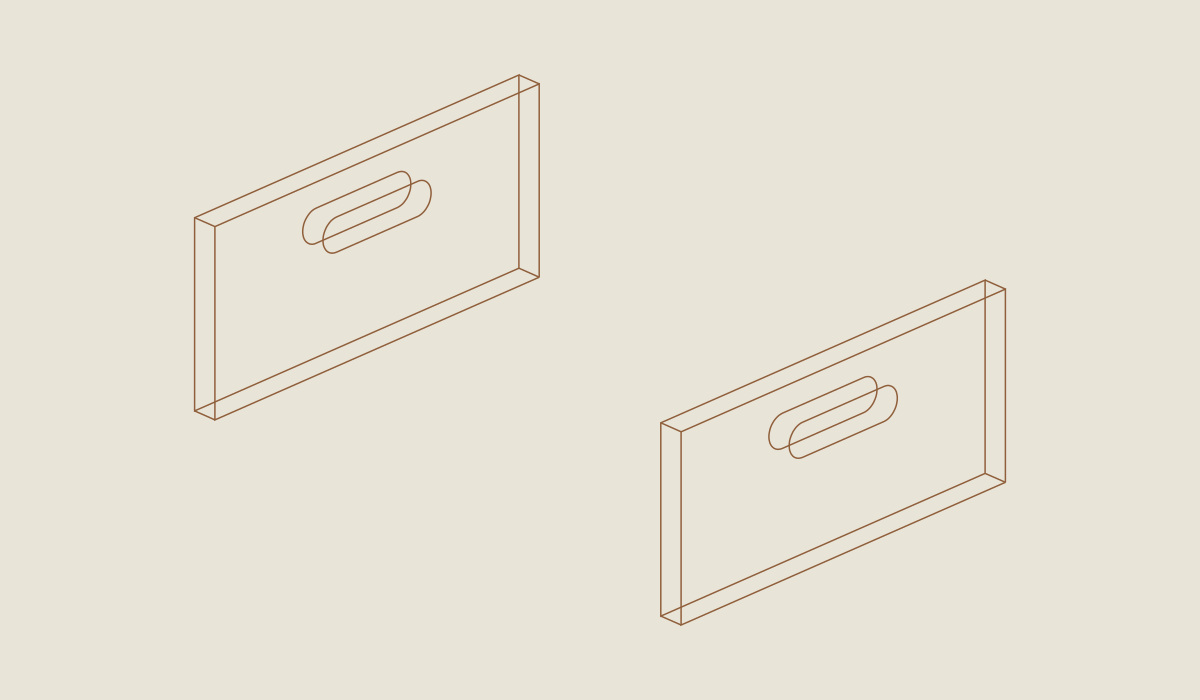
Loading the 3D view…
Drag to turn. Pinch or use + / − to zoom. The written step covers workholding and tool use.
Scroll or swipe the enlarged drawing to read its dimensions. Choose Fit to see the whole drawing again.
Check: All grip surfaces are smooth and the wood above each slot remains intact.
- 06
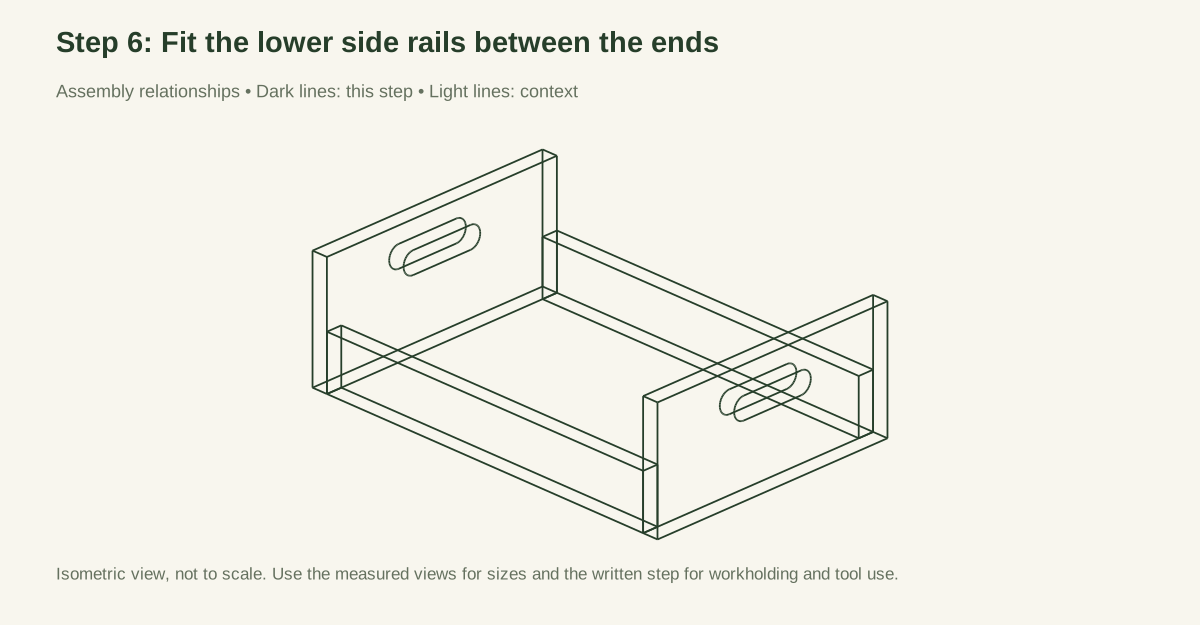
Fit the lower side rails between the ends
Stand E boards parallel with their inner faces 16-1/2 inches apart. Fit the lower S rails between them, flush with the end-board bottom edges and outside long edges. Each rail's 3/4-inch thickness occupies the edge band of the 12-inch-wide end. Clamp the four-piece rectangle on a flat surface.
Close-up · Whole model shows the complete part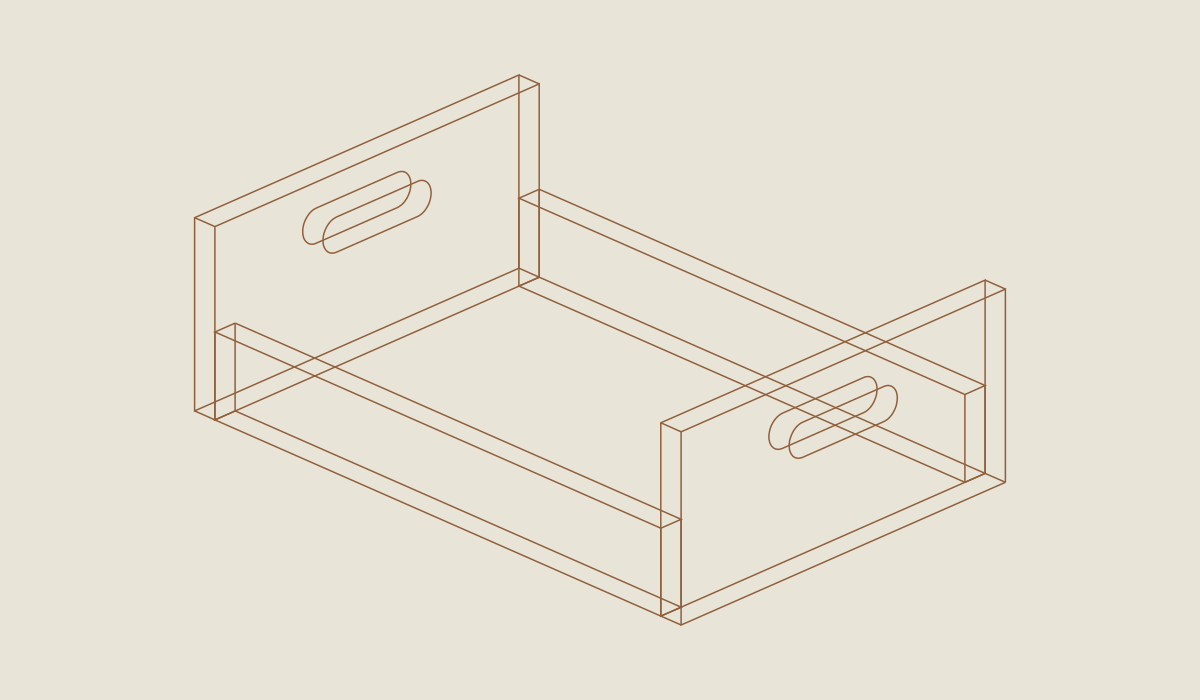
Loading the 3D view…
Drag to turn. Pinch or use + / − to zoom. The written step covers workholding and tool use.
Scroll or swipe the enlarged drawing to read its dimensions. Choose Fit to see the whole drawing again.
Check: Lower rails fit between the ends with matching bottom datums; the clamped body is square.
- 07
Mark the side-rail screws on the end faces
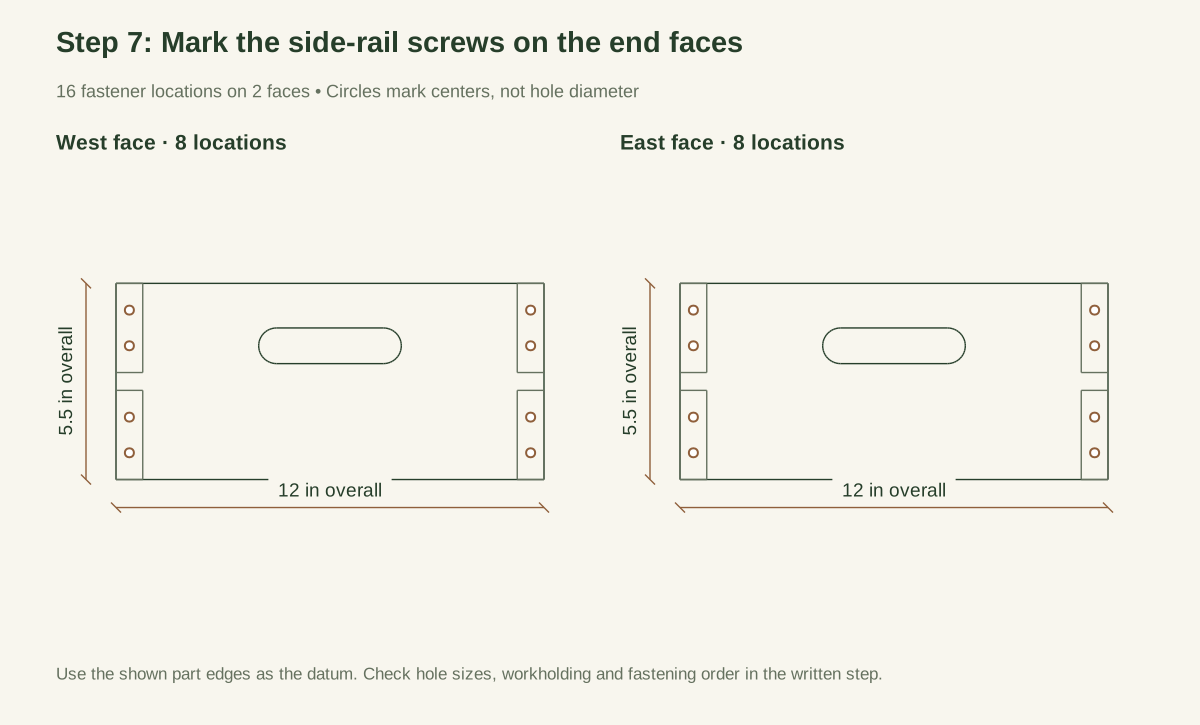
The screws pass through E into the ends of S. On each end board, mark vertical screw lines 3/8 inch from its left and right edges. For the lower rails, mark holes 3/4 and 1-3/4 inches above the end bottom. For the upper rails, mark holes 3-3/4 and 4-3/4 inches above the bottom. There are eight screws per end board, 16 body screws total.
Close-up · Whole model shows the complete part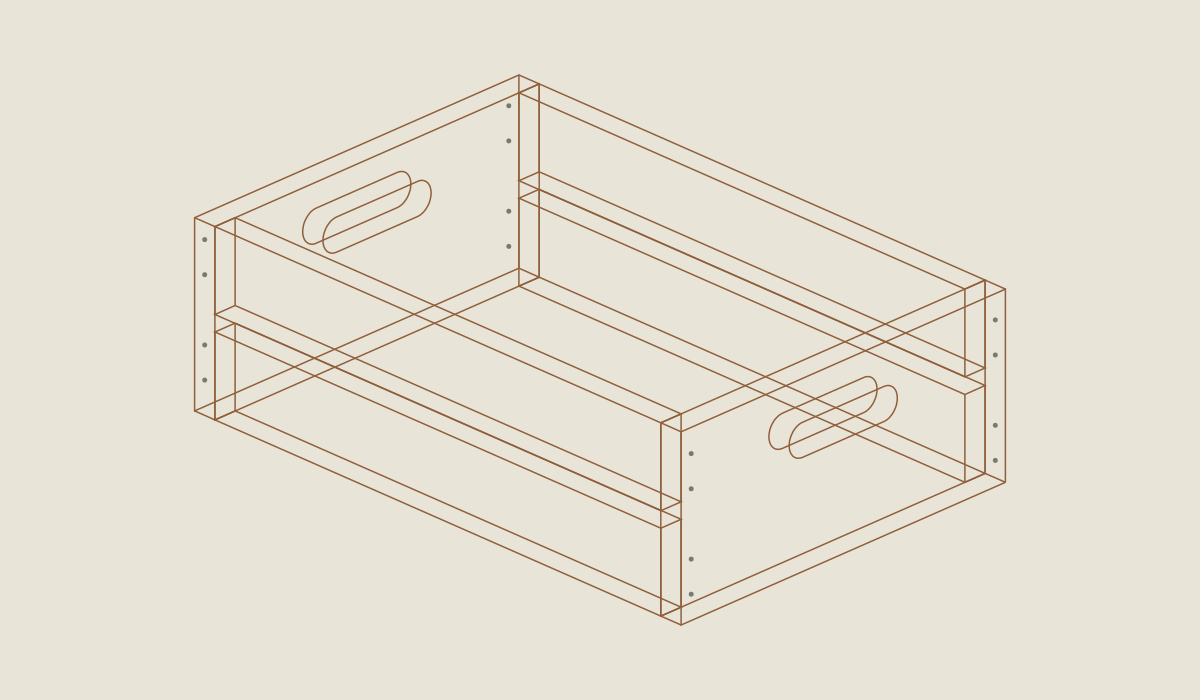
Loading the 3D view…
Drag to turn. Pinch or use + / − to zoom. The written step covers workholding and tool use.
Scroll or swipe the enlarged drawing to read its dimensions. Choose Fit to see the whole drawing again.
Check: Eight body screw locations on each end give sixteen total, clear of the hand slot and floor fasteners.
- 08
Pilot and fasten the lower rectangle
For conventional #8 screws in this pine, begin a sacrificial test with a 7/64-inch receiving pilot and 11/64-inch clearance through E only, following the actual screw's instructions where different. Drill straight into the narrow rail end while the joint is clamped. Countersink shallowly and drive with controlled torque. A split rail or stripped hole is not accepted.
Check the 18 × 12 outside footprint and matching diagonals; the ideal is √468 = 21.633 inches. Use a diagonal difference within 1/16 inch as the proposed shop target. Do not rely on the floor to pull a badly skewed rectangle square.
Close-up · Whole model shows the complete part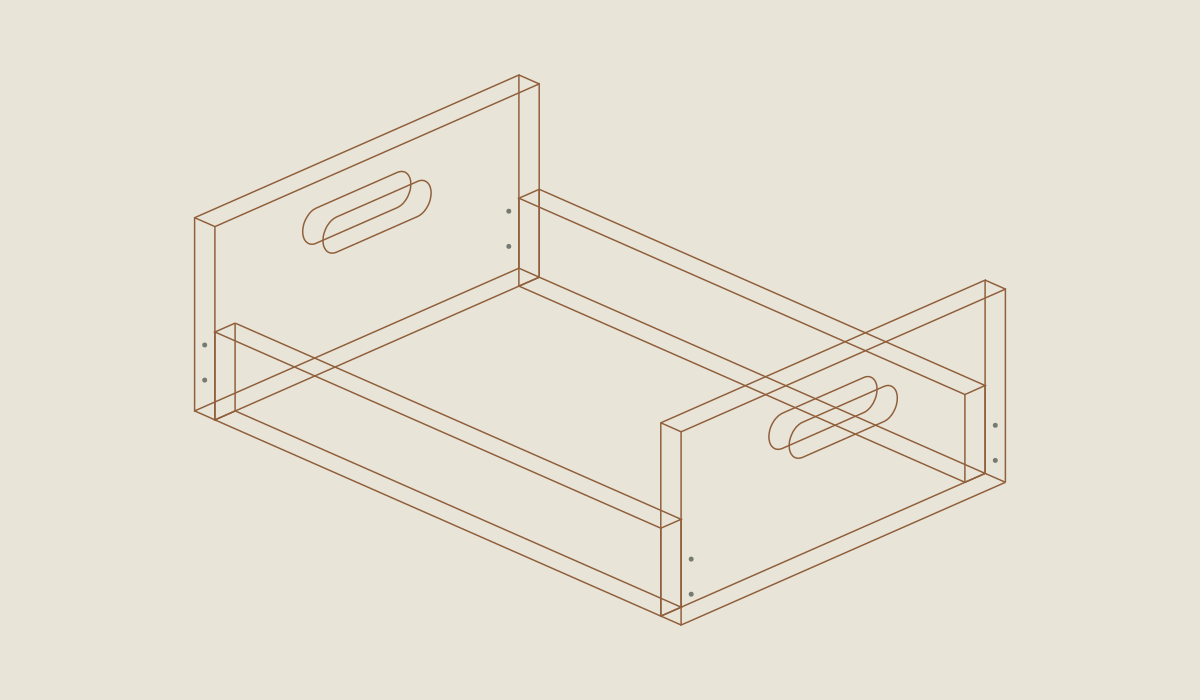
Loading the 3D view…
Drag to turn. Pinch or use + / − to zoom. The written step covers workholding and tool use.
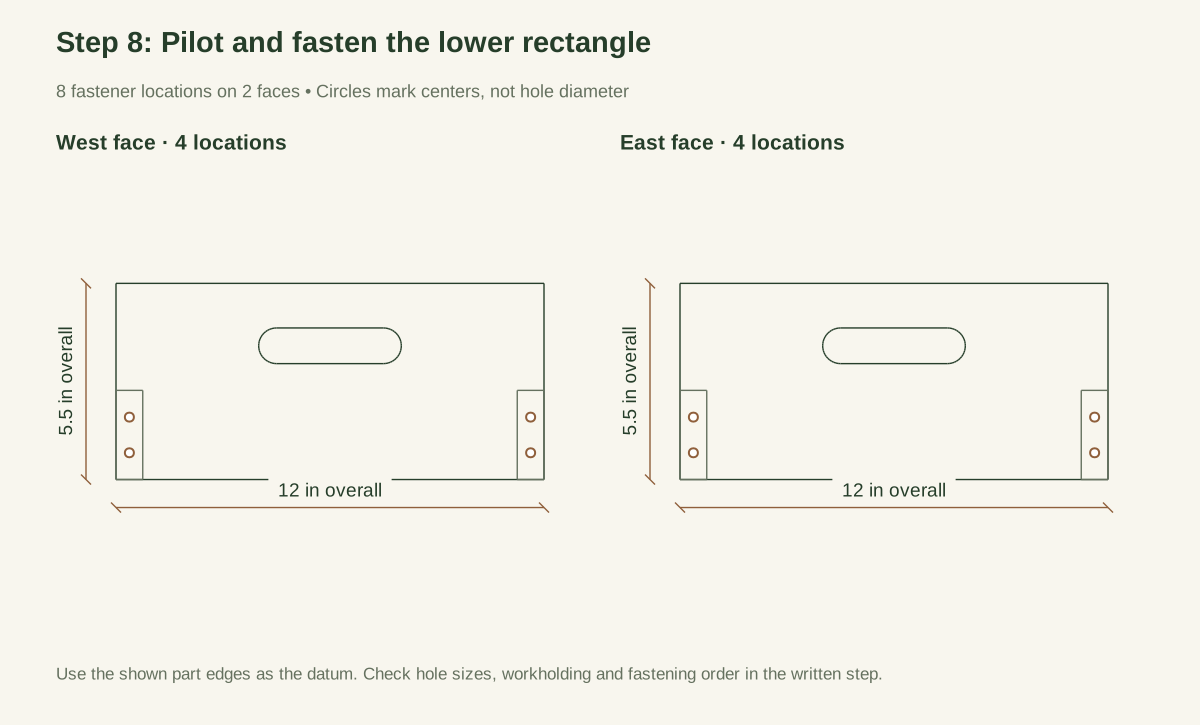
Scroll or swipe the enlarged drawing to read its dimensions. Choose Fit to see the whole drawing again.
Check: The eight lower body screws seat without splitting; diagonal agreement is retained.
- 09
Fit the upper rails with a half-inch gap
Set the upper S rails with their lower edges 3 inches above the E bottom. That leaves a half-inch opening above the lower 2-1/2-inch rails. Their tops finish flush at the 5-1/2-inch end height. Use matched half-inch spacers, clamp, and install the remaining body screws. Remove all temporary spacers.
Close-up · Whole model shows the complete part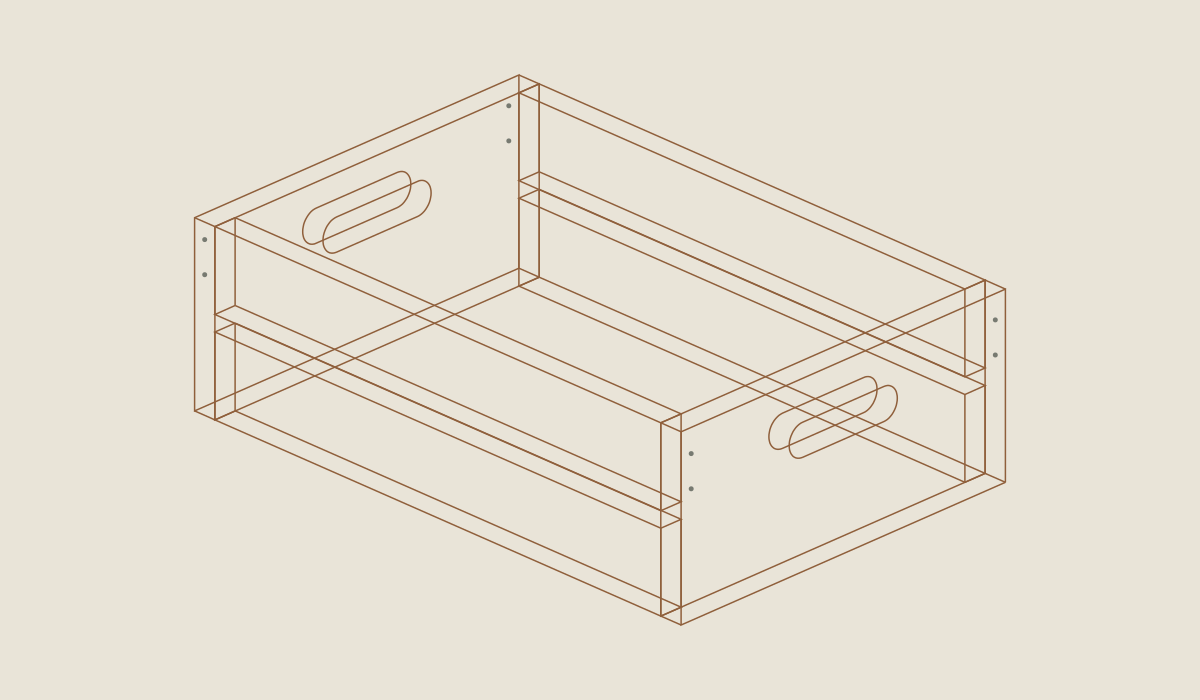
Loading the 3D view…
Drag to turn. Pinch or use + / − to zoom. The written step covers workholding and tool use.
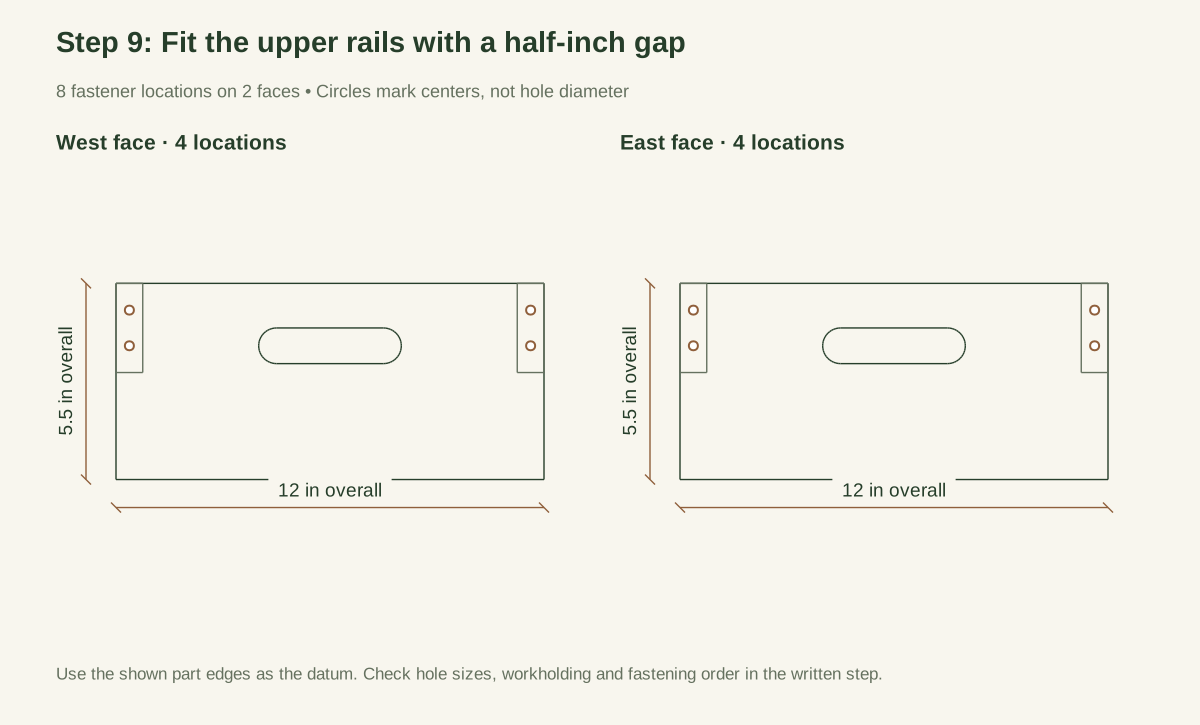
Scroll or swipe the enlarged drawing to read its dimensions. Choose Fit to see the whole drawing again.
Check: Upper rails are fixed with the remaining eight body screws and a 1/2-inch gap; temporary spacers are removed.
- 10
Lay out the four floor strips
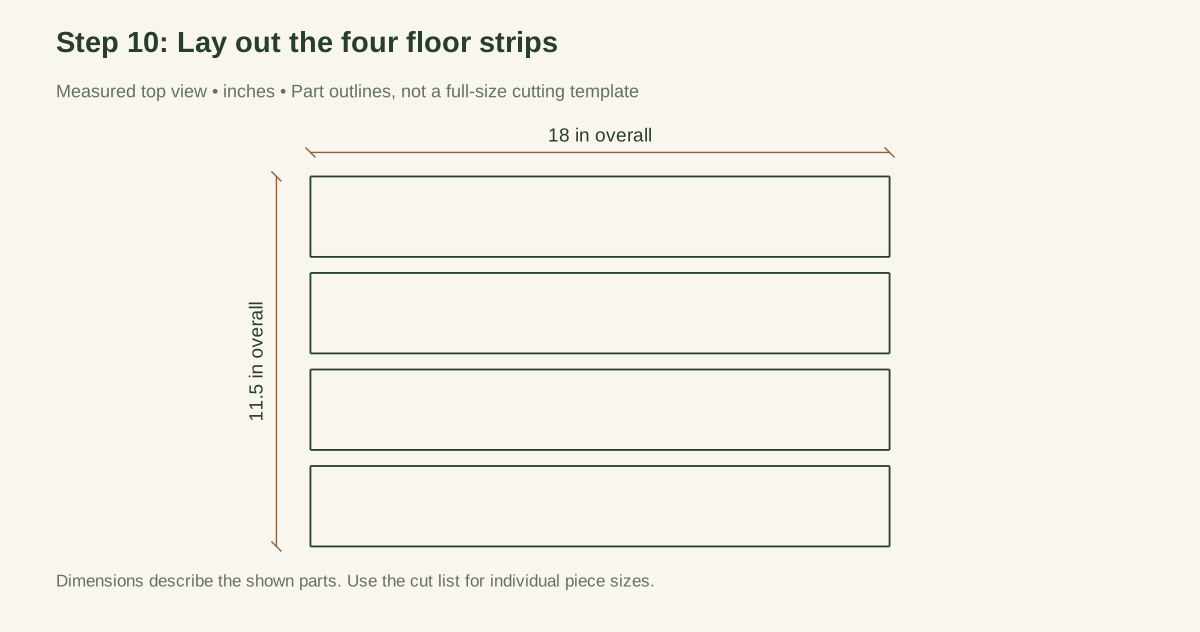
Invert the empty body on a protected bench. Position B slats along the 18-inch length, covering both end-board lower edges. Across the 12-inch width, the slat starting positions are 1/4, 3-1/4, 6-1/4, and 9-1/4 inches. Their centerlines are 1-1/2, 4-1/2, 7-1/2, and 10-1/2. The half-inch gaps and quarter-inch outer margins should be visible before drilling.
Close-up · Whole model shows the complete part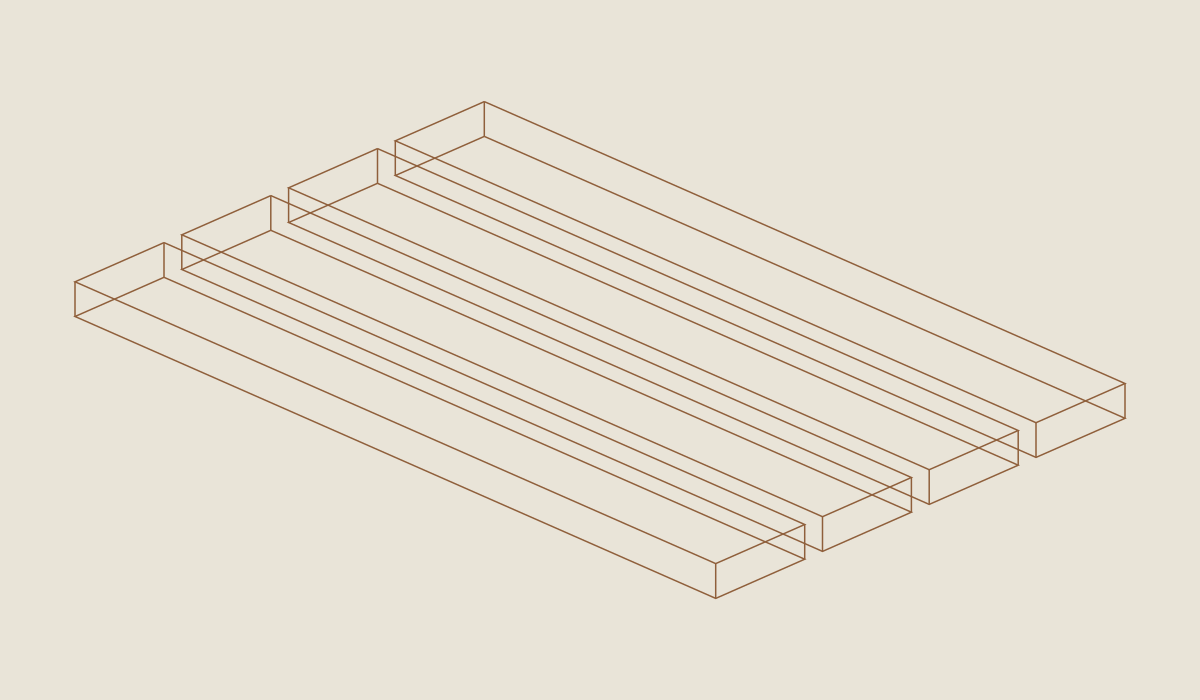
Loading the 3D view…
Drag to turn. Pinch or use + / − to zoom. The written step covers workholding and tool use.
Scroll or swipe the enlarged drawing to read its dimensions. Choose Fit to see the whole drawing again.
Check: Four floor strips have the planned 1/2-inch gaps and 1/4-inch outer margins before any pilot is drilled.
- 11
Attach the floor from underneath
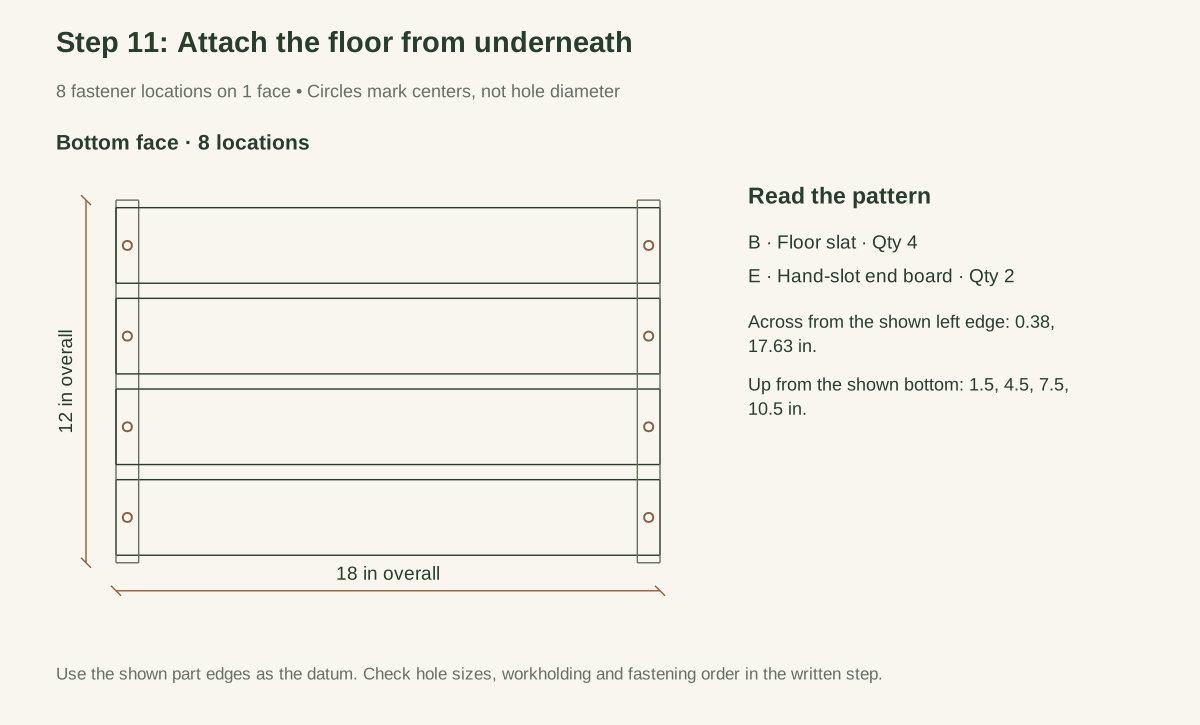
Each B slat receives one screw into each end board. Put those screw centers 3/8 inch from either 18-inch end, on the slat width centerline. Drill clearance through B and a controlled receiving pilot into E's lower edge, keeping the assembly clamped. Install eight floor screws with heads flush, for 24 installed screws overall.
Check that no point enters the hand-slot area or projects into the crate. Every floor slat must contact both ends; do not shim a twisted slat with a loose scrap. No floor screws are driven into the open middle span.
Close-up · Whole model shows the complete part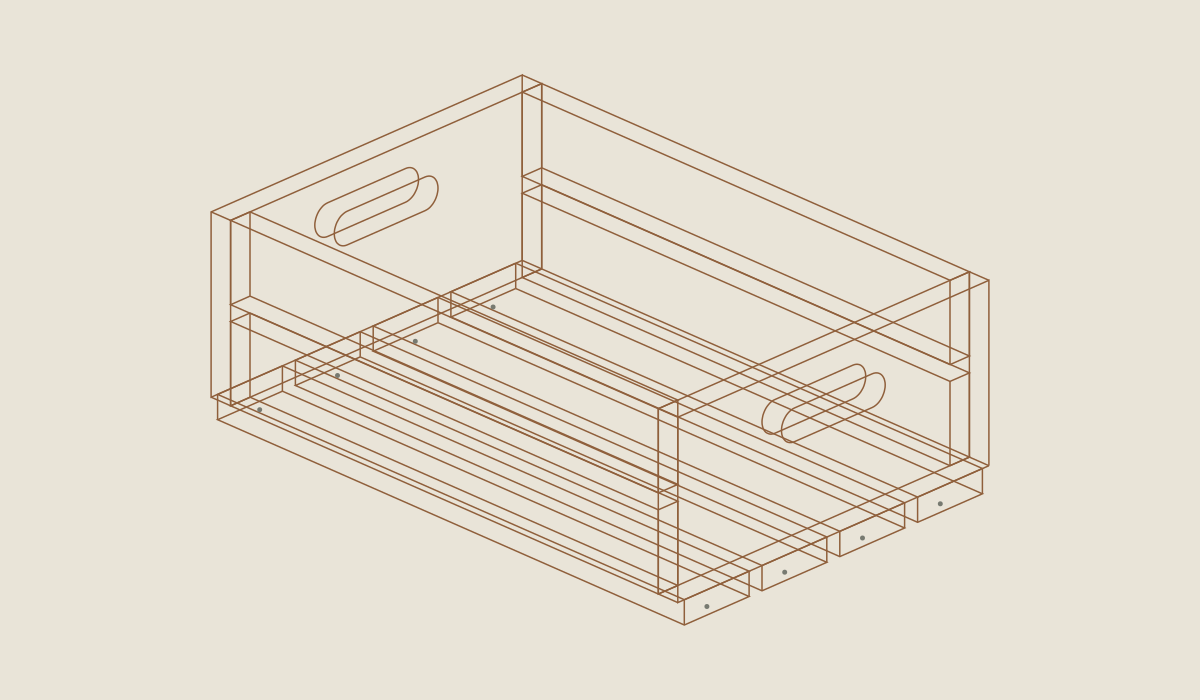
Loading the 3D view…
Drag to turn. Pinch or use + / − to zoom. The written step covers workholding and tool use.
Scroll or swipe the enlarged drawing to read its dimensions. Choose Fit to see the whole drawing again.
Check: Every floor slat bears on both ends; underside screws seat flush with no exposed point or improvised shim.
- 12
Inspect the complete empty crate
Set it upright and confirm it does not rock. Pass a cloth over both grips and every surface that could touch a hand or inner produce container. Inspect screw heads, floor gaps, and end grain. Measure the finished footprint and height, and note any change from the plan, before you carry anything in it.
Close-up · Whole model shows the complete part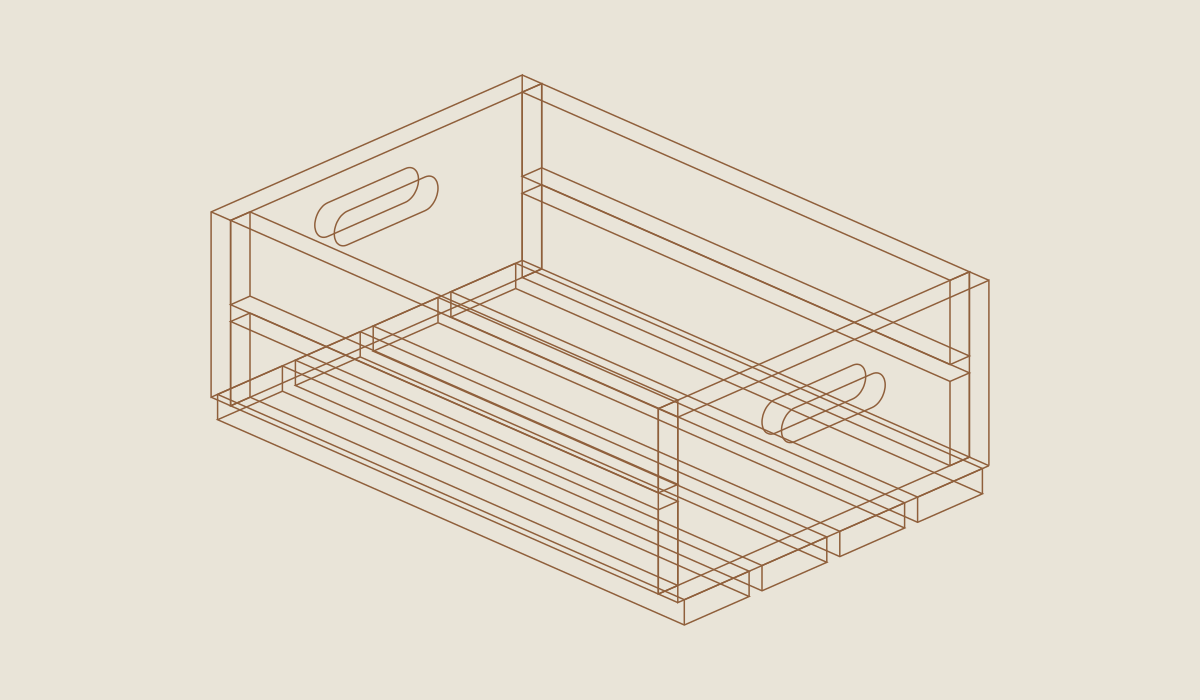
Loading the 3D view…
Drag to turn. Pinch or use + / − to zoom. The written step covers workholding and tool use.
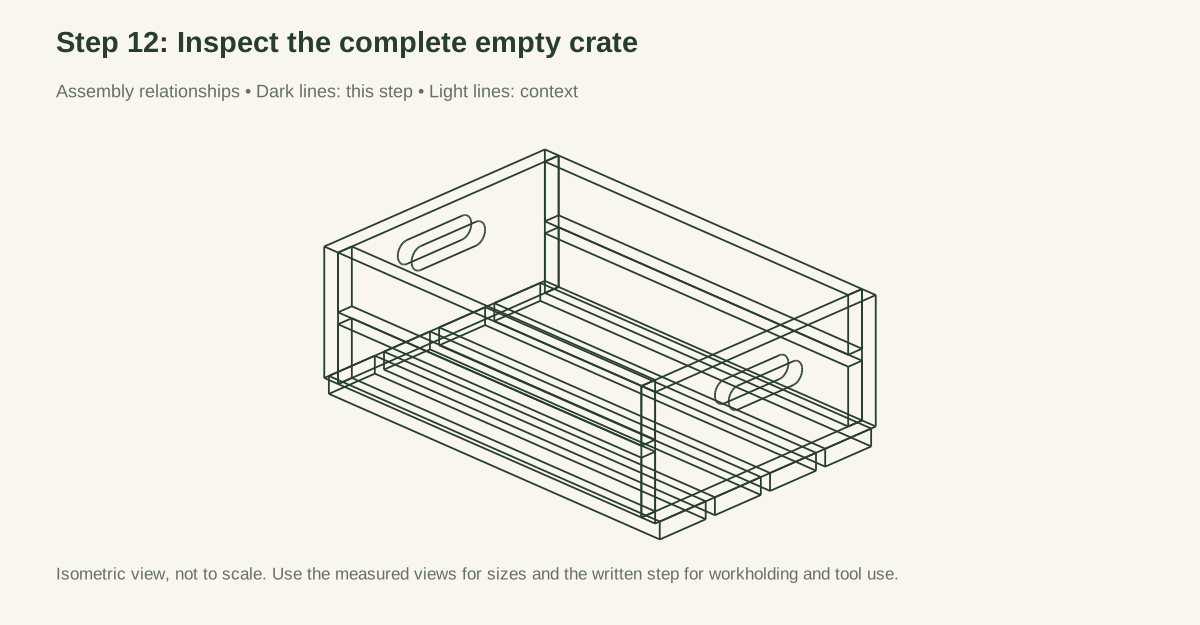
Scroll or swipe the enlarged drawing to read its dimensions. Choose Fit to see the whole drawing again.
Check: Inspect empty grips, corners, floor fixings and gaps. Carrying strength is not inferred from appearance.
05 / Keep it sound
Care
After the build
- Fit clean removable produce containers inside the 16.5 × 10.5-inch space without forcing the sides.
- Inspect the two grip webs and every floor attachment before each carry.
Check it each season
- Begin with empty removable produce containers. Check that they fit without forcing the long rails outward or catching on the floor gaps. The first few times you carry it, use a modest, evenly distributed quantity, lift only slightly above a safe surface, and stop immediately for movement, cracking, discomfort, or a loose part. Do not add weight to discover a failure limit.
- Carry with both hand slots and keep the crate close to the body. Do not swing it by one handle or stack filled crates. Set it down rather than dropping it. Keep harvested produce out of prolonged sun and handle it gently according to the crop's needs; this wooden object is not a cooling or food-preservation system.
- Empty after use. Remove the inner containers, brush out debris, and wipe only as needed. Dry fully with air around the floor gaps. Do not immerse the crate, pressure-wash it, or store it damp inside a sealed bag. Inspect the narrow grip webs and floor attachments before each use. Replace a cracked end board or floor slat with the specified full part; decorative filler is not a carrying repair.
- Use the tool caddy for sharp garden tools instead of mixing them with harvested food. The seed organizer belongs in dry storage, not inside a damp harvest crate.
If something looks wrong
- Crack above a hand slot
- Check: Grain defect, impact, overloaded use. Fix: Stop carrying and replace the entire end after review.
- Floor board moves
- Check: Loose screw, split end, wet decay. Fix: Empty immediately; repair the receiving material as well as the slat.
- Produce container catches
- Check: Proud screw, splinter, wrong container size. Fix: Remove the cause; do not force the container past it.
- Crate rocks
- Check: Warped floor or body out of square. Fix: Correct before further carrying.
- Persistent odor or visible contamination
- Check: Damp storage, residue, unsuitable use. Fix: Remove from produce use and reassess cleaning/replacement.
Keep exploring