Wooden raised beds · Guide 32
Build an Elevated Cedar Planter on Legs
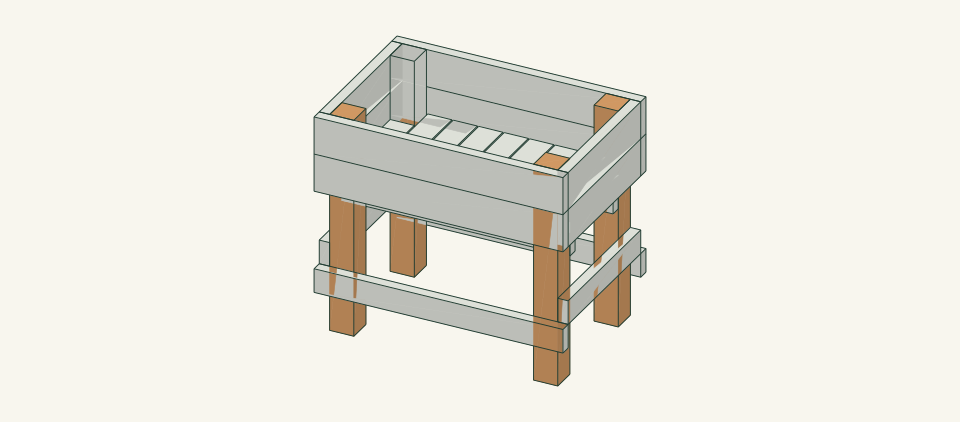
A 36 × 24-inch cedar planter box on four legs, 32 inches tall, with a slatted floor that drains and is carried by rails screwed to the legs.
01 / See the shape
View the project
Loading the 3D view…
Drag to turn. Pinch or use + / − to zoom. The written step covers workholding and tool use.

Scroll or swipe the enlarged drawing to read its dimensions. Choose Fit to see the whole drawing again.
All four leg bottoms must bear on the approved surface before the liner goes in.
02 / Plan your build
Before you start
This planter puts the soil at working height by carrying it on four continuous legs. The soil load follows a short, visible path. Floor boards rest on two rails, and each rail is screwed to the inside faces of two legs. The legs run from the ground to the top of the walls, so neither the walls nor the floor hang from a joint at the bottom of the box. The walls only hold the soil in from the sides. Lower stretchers tie the legs together near the ground. The planter fails when the rail-to-leg screws are short, split or missing, when the legs stand on soft or uneven ground, or when it is filled before every joint has been inspected. A failure can drop wet soil suddenly. Treat the filled planter as unreviewed until a qualified reviewer confirms the connections, racking resistance and supporting surface.
Where it goes
Level, firm ground, compacted gravel or paving with room for a 36 × 24-inch footprint and access for tending. Do not place it on a deck, roof, balcony, slope or soft soil without a separate review of that surface.
Footprint: A 36 × 24 in planter footprint. Add about 30 in of clear working access on every side you will tend, plus room for two people to carry the empty planter
What to expect
Measure accurately, make supported square cuts, and drill and drive long screws into clamped joints. Plan 7–9 hours for two people, including stock checks, trial joints, inspection and staged filling. Settling time between fill passes is extra.
A planning estimate for the hands-on work, once the materials are bought and the tools are set up. It has not been timed on a finished build.
Check the spot
- Confirm that the surface is level, firm and accepted by the reviewer for the filled planter. A deck, roof, balcony, slope or soft soil needs a separate review.
- Identify utilities, irrigation and drainage paths under and around the footprint, and keep water draining from the floor away from building walls.
- Clear a flat work area large enough to lay a 32-in side frame flat and to clamp parts without reaching across a cutter.
Stop and check first if…
- Stop if a leg, rail or floor board splits, a screw strips, or the frame racks or rocks. Unload the planter before opening any joint.
- Stop before filling if the reviewer has not confirmed the rail-to-leg screws, racking resistance and supporting surface for the medium's saturated weight.
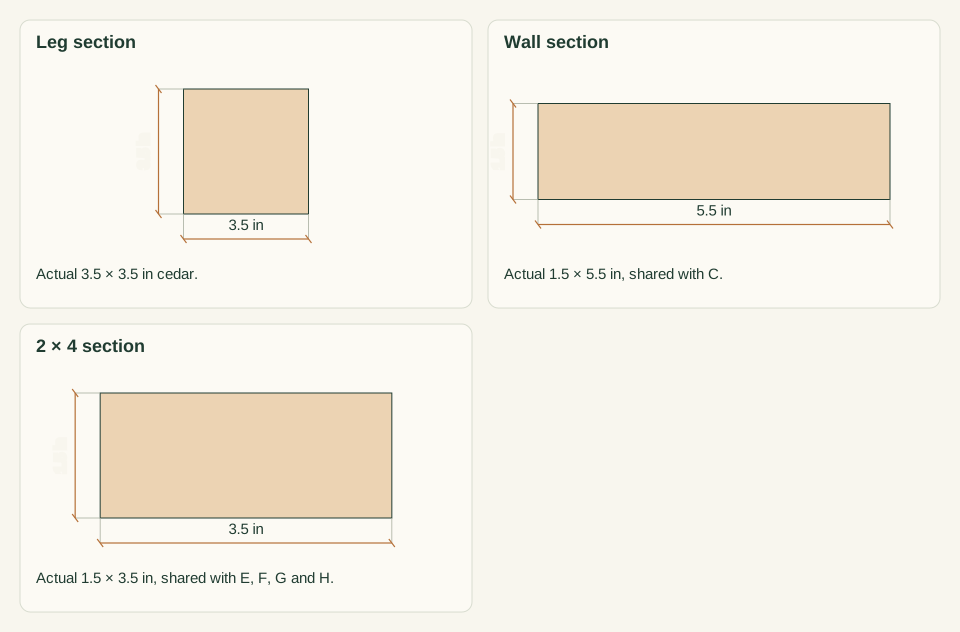
- Stop if the measured sections differ from 3.5 × 3.5, 1.5 × 5.5 or 1.5 × 3.5 in, or if the screw instructions cannot meet the marked edge distances.
- Do not make the planter taller, longer or deeper, or change a member or screw, without a new load-path review.
Work safely
- Clamp every post and board before cutting or drilling, and keep the guards in place. Cutting 4 × 4 legs needs a saw rated for that depth; follow the tool instructions.
- Drill long screws only into clamped parts. A bit that binds can spin an unsecured board.
- Lift the empty planter with two people at the lower stretchers. Never lift or move it with soil in it.
- Keep children off the planter, and never lean or climb on it during or after building.
Budget
We have not put a price on this one yet. Lumber and hardware prices change by store and season, so price the list under What you need at your local supplier before you buy.
03 / Gather and cut
What you need
A — Leg
4 pieces
Untreated cedar 4 × 4, actual 3.5 × 3.5 in Two 4 × 4 × 8-ft posts. Each post gives two legs: 0.5 trim + 32 + 0.125 kerf + 32 = 64.625 of 96 in. Each post leaves an offcut of about 31 in.
Reject posts with end splits, loose knots within 6 in of either end, or more than 1/8 in of bow over 32 in. Cut both ends square, because the leg bottoms bear on the ground.
B — Front and back wall course
4 pieces
Untreated cedar 2 × 6, actual 1.5 × 5.5 in Two 2 × 6 × 8-ft boards. Each board gives two B and one C: 0.5 + 36 + 0.125 + 36 + 0.125 + 21 = 93.75 of 96 in.
Confirm the measured width is 5.5 in on every board. Two stacked courses must reach exactly 11 in.
C — Side wall course
4 pieces
Untreated cedar 2 × 6, actual 1.5 × 5.5 in Two C come from the B boards. Buy one more 2 × 6 × 8-ft board for the other two: 0.5 + 21 + 0.125 + 21 = 42.625 of 96 in. Buy three 2 × 6 × 8-ft boards in total.
Length is 24 in outside depth less two 1.5-in B courses. Check that the ends are square so they close against the inside faces of the B courses.
D — Floor support rail
2 pieces
Untreated cedar 2 × 4, actual 1.5 × 3.5 in 2 × 4 board 2 of five 2 × 4 × 8-ft boards: 0.5 + 33 + 0.125 + 33 + 0.125 + 14 (H) = 80.75 of 96 in.
These rails carry the floor. Use the straightest, most knot-free 2 × 4 for D, with no knots within 4 in of either end.
E — Front and back lower stretcher
2 pieces
Untreated cedar 2 × 4, actual 1.5 × 3.5 in 2 × 4 board 1: 0.5 + 36 + 0.125 + 36 + 0.125 + 14 (H) = 86.75 of 96 in.
Ends must be square. Each end finishes flush with the outside faces of the side frame.
F — Side lower stretcher
2 pieces
Untreated cedar 2 × 4, actual 1.5 × 3.5 in 2 × 4 board 3: 0.5 + 21 (F) + 0.125 + 21 (F) + 0.125 + 21 (G) + 0.125 + 21 (G) = 84.875 of 96 in.
Same length as C. Check both ends for square before marking.
G — Center floor board
7 pieces
Untreated cedar 2 × 4, actual 1.5 × 3.5 in, laid flat Two G come from 2 × 4 board 3. Four come from 2 × 4 board 4: 0.5 + 4 × 21 + 3 × 0.125 = 84.875 of 96 in. One comes from 2 × 4 board 5. Keep the rest of board 5 for trial joints.
All seven must measure 3.5 in wide, or the 3/16-in drain gaps will not work out. Reject cupped boards.
H — End floor board
2 pieces
Untreated cedar 2 × 4, actual 1.5 × 3.5 in, laid flat One H from 2 × 4 board 1 and one from 2 × 4 board 2.
Fits between the legs on each side. It bears 1.5 in on each rail D, so its ends must be square and free of splits.
M — Floor liner
1 piece
Water-permeable nonwoven landscape fabric. It carries no load. One piece at least 37 × 25 in: 33 × 21 in floor plus 2 in turned up each wall.
Slit the fabric around the four legs. It keeps soil out of the drain gaps and must not block drainage. Confirm the product is suitable for food growing if edibles are planned.
Wood screws
74 items
#10 × 3-1/2 in exterior wood screws, Type 305 or 316 stainless steel, suited to cedar in wet soil contact Buy at least 74 plus spares for trial joints. Keep the spares separate from the installed count.
16 in B, 16 in C, 8 in D, 8 in E, 8 in F, 14 in G and 4 in H. Each screw passes through 1.5 in of member and engages 2.0 in of leg or rail. Follow the product's clearance, pilot and edge-distance instructions. No connection capacity is inferred.
Cut list
| Piece | How many | Cut length | Note |
|---|---|---|---|
| A — Leg | 4 | 32 × 3.5 × 3.5 in | Finished length × width × thickness; square ends unless the detail says otherwise. |
| B — Front and back wall course | 4 | 36 × 5.5 × 1.5 in | Finished length × width × thickness; square ends unless the detail says otherwise. |
| C — Side wall course | 4 | 21 × 5.5 × 1.5 in | Finished length × width × thickness; square ends unless the detail says otherwise. |
| D — Floor support rail | 2 | 33 × 3.5 × 1.5 in | Finished length × width × thickness; square ends unless the detail says otherwise. |
| E — Front and back lower stretcher | 2 | 36 × 3.5 × 1.5 in | Finished length × width × thickness; square ends unless the detail says otherwise. |
| F — Side lower stretcher | 2 | 21 × 3.5 × 1.5 in | Finished length × width × thickness; square ends unless the detail says otherwise. |
| G — Center floor board | 7 | 21 × 3.5 × 1.5 in | Finished length × width × thickness; square ends unless the detail says otherwise. |
| H — End floor board | 2 | 14 × 3.5 × 1.5 in | Finished length × width × thickness; square ends unless the detail says otherwise. |
Tools
- Tape measure, combination square, framing square, pencil and 24-in level
- Guarded saw able to cut a 3.5-in post square, with supported work
- Drill and driver, bits matched to the selected screw's clearance and pilot instructions, depth stop
- At least four clamps with 6-in or larger capacity, and sacrificial backing
- 3/16-in spacers, sanding block and abrasive, utility knife for the liner
Protective gear
- Eye protection for all cutting and drilling
- Hearing protection and dust control suited to the actual saw
- Closed footwear, and work gloves for carrying only, never near a rotating cutter
04 / Put it together
Build steps
- 01
Confirm the site and supporting surface
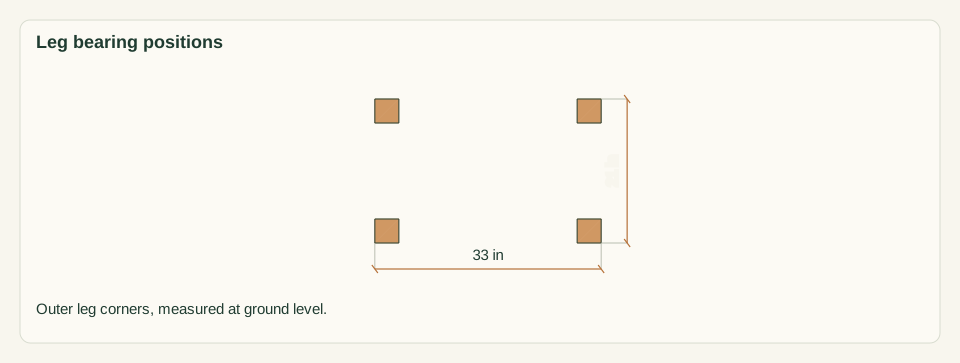
Choose level, firm ground, compacted gravel or paving with room for the 36 × 24-inch footprint and access on the sides you will tend. Mark the outer leg corners: 33 in apart across the width and 21 in apart front to back. Each leg A carries part of the full wet load. Do not use a deck, roof, balcony, slope or soft soil; each of those needs a separate surface review.
Close-up · Whole model shows the complete part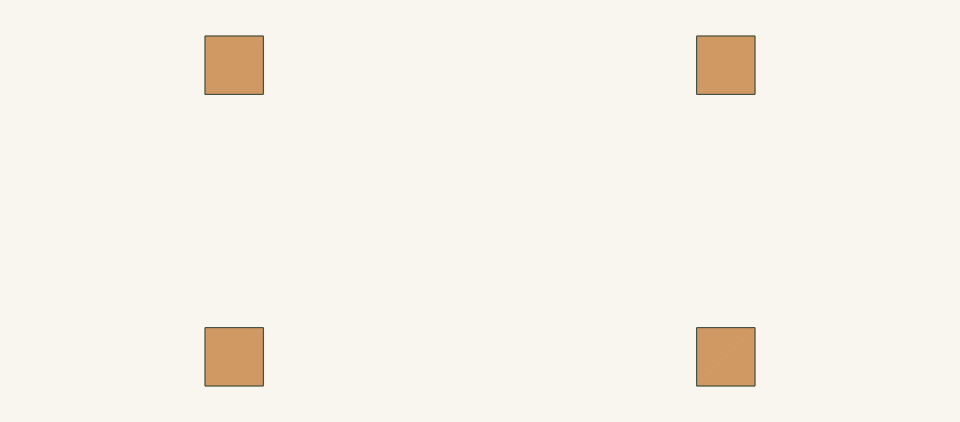
Loading the 3D view…
Drag to turn. Pinch or use + / − to zoom. The written step covers workholding and tool use.
Scroll or swipe the enlarged drawing to read its dimensions. Choose Fit to see the whole drawing again.
Planning reference only: the four leg positions show where the surface must carry the filled planter.
Check: A level reads level in both directions across the four marked leg positions, and no utilities, irrigation lines or drainage paths are affected.
- 02
Measure and record the stock
Measure every piece at both ends and the middle. The 4 × 4 posts must be 3.5 × 3.5 in, the 2 × 6 boards 1.5 × 5.5 in and the 2 × 4 boards 1.5 × 3.5 in. Reject split, twisted, cupped or badly bowed pieces. Choose the straightest 2 × 4 for the floor rails D. Record each usable length.
Close-up · Whole model shows the complete part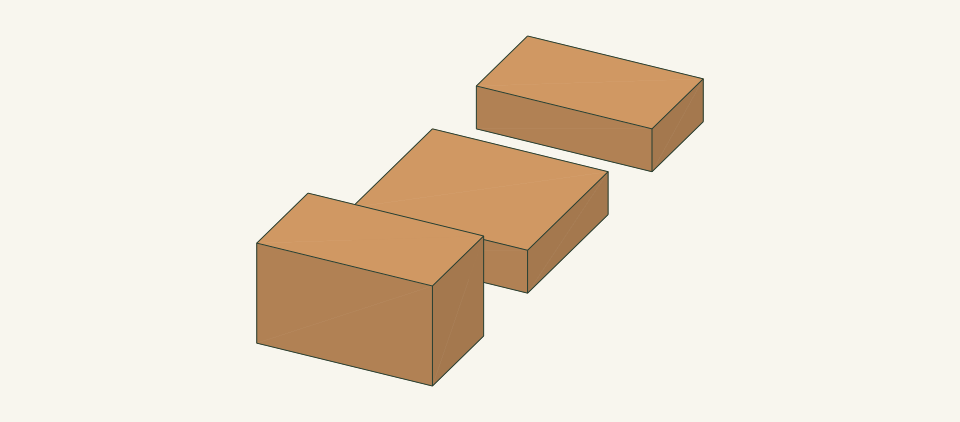
Loading the 3D view…
Drag to turn. Pinch or use + / − to zoom. The written step covers workholding and tool use.
Scroll or swipe the enlarged drawing to read its dimensions. Choose Fit to see the whole drawing again.
Compare the three actual sections against the measured stock before any cut.
Check: Every section matches the written actual size; any difference is recorded and the cut list is reconciled before cutting.
- 03
Cut the legs and wall courses
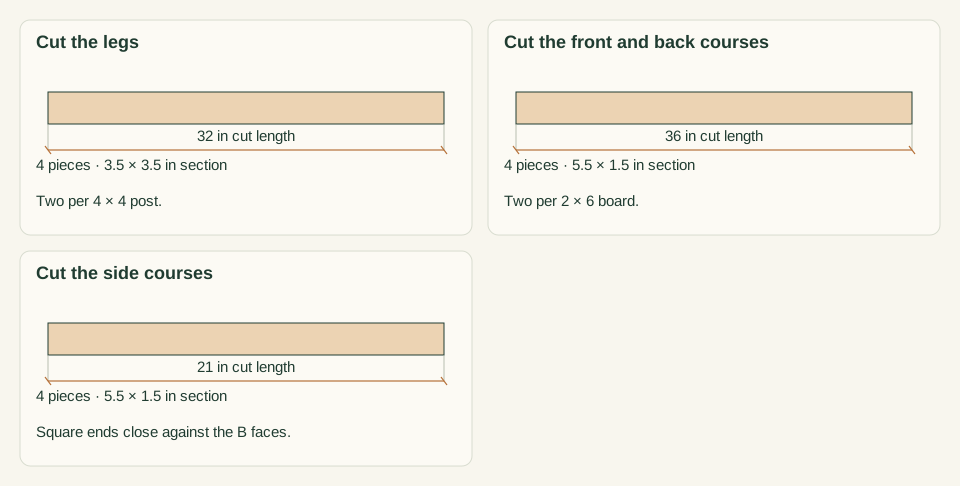
Square one end of each board, removing 0.5 in. Cut four legs A at 32 in from the two 4 × 4 posts. From each of two 2 × 6 boards, cut two B at 36 in and one C at 21 in. Cut the last two C at 21 in from the third 2 × 6. Keep the 0.125-in kerf on the waste side of each line. Support both sides of every cut.
Close-up · Whole model shows the complete part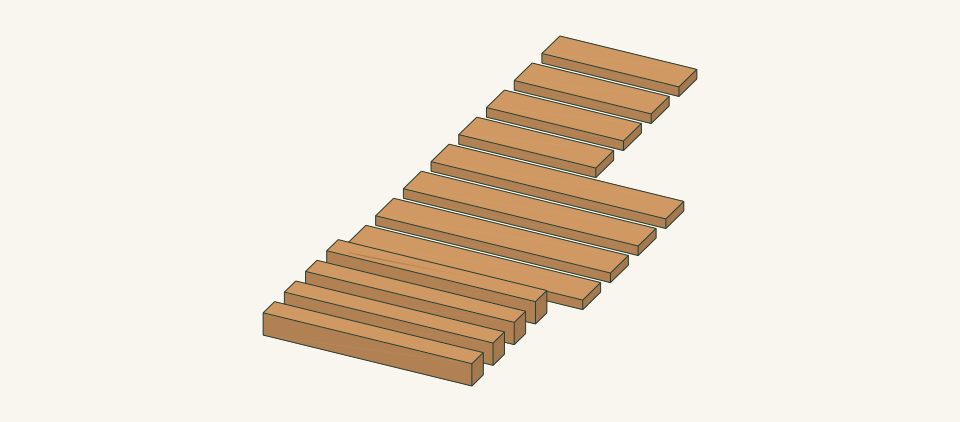
Loading the 3D view…
Drag to turn. Pinch or use + / − to zoom. The written step covers workholding and tool use.
Scroll or swipe the enlarged drawing to read its dimensions. Choose Fit to see the whole drawing again.
Legs and wall courses laid out as loose cut pieces.
Check: Four A at 32 in, four B at 36 in and four C at 21 in are cut, and like pieces match within 1/32 in face to face.
- 04
Cut the rails, stretchers and floor boards
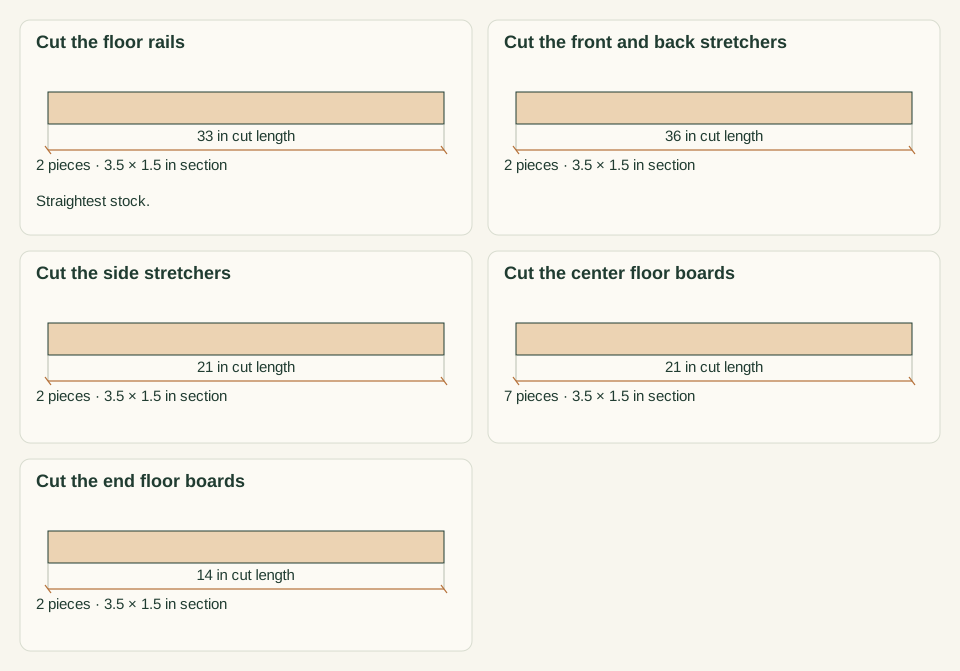
Follow the 2 × 4 board plan in the parts list. Cut two D at 33 in, two E at 36 in, two F at 21 in, seven G at 21 in and two H at 14 in. Square every end. Label each piece with its letter on the face that will stay hidden. Keep the board 5 offcut for trial joints.
Close-up · Whole model shows the complete part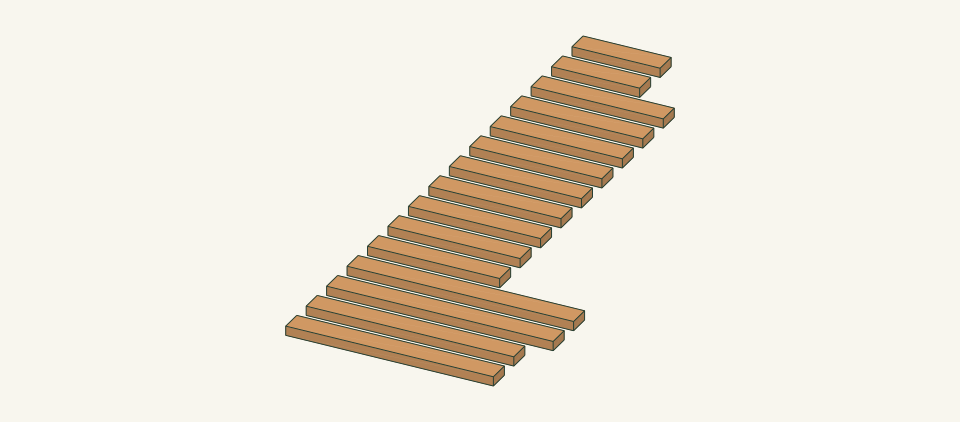
Loading the 3D view…
Drag to turn. Pinch or use + / − to zoom. The written step covers workholding and tool use.
Scroll or swipe the enlarged drawing to read its dimensions. Choose Fit to see the whole drawing again.
All thirteen 2 × 4 pieces from the five-board plan.
Check: All fifteen 2 × 4 pieces are labeled and like lengths match within 1/32 in; all seven G measure 3.5 in wide.
- 05
Mark and drill the wall courses
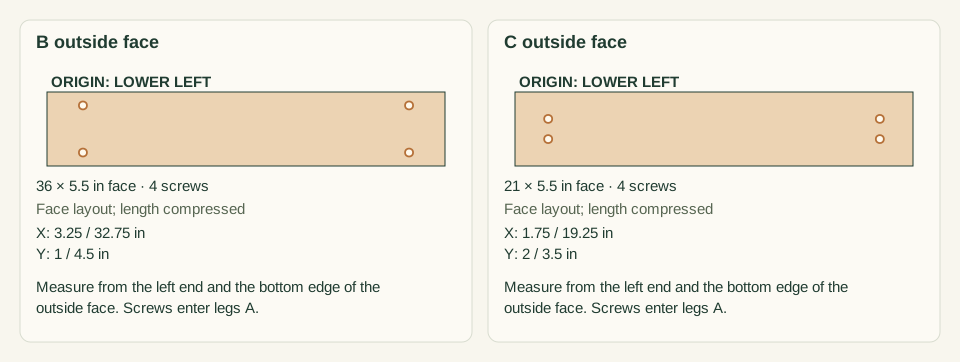
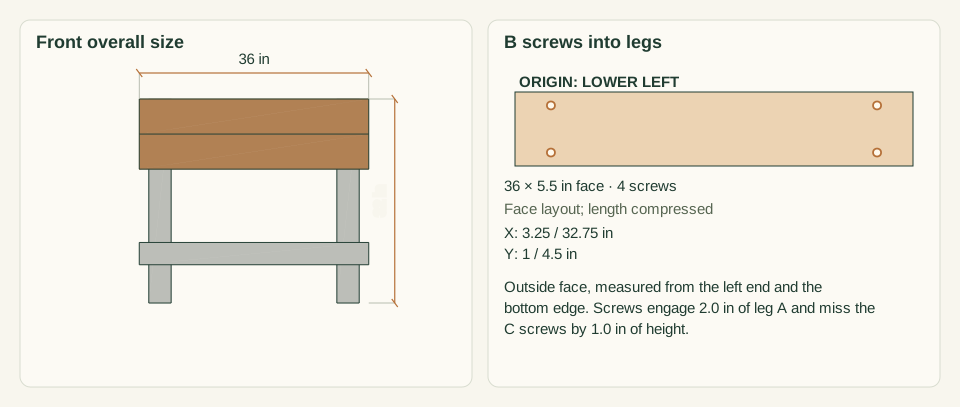
On the outside face of each B, mark screw centers 3.25 in from each end, at 1.0 and 4.5 in above the bottom edge. On each C, mark centers 1.75 in from each end, at 2.0 and 3.5 in above the bottom edge. Clamp each board to sacrificial backing. Drill the screw maker's clearance hole through the board only, and countersink only if the screw instructions call for it.
Close-up · Whole model shows the complete part
Loading the 3D view…
Drag to turn. Pinch or use + / − to zoom. The written step covers workholding and tool use.
Scroll or swipe the enlarged drawing to read its dimensions. Choose Fit to see the whole drawing again.
B and C holes sit at different heights so the screws miss each other inside the leg.
Check: There are four holes in every B and every C, with B holes at heights 1.0/4.5 and C holes at heights 2.0/3.5.
- 06
Mark and drill rails, stretchers and floor
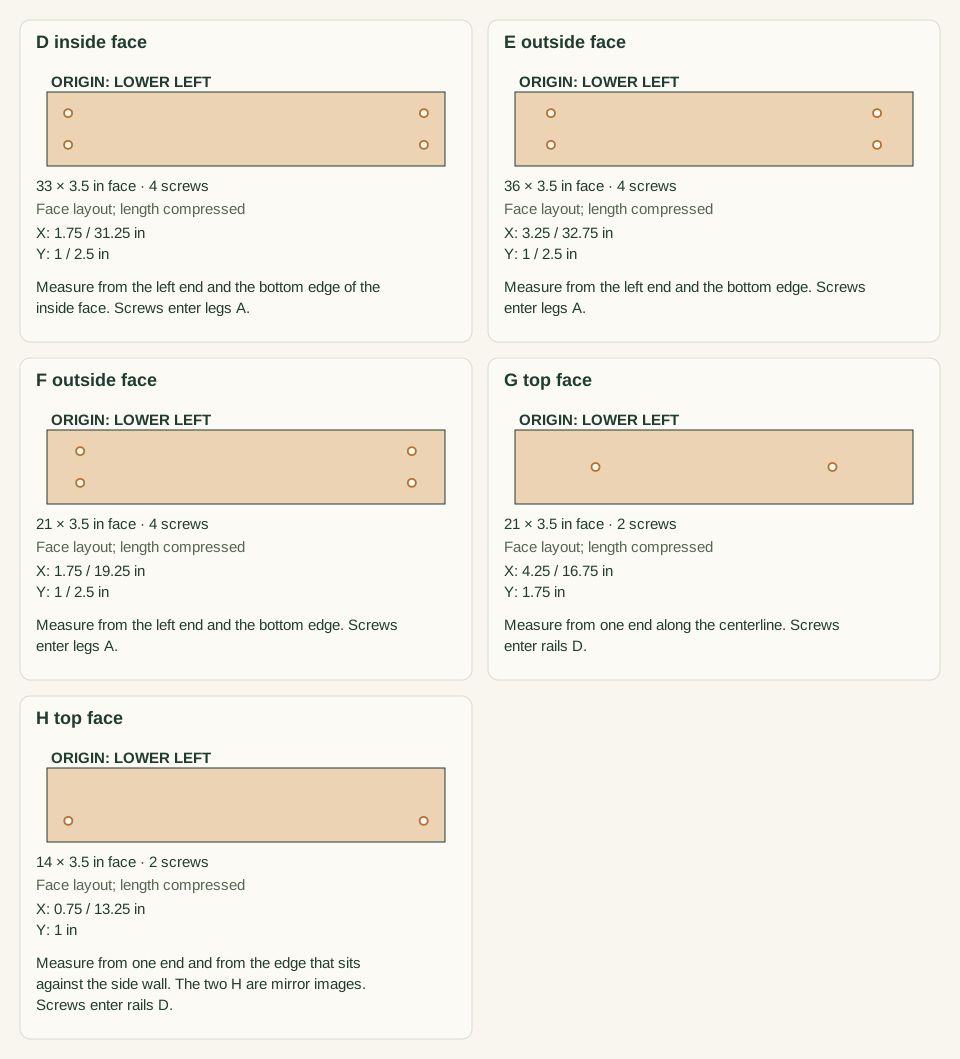
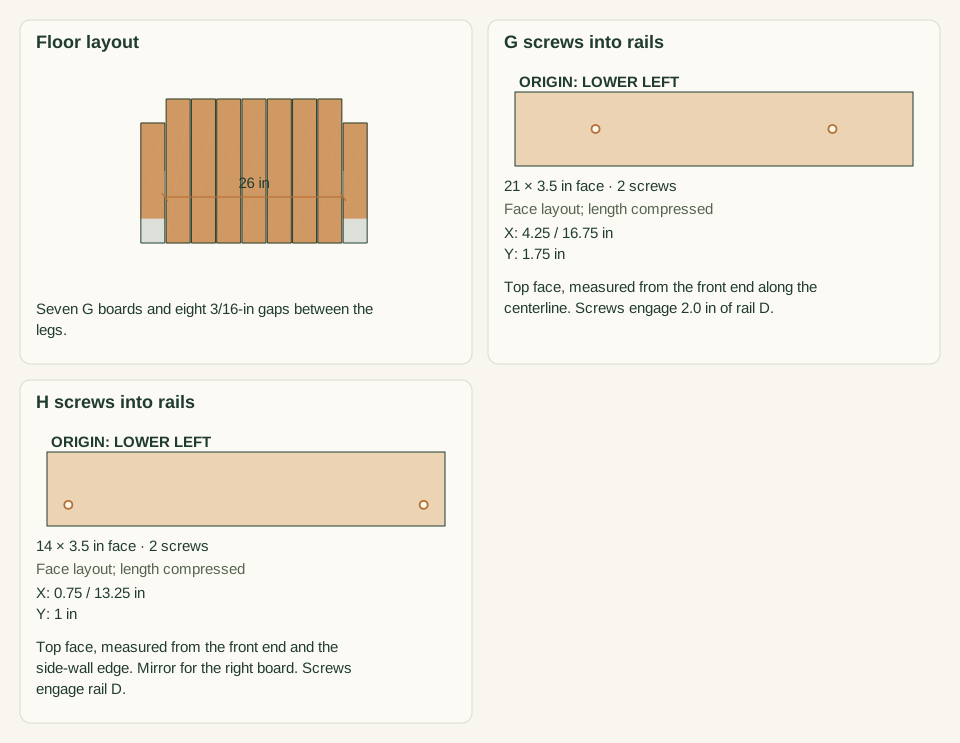
Mark D and F at 1.75 in from each end, and E at 3.25 in from each end, all at 1.0 and 2.5 in above the bottom edge. Mark each G on its centerline, 4.25 in from each end. Mark each H 0.75 in from each end and 1.0 in from the edge that will sit against the side wall. Drill clearance holes through these parts only. Trial one screw through scrap into a leg offcut.
Close-up · Whole model shows the complete part
Loading the 3D view…
Drag to turn. Pinch or use + / − to zoom. The written step covers workholding and tool use.
Scroll or swipe the enlarged drawing to read its dimensions. Choose Fit to see the whole drawing again.
One measured pattern for each 2 × 4 part.
Check: The trial screw seats flush without splitting the scrap, and every part has its full hole pattern: 4 per D, E and F, and 2 per G and H.
- 07
Assemble the two side frames
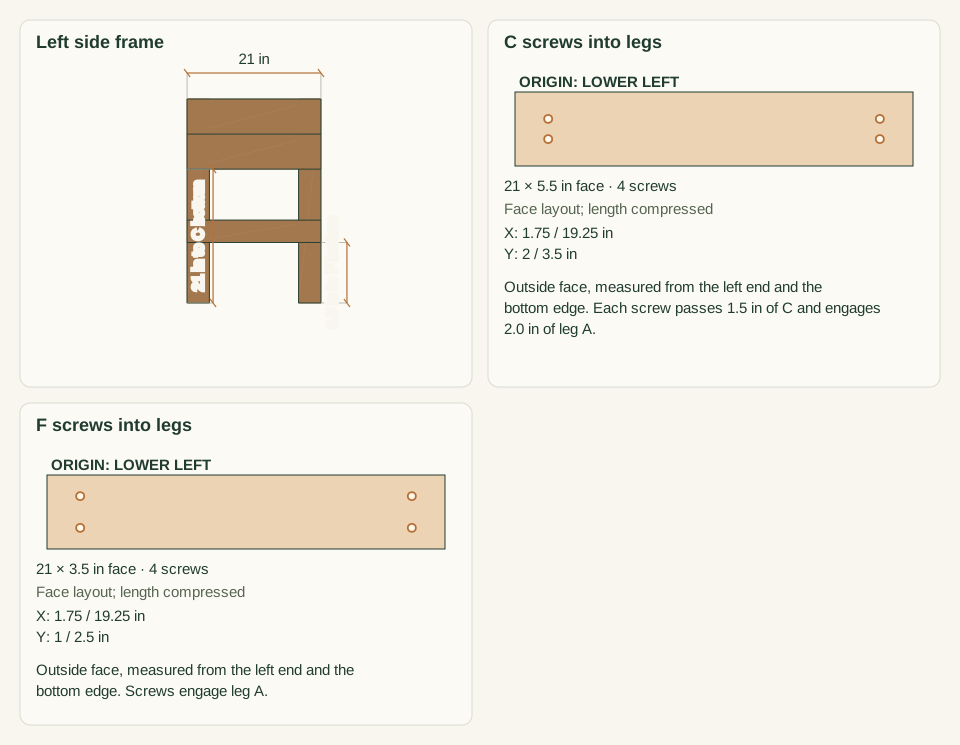
Lay legs A0 and A2 on a flat bench with their side faces up and their outside edges 21 in apart. Clamp C1 with its top flush to the leg tops, then C0 directly below it. Clamp F0 with its bottom 9.5 in above the leg bottoms. Drill pilots into the legs through the clearance holes and drive 8 screws per C pair and 4 per F. Build the right frame from A1, A3, C2, C3 and F1 the same way.
Close-up · Whole model shows the complete part
Loading the 3D view…
Drag to turn. Pinch or use + / − to zoom. The written step covers workholding and tool use.
Scroll or swipe the enlarged drawing to read its dimensions. Choose Fit to see the whole drawing again.
Each side frame is built flat, with the C courses flush at the leg tops.
Check: Both side-frame diagonals measure 38.28 in within 1/8 in, and 12 screws are seated in each frame with no split legs.
- 08
Join the side frames with stretchers E
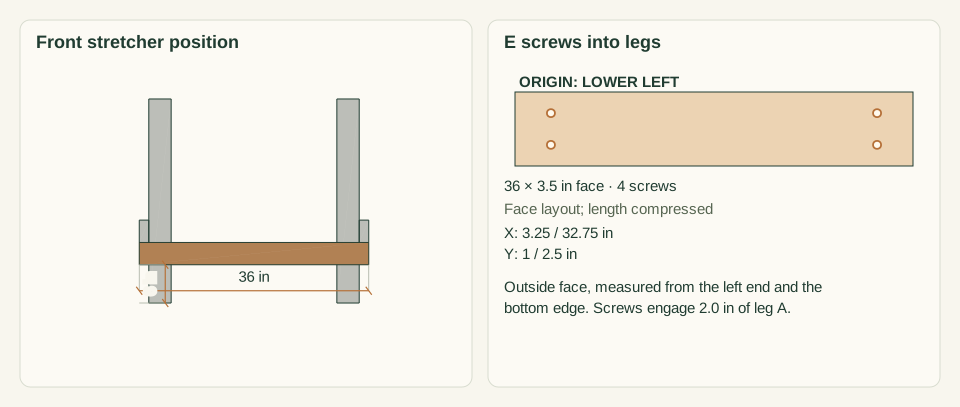
Stand both side frames upright, C faces outward, with a helper holding them. Clamp E0 across the front faces of the front legs, 6 in above the leg bottoms, with its ends flush with the outside faces of F0 and F1. Drill pilots and drive 4 screws at 3.25 in from each end. Fit E1 across the back legs the same way.
Close-up · Whole model shows the complete part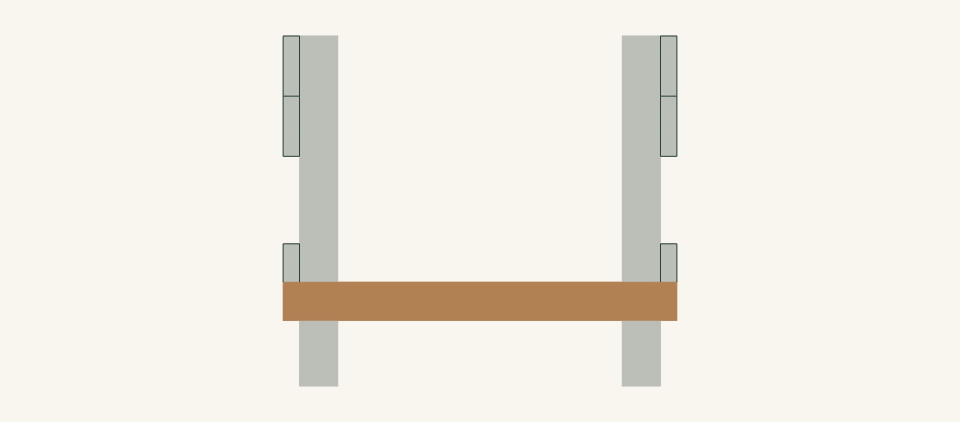
Loading the 3D view…
Drag to turn. Pinch or use + / − to zoom. The written step covers workholding and tool use.
Scroll or swipe the enlarged drawing to read its dimensions. Choose Fit to see the whole drawing again.
Stretchers E tie the two side frames together near the ground.
Check: The outside width is 36 in at the stretchers, the leg-corner diagonals at the ground measure 39.12 in within 1/8 in, and 8 screws are seated.
- 09
Fasten the floor rails D to the legs
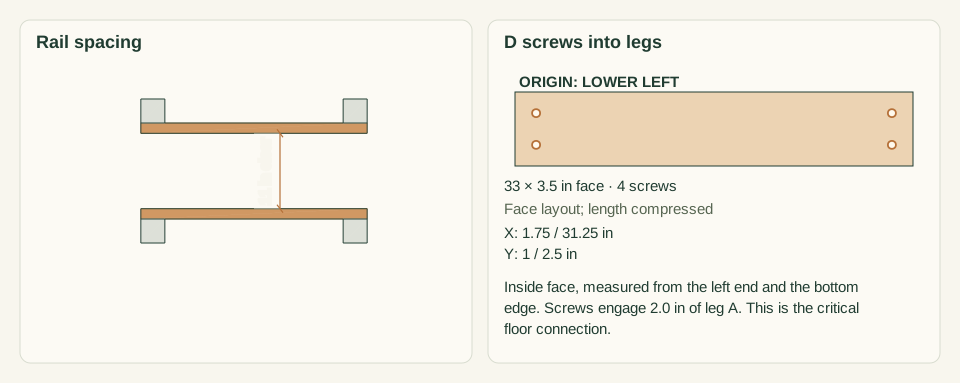
Clamp D0 to the inside faces of the front legs and D1 to the inside faces of the back legs. Set each rail top 21 in above the leg bottoms and keep its ends flush with the outer leg faces. Drill pilots and drive two screws at each end, 1.75 in from the rail end, at 1.0 and 2.5 in above the rail bottom. These 8 screws carry the floor.
Close-up · Whole model shows the complete part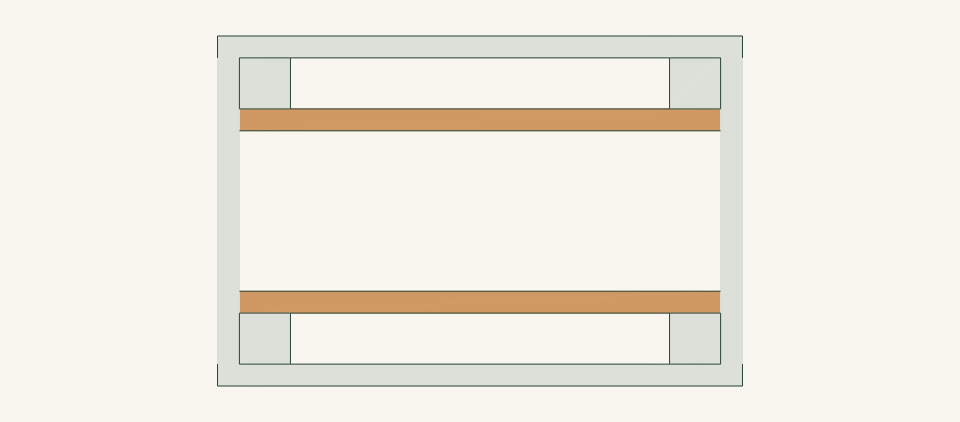
Loading the 3D view…
Drag to turn. Pinch or use + / − to zoom. The written step covers workholding and tool use.
Scroll or swipe the enlarged drawing to read its dimensions. Choose Fit to see the whole drawing again.
The rails sit on the inside leg faces and carry the whole floor.
Check: Both rail tops measure 21 in above the leg bottoms and 11 in apart clear, and all 8 screws are seated without splitting.
- 10
Fasten the front and back walls B
Clamp B1 to the front leg faces with its top flush with the leg tops and its ends flush with the outside faces of C1 and C3. Drive 4 screws at 3.25 in from each end, at 1.0 and 4.5 in above the course bottom. Fit B0 directly below it the same way. Repeat with B3 and B2 on the back. Recheck square while each course is clamped.
Close-up · Whole model shows the complete part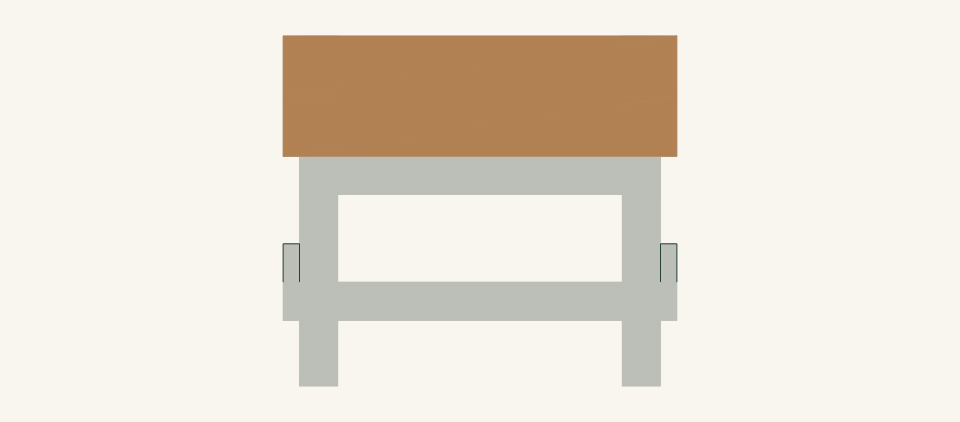
Loading the 3D view…
Drag to turn. Pinch or use + / − to zoom. The written step covers workholding and tool use.
Scroll or swipe the enlarged drawing to read its dimensions. Choose Fit to see the whole drawing again.
The B courses close the box and fix the overall size.
Check: Outside size measures 36 × 24 in at the top, the top diagonals match 43.27 in within 1/8 in, and 16 B screws are seated.
- 11
Inspect the frame before the floor goes in
Release all clamps. Inspect every one of the 56 frame screws for splits, stripped holes or points breaking out of a face. Check that the legs are plumb and that the wall corners are closed. Ease hand-contact edges with abrasive and wipe for splinters. Replace any split part now; never add a screw beside a crack.
Close-up · Whole model shows the complete part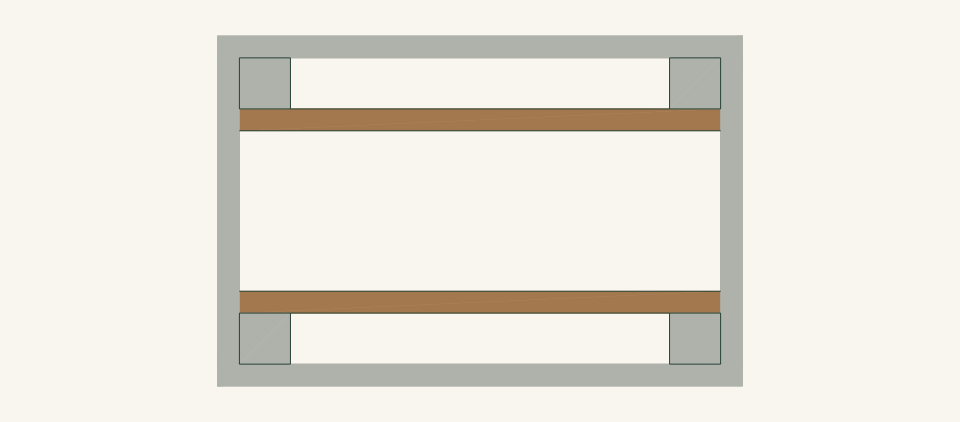
Loading the 3D view…
Drag to turn. Pinch or use + / − to zoom. The written step covers workholding and tool use.

Scroll or swipe the enlarged drawing to read its dimensions. Choose Fit to see the whole drawing again.
The rail-to-leg joints are still visible from below; inspect them before the floor hides their tops.
Check: The frame stands without rocking on a flat floor, all 56 frame screws are sound and the rail-to-leg joints show no movement.
- 12
Fit and fasten the floor boards
Lay H0 and H1 between the legs against each side wall, resting 1.5 in on each rail. Lay G0 to G6 across the rails with their ends against walls B. Use 3/16-in spacers so there are eight equal gaps across the 26 in between the legs. Drill pilots and drive 2 screws per G and 2 per H at the marked positions.
Close-up · Whole model shows the complete part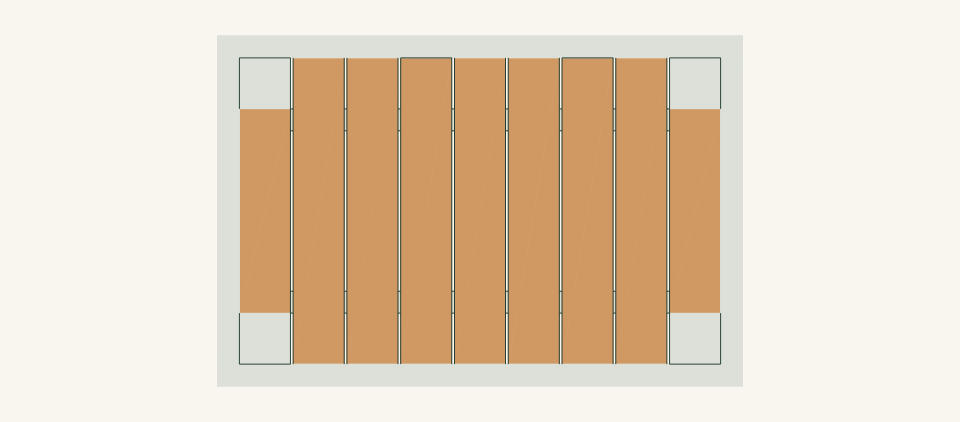
Loading the 3D view…
Drag to turn. Pinch or use + / − to zoom. The written step covers workholding and tool use.
Scroll or swipe the enlarged drawing to read its dimensions. Choose Fit to see the whole drawing again.
Spacers set eight equal drain gaps before any floor screw goes in.
Check: Eight 3/16-in gaps are visible, every board bears on both rails, and all 18 floor screws are flush.
- 13
Place the empty planter and fit the liner
With a helper, carry the empty planter by the lower stretchers E to the approved surface. Do not lift it by one wall. Set all four legs A down and check that each one bears. Check level across the width and depth on the wall tops. Lay liner M over the floor, slit it around the legs and turn 2 in up the walls without covering the outside faces.
Close-up · Whole model shows the complete partLoading the 3D view…
Drag to turn. Pinch or use + / − to zoom. The written step covers workholding and tool use.
Scroll or swipe the enlarged drawing to read its dimensions. Choose Fit to see the whole drawing again.
All four leg bottoms must bear on the approved surface before the liner goes in.
Check: All four legs bear without rocking, the wall tops read level both ways, and the liner lies flat over the drain gaps.
- 14
Fill in stages and test drainage
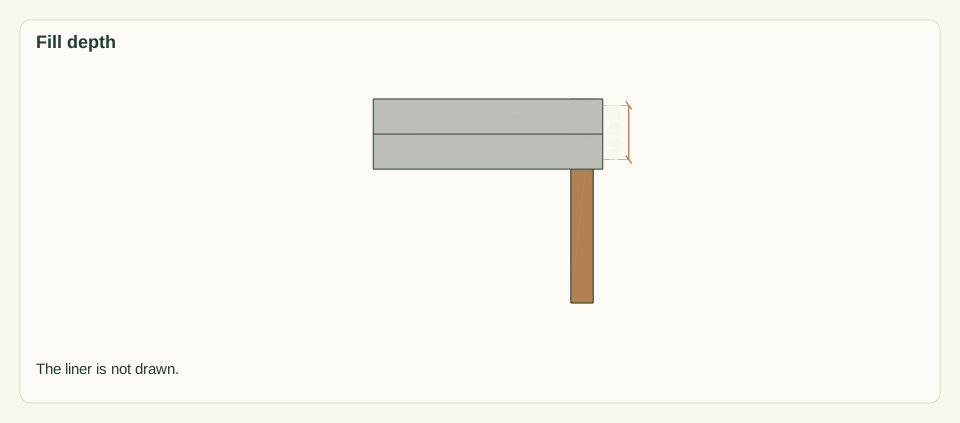
Mark the fill line inside the walls 8.5 in above the floor top, 1 in below the rim. Add the selected growing medium in passes of about 2 in, spread evenly. After each pass, check the legs, rail joints and wall corners. Water lightly after the first half and watch it drain out through the floor gaps. Stop and unload if anything moves.
Close-up · Whole model shows the complete part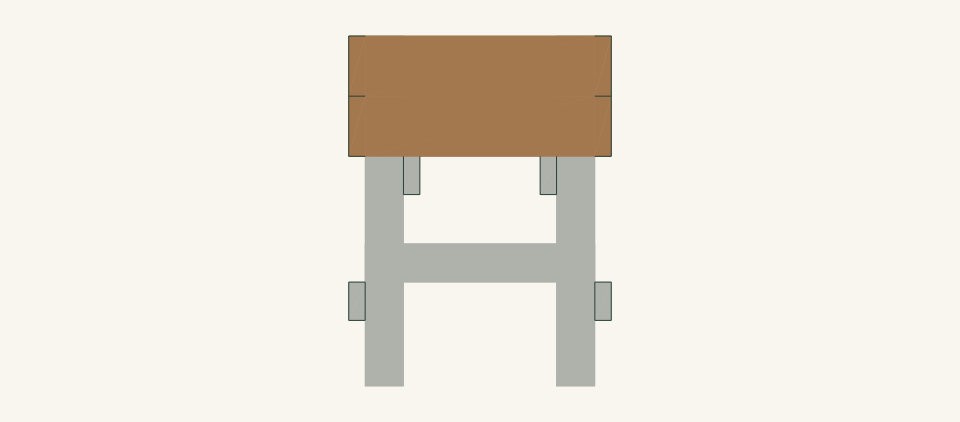
Loading the 3D view…
Drag to turn. Pinch or use + / − to zoom. The written step covers workholding and tool use.

Scroll or swipe the enlarged drawing to read its dimensions. Choose Fit to see the whole drawing again.
Watch the walls and legs between fill passes.
Check: The fill stops at the 8.5-in line, water drains through the floor, and no joint, wall or leg has moved.


05 / Keep it sound
Care
After the build
- Place the planter only on the accepted surface, with all four legs bearing and the wall tops level. Fill only after the frame inspection and the reviewer's confirmation.
- Keep the fill at or below the 8.5-in line. Check the joints after the first full watering and again after the first week.
Check it each season
- Inspect the rail-to-leg screws, the leg bottoms and the floor boards at the start of each season and after any heavy rain. Unload before tightening or replacing a part.
- Keep the drain gaps clear and the leg bottoms out of standing water. Replace a softened or cracked leg, rail or floor board as a whole part; never patch it with extra screws.
If something looks wrong
- Planter rocks on its legs
- Unload it and check the surface and leg ends. Correct the surface or recut the leg ends square; do not wedge loose scraps under a leg.
- Floor board sags or a rail joint opens
- Stop watering, remove the soil until the floor is clear and inspect the D screws and the legs. Replace damaged parts before refilling.
- Water stays on the surface
- Check whether the liner or fine medium has blocked the floor gaps. Clear the gaps; do not drill holes in the walls or legs.
- Frame leans sideways
- Unload it immediately. Check the E and F stretcher screws and the leg plumb. Have the racking resistance reviewed before reuse.
- Wall course bows outward
- Remove fill down below the bow and inspect the B or C screws. Keep the fill at or below the 8.5-in line.
Keep exploring