Wooden raised beds · Guide 38
Build a Deep-Access U-Shaped Cedar Raised Bed
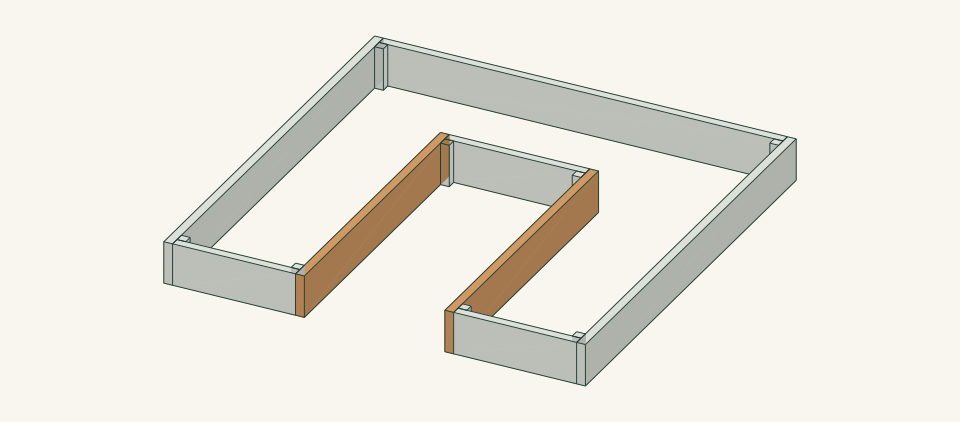
A 72-inch-square cedar bed with a deep central working path and low planting bands. This square-cut U-shaped layout is an access variant, not a circular keyhole or compost-basket design.
01 / See the shape
View the project
Loading the 3D view…
Drag to turn. Pinch or use + / − to zoom. The written step covers workholding and tool use.

Scroll or swipe the enlarged drawing to read its dimensions. Choose Fit to see the whole drawing again.
After watering, check the channel walls first. They carry soil on one side and have no restraint at mid-length.
02 / Plan your build
Before you start
A 72-inch square bed is too deep to reach across from its edges. This design cuts a 24-inch-wide, 48-inch-deep access channel into the square from the front. That leaves a U of soil bands, each 21 inches wide, that can be worked from two sides. This deep-access U-shaped variant uses square walls instead of a curved perimeter. Every cut is a square crosscut, every butt joint is backed by an inside cedar block, and each wall states whether it runs through or fits between. The main failure is a joint built the wrong way round. A screw driven into end grain, a block placed on the wrong side of a wall, or a wall cut to the wrong through or between length will let soil pressure open the corner or push a channel wall into the path. The design has no center compost basket. A basket is a separate system that has not been reviewed.
Where it goes
Level native garden soil with a clear 108 × 108-inch area that includes working access. Do not place it on paving, a deck, a roof, a slope, against a building or over buried services.
Footprint: 72 × 72 in outside, plus 18 in of clear working access on every side and at the channel mouth: a 108 × 108-in area
What to expect
Measure accurately, make supported square crosscuts and drill clamped screw joints. Plan 7–9 hours for two people including layout, leveling and filling, excluding delivery and sourcing of growing medium.
A planning estimate for the hands-on work, once the materials are bought and the tools are set up. It has not been timed on a finished build.
Check the spot
- Level native garden soil with a clear 108 × 108-in area including access. Not on paving, a deck, a roof, a slope or against a building.
- Buried utilities, private irrigation and large roots are located before any digging.
- Past land use and soil contamination are known for an open-bottom edible bed.
- The intended gardener can reach every marked soil area from the string mock-up.
Stop and check first if…
- Stop before ground disturbance if buried services, irrigation lines, large roots or past contamination are unresolved.
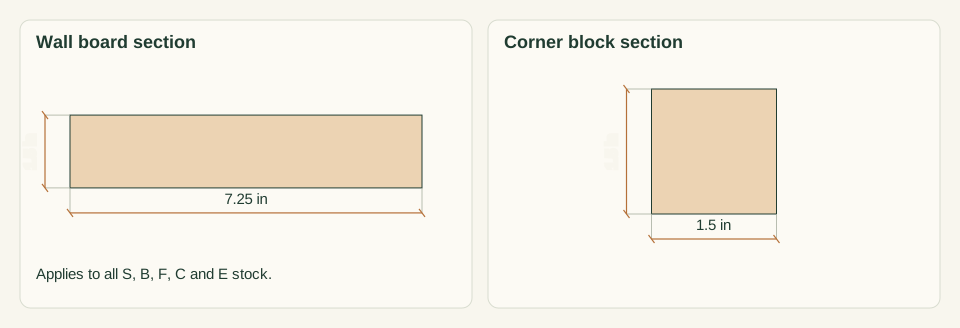
- Stop if the measured wall stock is not 1.5 × 7.25 in or the block stock is not 1.5 × 1.5 in. Different stock needs a reconciled design.
- Stop if a K block splits, a screw strips or the screw instructions cannot be met in a 1.5-in block. Replace the part and get qualified advice on the joint.
- Stop filling if any wall moves, bows or opens at a joint. Remove the fill against that wall before repair.
- Do not add a compost basket, a second course, legs or a floor without a new design review.
Work safely
- Follow the saw and drill instructions and keep the guards in place. Cut K blocks against a stop block with the stock clamped; never hold a 7.25-in block beside a blade.
- Clamp each wall to its block before drilling. A drill that catches can spin an unclamped block.
- Carry 72-in boards with two people. Keep hands out of a closing butt joint while clamping.
- Lift soil bags with your legs and fill from the channel or the outside. Never stand on the rim.
Budget
We have not put a price on this one yet. Lumber and hardware prices change by store and season, so price the list under What you need at your local supplier before you buy.
03 / Gather and cut
What you need
S — Side wall (runs through full depth)
2 pieces
Untreated western red cedar 2 × 8; actual 1.5 × 7.25 in as measured. Record the grade selected. Boards 1 and 2 of five 2 × 8 × 8-ft boards. Each board yields one 72-in S plus one 21-in F: 72 + 21 + 0.125 kerf + 0.5 trim at each end = 94.125 ≤ 96 in.
Reject boards with splits, loose knots within 3 in of an end, or visible twist. The measured section governs, not the nominal label.
B — Back wall (fits between S)
1 piece
Same cedar 2 × 8; actual 1.5 × 7.25 in. Board 3 yields one 69-in B plus one 24-in E: 69 + 24 + 0.125 + 1 = 94.125 ≤ 96 in.
Confirm 72 − 2 × measured S thickness before cutting. Stop if the result is not 69 in.
F — Front wall segment (fits between S and C)
2 pieces
Same cedar 2 × 8; actual 1.5 × 7.25 in. One from each of boards 1 and 2. See part S.
Both segments are identical. Each has an outer end at S and an inner end at C.
C — Channel wall (runs from front edge to back of E)
2 pieces
Same cedar 2 × 8; actual 1.5 × 7.25 in. Boards 4 and 5, one C each. Two C need 99 in, which does not fit one 96-in board. Each board leaves about 45 in of offcut; keep it for test joints.
Mark the front end of each C. All C screw lines are measured from that front end.
E — Channel end wall (fits between C)
1 piece
Same cedar 2 × 8; actual 1.5 × 7.25 in. From board 3. See part B.
The E length sets the 24-in clear channel width. Cut it square and check it with a square before assembly.
K — Inside corner block
8 pieces
Untreated western red cedar 2 × 2; actual 1.5 × 1.5 in as measured. One 2 × 2 × 8-ft: 8 × 7.25 = 58 + 7 kerfs × 0.125 + 1 trim = 59.875 ≤ 96 in.
Reject stock with checks or knots. A split block cannot be repaired with an extra screw.
Corner block screws
32 items
#9 × 2-1/2 in Type 316 or 305 stainless wood screws, exterior and soil-adjacent exposure, compatible with cedar Buy at least 32 plus spares for scrap test joints. Use one product throughout.
Two screws per wall face per K block: 8 blocks × 2 faces × 2 = 32. Follow the product pilot, clearance and edge-distance instructions. No connection capacity is inferred.
Cut list
| Piece | How many | Cut length | Note |
|---|---|---|---|
| S — Side wall (runs through full depth) | 2 | 72 × 7.25 × 1.5 in | Finished length × width × thickness; square ends unless the detail says otherwise. |
| B — Back wall (fits between S) | 1 | 69 × 7.25 × 1.5 in | Finished length × width × thickness; square ends unless the detail says otherwise. |
| F — Front wall segment (fits between S and C) | 2 | 21 × 7.25 × 1.5 in | Finished length × width × thickness; square ends unless the detail says otherwise. |
| C — Channel wall (runs from front edge to back of E) | 2 | 49.5 × 7.25 × 1.5 in | Finished length × width × thickness; square ends unless the detail says otherwise. |
| E — Channel end wall (fits between C) | 1 | 24 × 7.25 × 1.5 in | Finished length × width × thickness; square ends unless the detail says otherwise. |
| K — Inside corner block | 8 | 7.25 × 1.5 × 1.5 in | Finished length × width × thickness; square ends unless the detail says otherwise. |
Tools
- Tape measure, framing square, pencil, stakes and string
- 4-ft level and an 8-ft straight board
- Spade, rake and flat shovel for leveling
- Guarded saw suited to 2 × 8 and 2 × 2 cedar, with a supported bench and stop block
- Drill/driver with bits matched to the selected screw's clearance and pilot instructions
- At least four bar clamps that open past 3 in
- Fine abrasive and a dust brush
Protective gear
- Eye protection during cutting and drilling
- Hearing protection and dust control matched to the actual saw
- Closed footwear and work gloves for handling boards; keep gloves away from rotating cutters
04 / Put it together
Build steps
- 01
Confirm the site and mock up reach
Choose level native garden soil that gets the light your crops need. Lay out a 72 × 72-inch square with stakes and string. Mark the 24-inch-wide, 48-inch-deep channel from the front edge. Stand in the marked channel and kneel at each outside edge. Reach to the middle of each 21-inch band and to both back corners. Locate utilities, irrigation lines and large roots before disturbing any ground.
Close-up · Whole model shows the complete part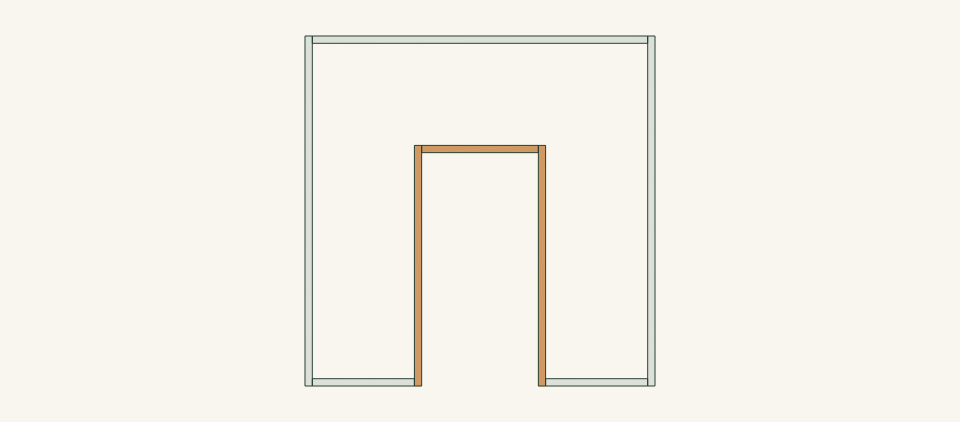
Loading the 3D view…
Drag to turn. Pinch or use + / − to zoom. The written step covers workholding and tool use.
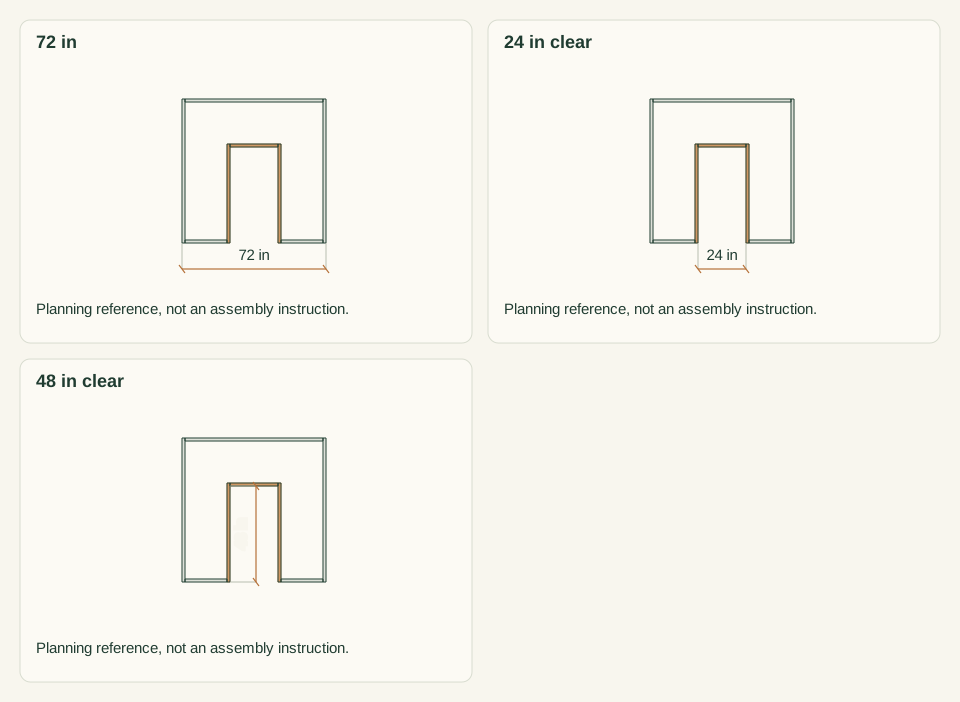
Scroll or swipe the enlarged drawing to read its dimensions. Choose Fit to see the whole drawing again.
Planning reference only. The wall lines show where to run string for the square and the channel before any cutting.
Check: The intended gardener reaches every marked soil area without stepping inside the square, and no buried service is unresolved.
- 02
Measure and record the stock
Measure each of the five 2 × 8 boards at both ends and the middle. This design requires 1.5-inch thickness and 7.25-inch height. Measure the 2 × 2 at 1.5 × 1.5 inches. Sight each piece for twist, bow and splits. Mark unusable ends and record the usable length of every board before marking any part.
Close-up · Whole model shows the complete part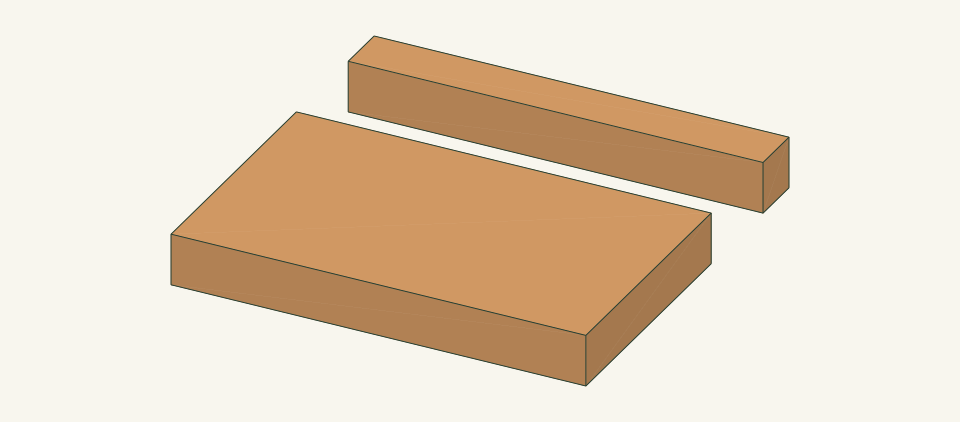
Loading the 3D view…
Drag to turn. Pinch or use + / − to zoom. The written step covers workholding and tool use.
Scroll or swipe the enlarged drawing to read its dimensions. Choose Fit to see the whole drawing again.
Compare the actual board and block sections with the sections the design depends on.
Check: Five wall boards measure 1.5 × 7.25 in with at least 94.125 in usable each, and the 2 × 2 has at least 60 in usable.
- 03
Clear and level the bed area
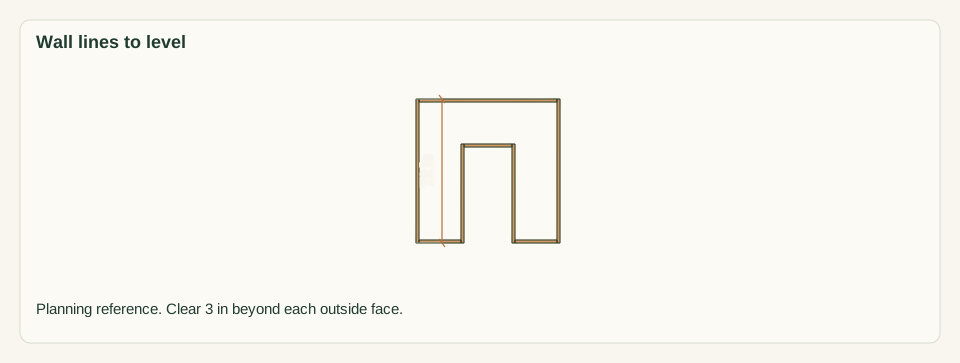
Remove turf and debris from a 78 × 78-inch area centered on the string layout. Level the strip under each planned wall line with hand tools. Cut down high spots rather than filling low ones. Check level with a straight board in both directions and along both diagonals of the 72-inch square. Keep the existing runoff path open and do not build a berm.
Close-up · Whole model shows the complete part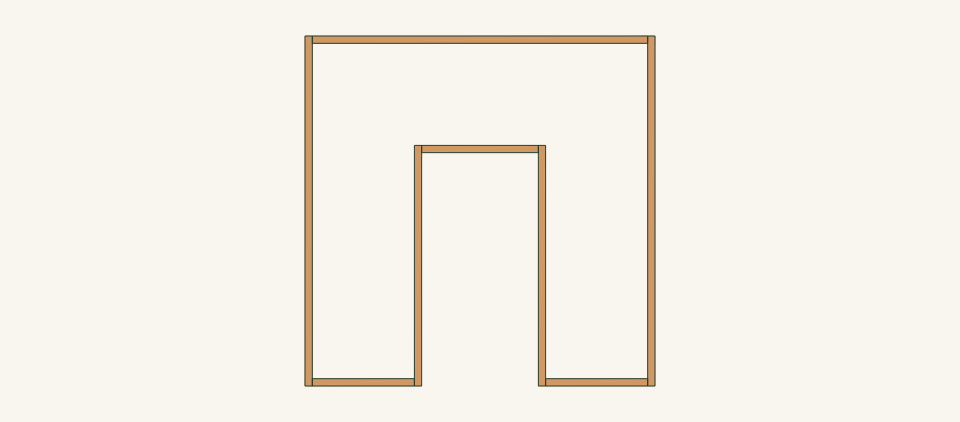
Loading the 3D view…
Drag to turn. Pinch or use + / − to zoom. The written step covers workholding and tool use.
Scroll or swipe the enlarged drawing to read its dimensions. Choose Fit to see the whole drawing again.
Planning reference only. Level the ground strip under every wall line shown.
Check: Each wall line is within a proposed 1/4 in of level over 72 in, and no drainage path is blocked.
- 04
Cut the wall parts
Number the five 2 × 8 boards and square one datum end on each. Cut S at 72 in and F at 21 in from boards 1 and 2. Cut B at 69 in and E at 24 in from board 3. Cut one C at 49.5 in from each of boards 4 and 5. Keep the kerf on the waste side of each line. Support both sides of every cut. Write the part letter on the top edge of each piece and mark the front end of each C.
Close-up · Whole model shows the complete part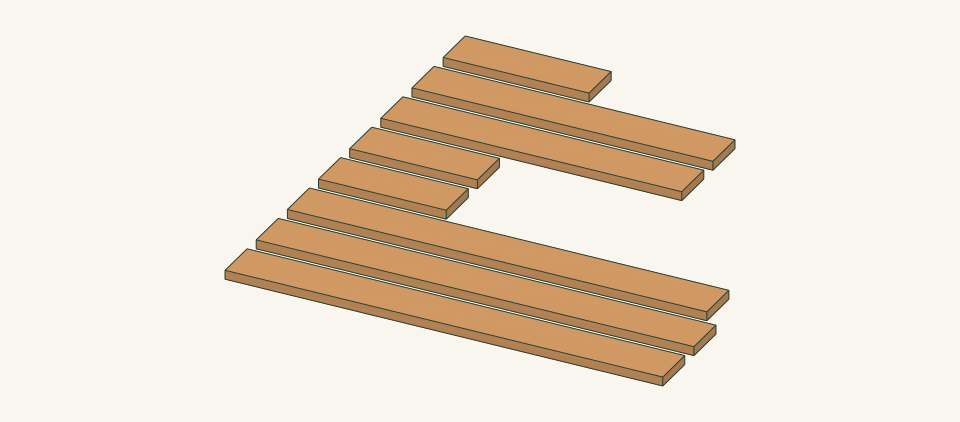
Loading the 3D view…
Drag to turn. Pinch or use + / − to zoom. The written step covers workholding and tool use.
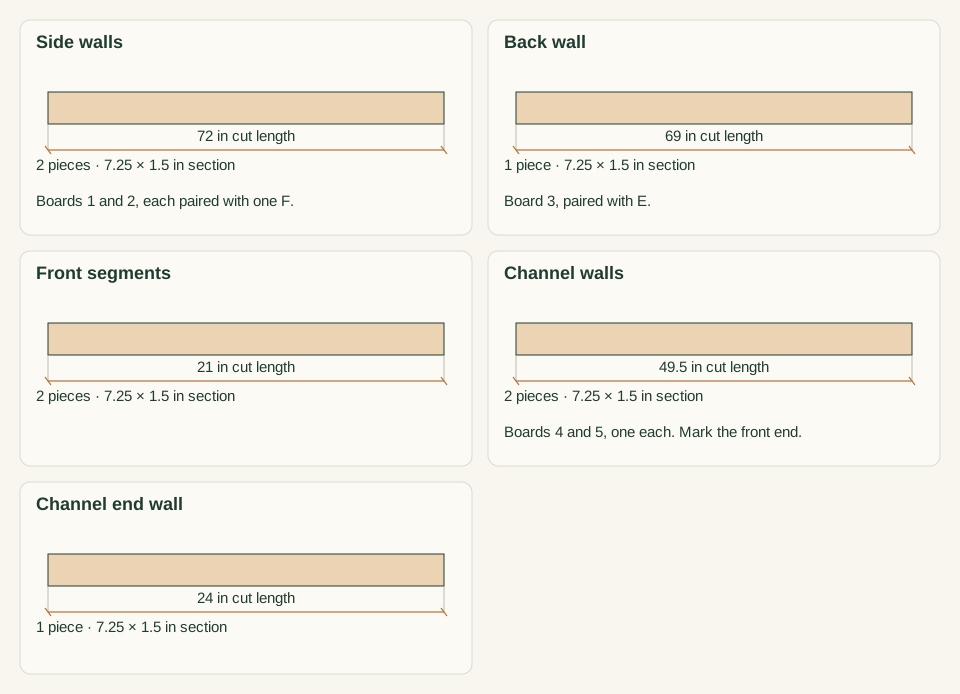
Scroll or swipe the enlarged drawing to read its dimensions. Choose Fit to see the whole drawing again.
The eight wall pieces come from five boards in the stated pairings.
Check: Like parts match face to face: S 72, B 69, F 21, C 49.5 and E 24 in, all with square ends.
- 05
Cut the eight corner blocks
Clamp the 2 × 2 on a supported bench with a stop block set at 7.25 in. Cut eight K blocks and label them K0 through K7. Never hold a short block by hand beside the blade. Stand each K beside a wall offcut to check that it is flush with the 7.25-inch wall height.
Close-up · Whole model shows the complete part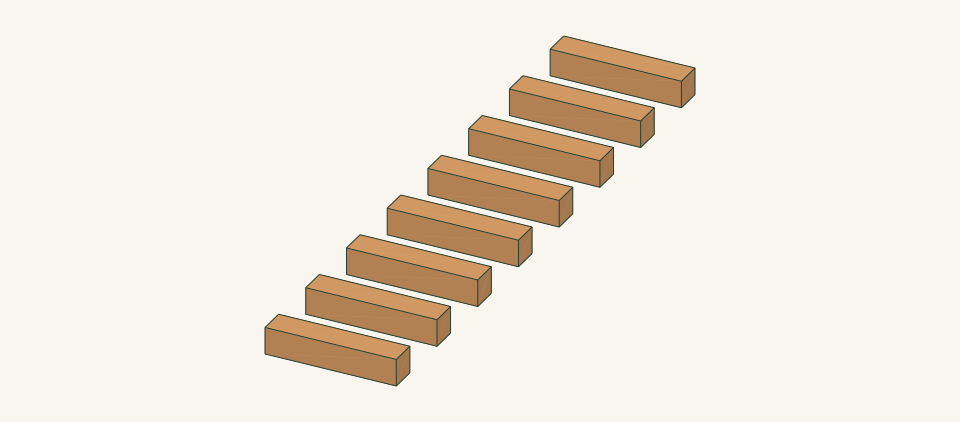
Loading the 3D view…
Drag to turn. Pinch or use + / − to zoom. The written step covers workholding and tool use.
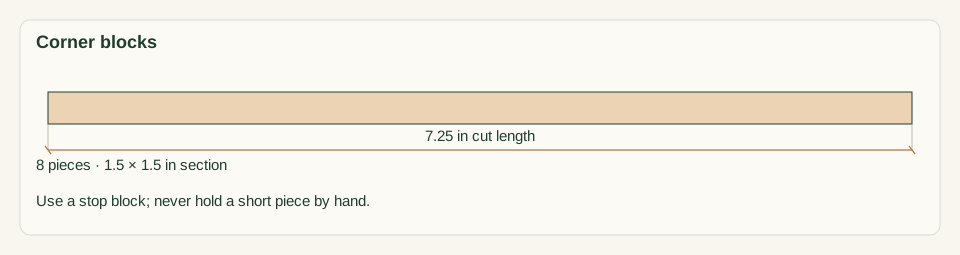
Scroll or swipe the enlarged drawing to read its dimensions. Choose Fit to see the whole drawing again.
All eight blocks are cut against one stop so they match the wall height.
Check: Eight K blocks are 7.25 in long, square-ended and free of checks.
- 06
Mark and drill wall clearance holes
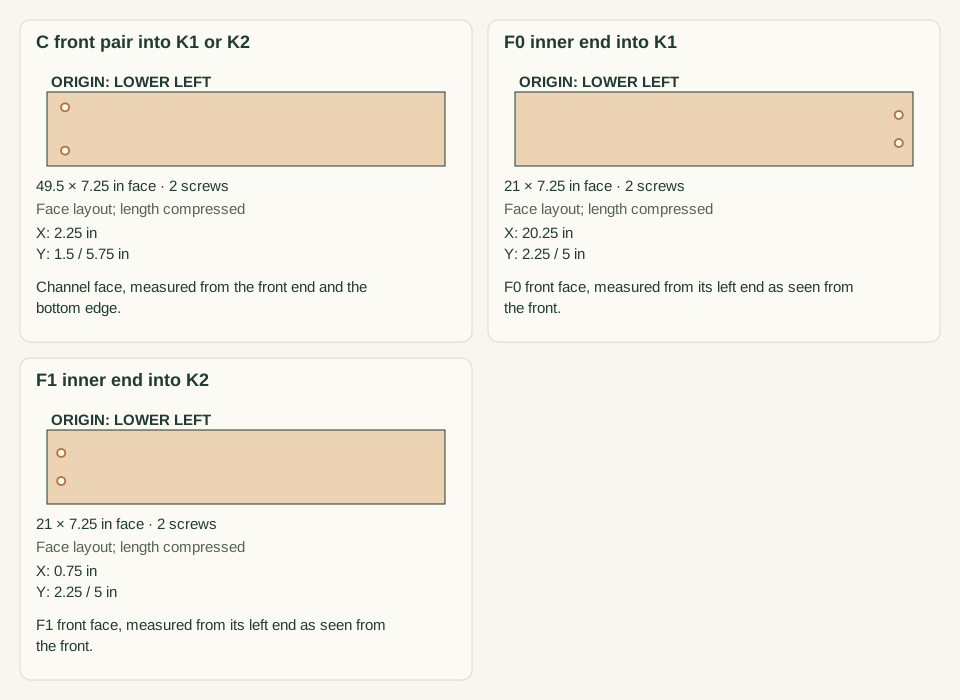
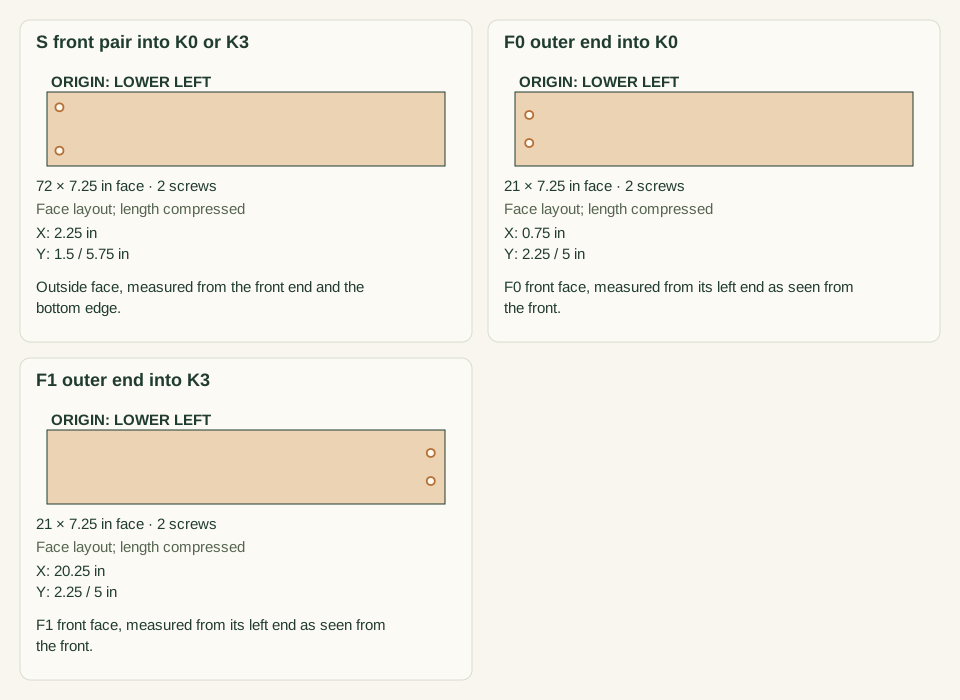
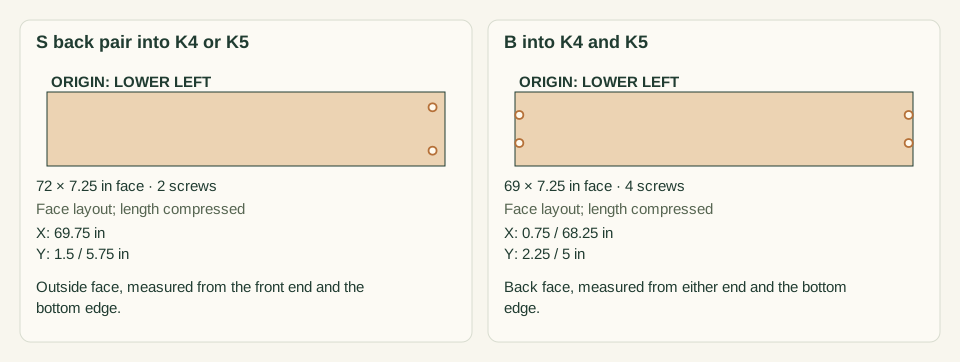
Use the wall bottom edge as the height datum. On S, mark lines 2.25 in from each end with holes at 1.5 and 5.75 in. On C, mark lines 2.25 and 47.25 in from the front end at 1.5 and 5.75 in. On F, B and E, mark lines 0.75 in from each end at 2.25 and 5.0 in. Mark on the entry face: the outside face for S, F and B, the soil face for E, the channel face for the C front holes and the soil face for the C back holes. Clamp each wall over sacrificial backing. Drill the clearance holes through the wall only.
Close-up · Whole model shows the complete part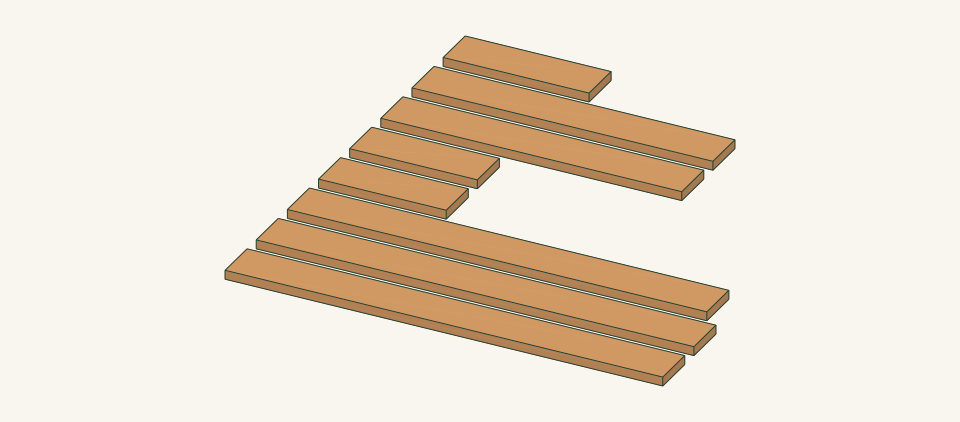
Loading the 3D view…
Drag to turn. Pinch or use + / − to zoom. The written step covers workholding and tool use.
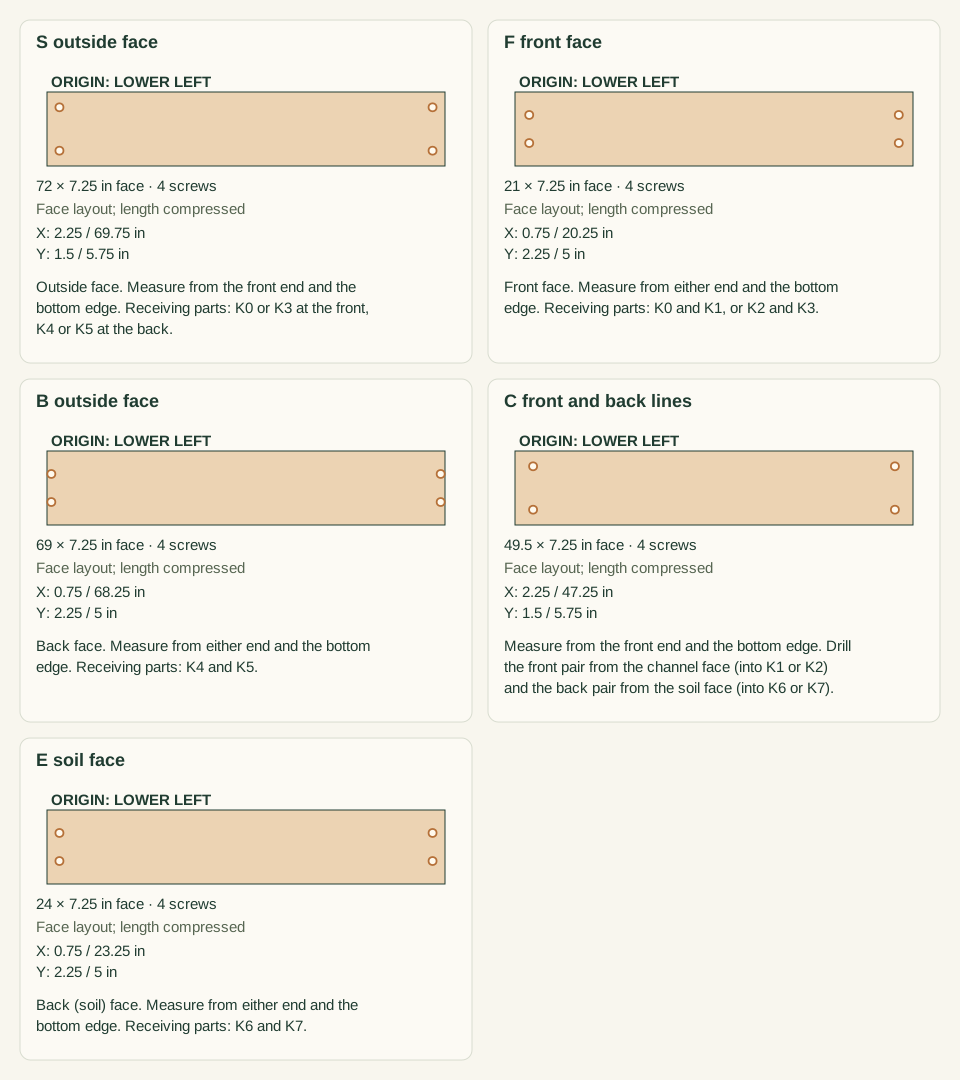
Scroll or swipe the enlarged drawing to read its dimensions. Choose Fit to see the whole drawing again.
Each wall gets its own staggered pattern so perpendicular screws pass at different heights in the block.
Check: 32 clearance holes are drilled, each on its stated entry face, and none is drilled into a K block.
- 07
Assemble the channel end
Stand C0 and C1 on edge on the leveled site with their inner faces 24 in apart and their front ends on the front string. Set E between them with its back face flush with the C back ends at 49.5 in. Place K6 and K7 in the two channel-side corners against E, flush at top and bottom. Clamp each K to C and E. Drill the product pilots into K through the C back holes from the soil face and through the E holes. Drive 8 screws.
Close-up · Whole model shows the complete part
Loading the 3D view…
Drag to turn. Pinch or use + / − to zoom. The written step covers workholding and tool use.
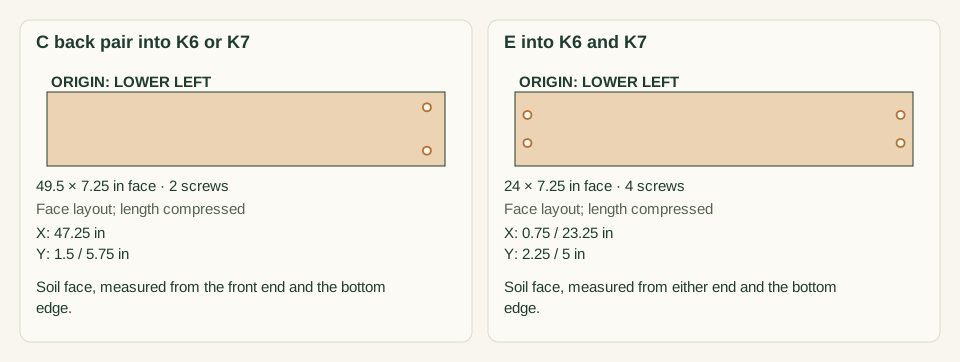
Scroll or swipe the enlarged drawing to read its dimensions. Choose Fit to see the whole drawing again.
The blocks sit inside the channel, so soil pressure on E bears against them. All screws here are driven from the soil side.
Check: The channel measures 24 in between the C inner faces at the front ends and at 45 in back, and 8 screws are seated with no split K.
- 08
Attach the front segments
Set F0 against the soil face of C0 with its front face flush with the C0 front end. Set F1 against C1 the same way. Place K1 in the soil-side corner of F0 and C0. Place K2 at F1 and C1. Set both blocks flush at top and bottom and clamp them. Pilot and drive two screws through each F inner-end hole. Drive two screws through each C front hole from the channel face. This step installs 8 screws.
Close-up · Whole model shows the complete part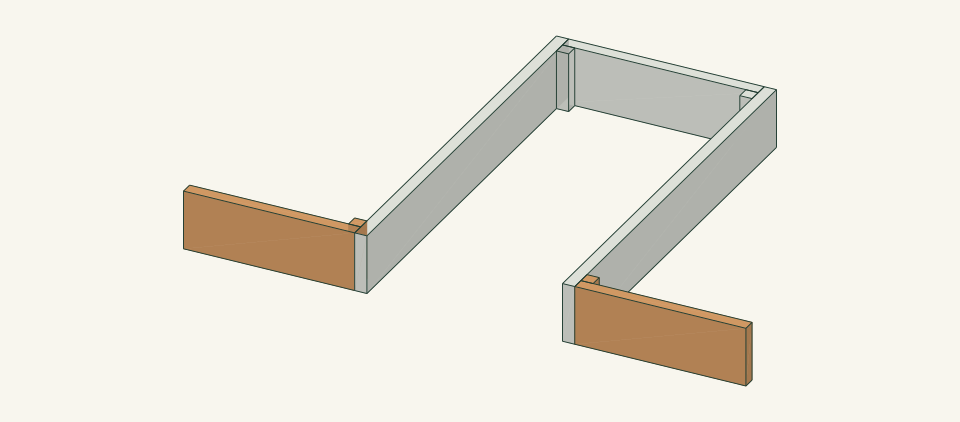
Loading the 3D view…
Drag to turn. Pinch or use + / − to zoom. The written step covers workholding and tool use.
Scroll or swipe the enlarged drawing to read its dimensions. Choose Fit to see the whole drawing again.
The front segments butt against the soil faces of the channel walls and are backed by K1 and K2.
Check: F0 and F1 each extend 21 in from the channel walls along one straight front line, and 8 screws are seated.
- 09
Fit the side walls at the front corners
Set S0 against the outer end of F0 and S1 against F1. Keep the S front ends flush with the F front faces. Place K0 and K3 in the front soil-side corners. Square each corner with a framing square and clamp it. Pilot and drive two screws through each S front hole and two through each F outer-end hole. This step installs 8 screws. Support the free back ends of S0 and S1 so they stay on edge.
Close-up · Whole model shows the complete part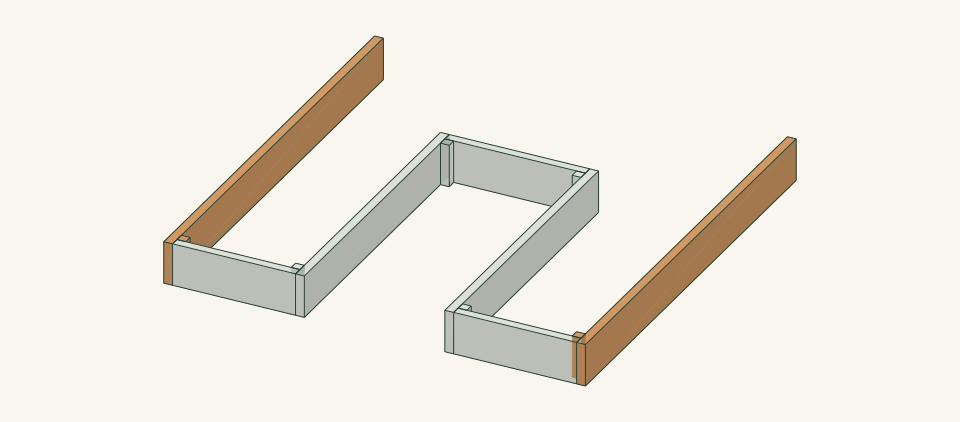
Loading the 3D view…
Drag to turn. Pinch or use + / − to zoom. The written step covers workholding and tool use.
Scroll or swipe the enlarged drawing to read its dimensions. Choose Fit to see the whole drawing again.
The side walls run through past the front segments, so the front corners close against K0 and K3.
Check: The front line measures 72 in outside, both front corners are square, and 8 screws are seated.
- 10
Close the back wall and square the frame
Set B between S0 and S1 with its back face flush with the S back ends at 72 in. Place K4 and K5 in the back corners. Measure both outside diagonals; the design value is 101.82 in. Rack the frame until the diagonals differ by no more than 1/8 in, a proposed shop target. Clamp the joints. Pilot and drive two screws through each S back hole and four through B. This step installs 8 screws. Measure the diagonals again.
Close-up · Whole model shows the complete part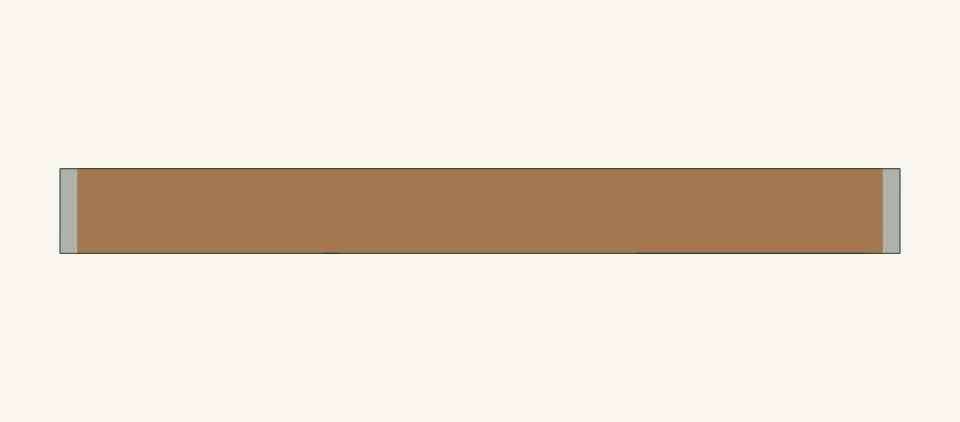
Loading the 3D view…
Drag to turn. Pinch or use + / − to zoom. The written step covers workholding and tool use.
Scroll or swipe the enlarged drawing to read its dimensions. Choose Fit to see the whole drawing again.
The back wall fits between the side walls. Square the frame on its diagonals before driving these screws.
Check: The outside measures 72 × 72 in, the diagonals agree within 1/8 in, and all 32 screws are installed.
- 11
Inspect every joint before filling
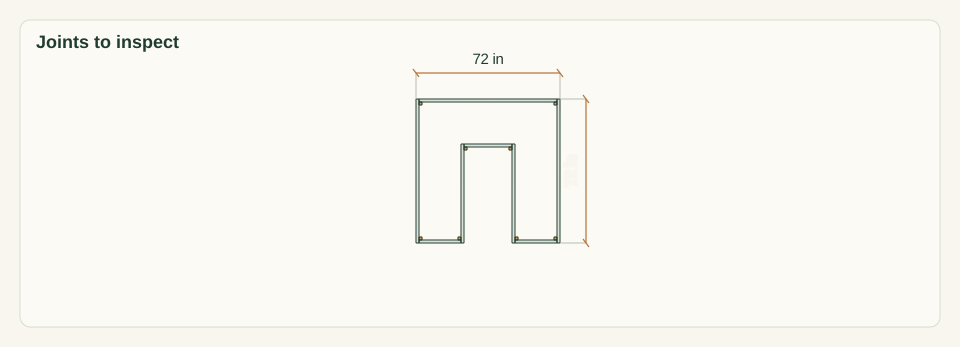
Release all clamps. Check each of the eight K blocks for splits, stripped holes and screw points showing at a face. Confirm that every wall bears on soil along its full length with no gap over 1/4 in. Check that the rim is level within 1/4 in across 72 in. Sight along S0, S1, C0 and C1 and record any bow. Ease the hand-contact rim edges and remove splinters.
Close-up · Whole model shows the complete part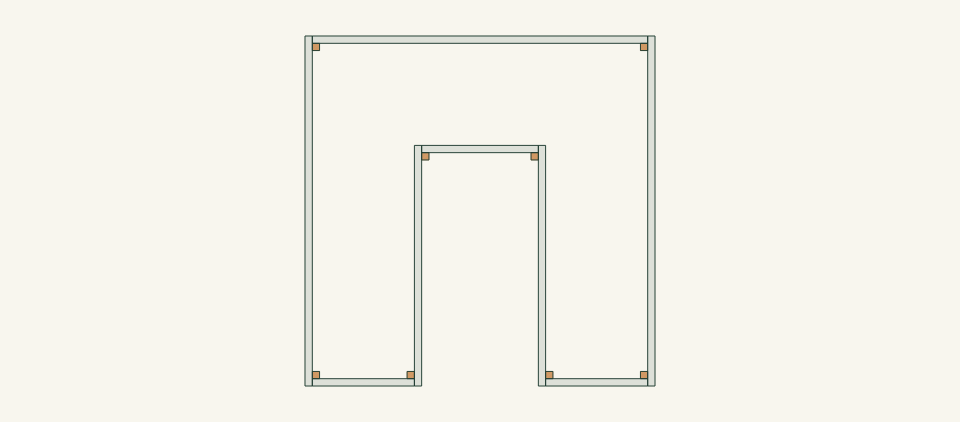
Loading the 3D view…
Drag to turn. Pinch or use + / − to zoom. The written step covers workholding and tool use.
Scroll or swipe the enlarged drawing to read its dimensions. Choose Fit to see the whole drawing again.
All eight block joints are still visible from above. Inspect them now, before fill covers them.
Check: All 32 screws are sound, every wall bears on soil, and any bow is recorded before fill hides the joints.
- 12
Mark the fill line and fill in passes
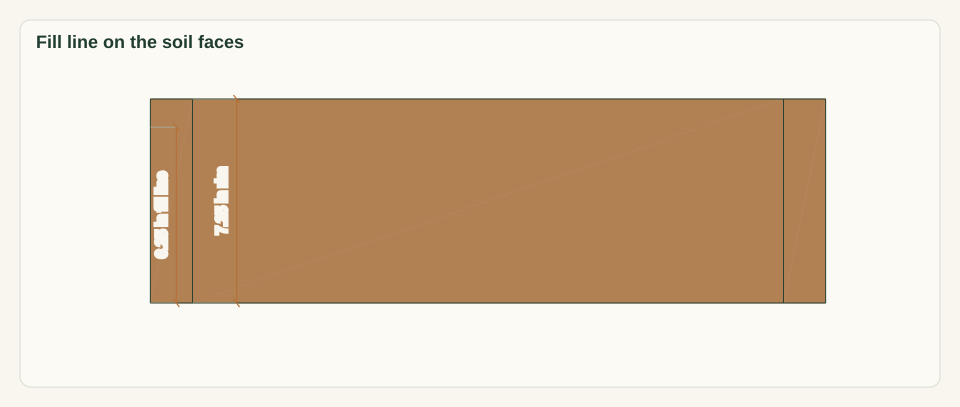
Mark a fill line 6.25 in above the ground on the soil faces of S, F, B, C and E. Add the selected growing medium in shallow passes around the U. Alternate between bands so no single wall takes the full fill at once. Plan for about 12.5 cu ft loose. Keep the 24-in channel clear and do not stand on the rim. Stop if any wall moves, bows or opens at a K joint.
Close-up · Whole model shows the complete part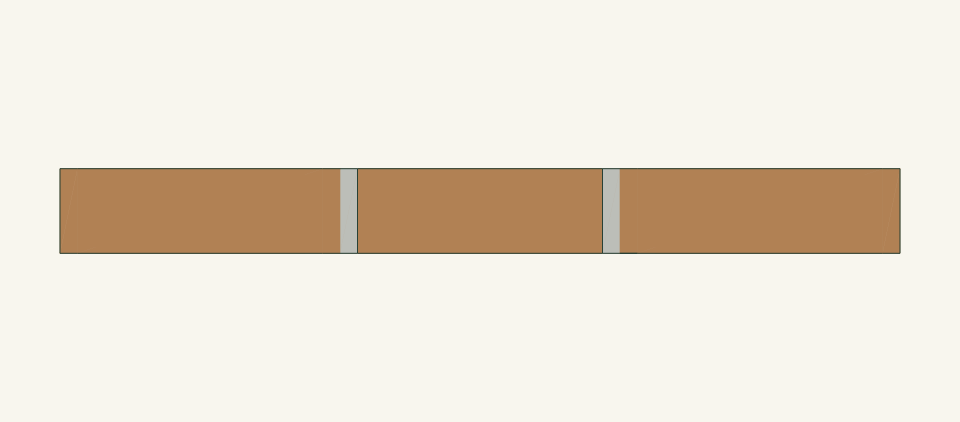
Loading the 3D view…
Drag to turn. Pinch or use + / − to zoom. The written step covers workholding and tool use.
Scroll or swipe the enlarged drawing to read its dimensions. Choose Fit to see the whole drawing again.
The fill line leaves 1 in of freeboard below the rim. The channel stays empty.
Check: Fill reaches the 6.25-in line, 1 in below the rim, with the channel clear and no joint opening.
- 13
Water, settle and record the first inspection
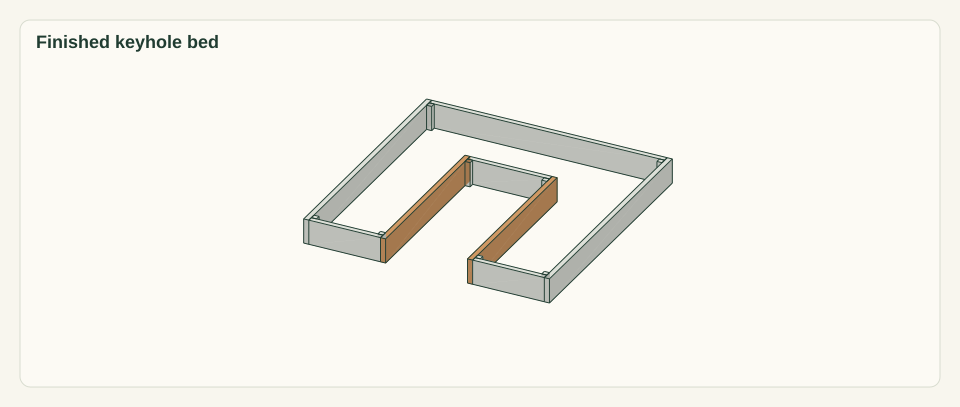
Water slowly in passes using the planned method. Watch the channel floor and the outside wall bottoms for ponding or soil washing out. After settling, measure the diagonals again. Check the C walls at the channel mouth and at mid-length, and check every K joint. Top up only to the 6.25-in line. Record the date, the measurements and any bow.
Close-up · Whole model shows the complete partLoading the 3D view…
Drag to turn. Pinch or use + / − to zoom. The written step covers workholding and tool use.
Scroll or swipe the enlarged drawing to read its dimensions. Choose Fit to see the whole drawing again.
After watering, check the channel walls first. They carry soil on one side and have no restraint at mid-length.
Check: Water drains without washing soil into the channel, and the 24-in channel width and 101.82-in diagonals are unchanged.


05 / Keep it sound
Care
After the build
- Plant the bands with crops whose mature spread does not lean into the 24-in channel. Keep the channel as a working path.
- Choose crops for the 6.25-in fill depth over the native soil beneath. This open-bottom bed does not isolate roots from the soil below.
Check it each season
- Inspect every K joint, the channel width and both diagonals at the start of each growing season and after heavy rain.
- Replace a softened or split wall or block as a complete part. Remove the adjacent fill before opening a joint.
- Top up settled fill only to the 6.25-in line. Keep the channel floor clear of soil and debris.
If something looks wrong
- Channel wall bows into the path
- Stop filling. Remove the fill against that C wall, check the K1 or K2 and K6 or K7 joints, and get a review of the wall restraint before refilling.
- Frame rocks or a wall shows a gap below it
- Before filling, lift the frame with two people and correct the ground under that wall line. Do not wedge it with scraps.
- Diagonals no longer agree
- Find the joint that has moved. Remove the fill against it, re-square the frame and replace any stripped screw or split block.
- Soil washes into the channel
- Check for a gap under C or E. Water more slowly, and correct the ground contact with that wall emptied.
- Cannot reach the back corners comfortably
- Do not stand in the bed. Plant the corners with low-care crops, or rebuild with narrower bands after a new layout review.
Keep exploring