Wooden raised beds · Guide 33
Build a Seated-Height Cedar Raised Planter
Build a cedar planter with a 6-inch soil box and a 36.25-inch rim, open underneath so a seated gardener can work with knees under the front edge.
01 / See the shape
View the project
Loading the 3D view…
Drag to turn. Pinch or use + / − to zoom. The written step covers workholding and tool use.

Scroll or swipe the enlarged drawing to read its dimensions. Choose Fit to see the whole drawing again.
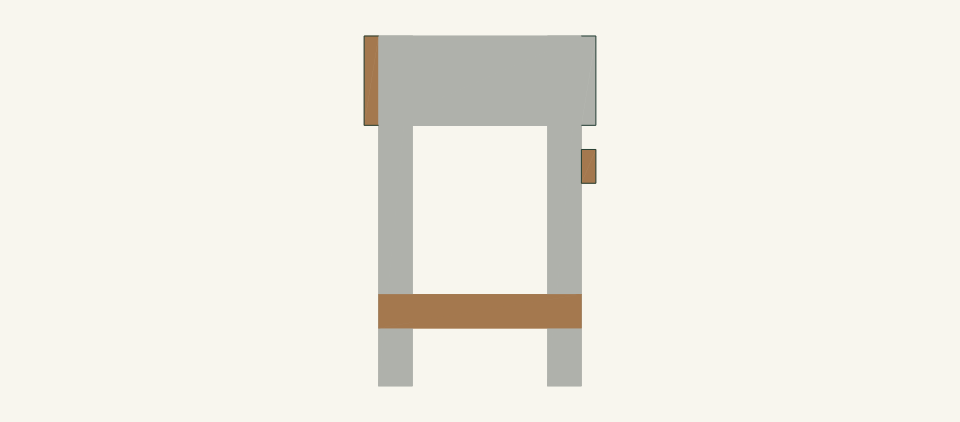
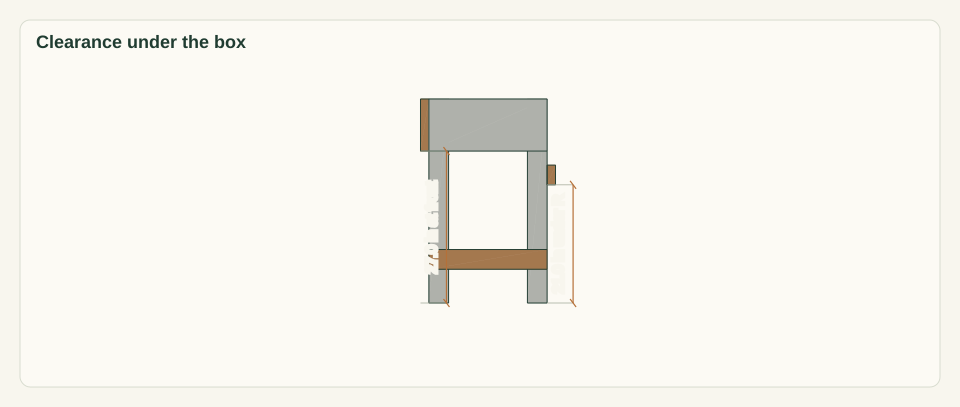
The side view shows where knees and feet pass beneath the box.
02 / Plan your build
Before you start
This planter keeps the soil box shallow and high so the space under it stays open. The four 4 × 4 legs run up to the rim and act as the corner posts. All four walls are screwed to them. The floor sits on ledgers flush with the wall bottoms, so nothing hangs below 27.0 inches across the front. The low braces run only along the two ends, and the rear brace sits high at the back. That leaves a 38.75-inch-wide, 27.0-inch-high knee opening between the front legs. The design fails in two main ways. A brace added low across the front, or a deeper box, blocks the knees. Overfilling, deepening the box or using split stock overloads the screwed wall-to-leg and ledger joints, which carry all of the wet soil. The rim height and reach suit some seated users and not others. Mock up the approach with the actual user before cutting.
Where it goes
Use firm, level paving or compacted ground with a clear, flat seated approach in front. Do not place it on a deck, roof, slope, soft lawn or wall edge.
Footprint: 48.75 × 24 in planter. Add the clear, flat seated approach in front recorded in the step 1 mock-up, and working access at one end
What to expect
Measure and square a frame, make supported cuts in 4 × 4 stock and drill clamped screw joints. Plan 7–9 hours, including the user mock-up, cutting, notching, assembly and liner fitting. Allow extra time for staged filling and the first inspection.
A planning estimate for the hands-on work, once the materials are bought and the tools are set up. It has not been timed on a finished build.
Check the spot
- Firm, level paving or compacted ground at least 48.75 × 24 in, plus the seated approach recorded in the mock-up. Not on a deck, roof, slope, soft lawn or wall edge.
- Utility and irrigation lines are identified before any ground work, and sun and water access suit the intended crops.
- The work area is flat and large enough to clamp a 48.75-in wall without reaching across a moving cutter.
Stop and check first if…
- Stop if the mock-up shows the user cannot clear 27.0 in or reach 22.5 in. Do not change dimensions without reconciling the parts, joints and review.
- Stop if any stock section differs from the listed actual size, or if a leg top, wall end or ledger splits during drilling.
- Stop before filling until a technical reviewer has accepted the wall-to-leg and ledger screw joints for the selected medium's saturated weight.
- Stop filling and unload if a joint opens, a floor board sags, a leg lifts or the frame rocks.
Work safely
- Clamp every workpiece and support long offcuts. Never hold a 4 × 4 or a notched board by hand beside a moving blade. Keep guards in place.
- Cut the M notches with the board clamped over sacrificial backing, and let the blade stop before lifting it out of the corner.
- Lift and move the planter only when empty, with two people holding the legs and walls. Never move it while filled.
- Turn off and isolate tools before changing bits or clearing chips.
Budget
We have not put a price on this one yet. Lumber and hardware prices change by store and season, so price the list under What you need at your local supplier before you buy.
03 / Gather and cut
What you need
P — Leg and corner post
4 pieces
Untreated cedar 4 × 4; actual 3.5 × 3.5 in. Two 4 × 4 × 8-ft posts. Cut two 36.25-in legs per post: 72.5 + two 0.125 kerfs + 1 in end trim = 73.75 of 96 in.
Reject checked or split top ends, because the wall screws enter there. Mark the top end of each leg. The leg top is the rim.
F — Front and back wall
2 pieces
Untreated cedar 2 × 10; actual 1.5 × 9.25 in. Two 2 × 10 × 8-ft boards. Each board gives one F at 48.75 and one E at 21: 69.75 + two 0.125 kerfs + 1 in trim = 71 of 96 in.
F runs through the full width. Mark the top edge and the outer face. Reject boards with splits within 6 in of either end.
E — End wall
2 pieces
Untreated cedar 2 × 10; actual 1.5 × 9.25 in. Cut from the same two 2 × 10 boards as F. See F.
E fits between the F inner faces. Check that its length matches the measured gap of 21 in before cutting the second E.
G — Long floor ledger
2 pieces
Untreated cedar 2 × 2; actual 1.5 × 1.5 in. One 2 × 2 × 8-ft board for both G: 77.5 + two 0.125 kerfs + 1 in trim = 78.75 of 96 in.
Fit G to the measured space between the leg inner faces. Reject boards with knots across the section.
H — End floor ledger
2 pieces
Untreated cedar 2 × 2; actual 1.5 × 1.5 in. A second 2 × 2 × 8-ft board: two 14-in pieces = 28 + 0.25 kerf + 1 in trim = 29.25 of 96 in.
H fits between the legs on the E inner face. Confirm the 14-in gap before cutting.
N — Plain floor board
6 pieces
Untreated cedar 1 × 6; actual 0.75 × 5.5 in. Two 1 × 6 × 8-ft boards give all N and M. Four 20.75-in pieces per board = 83 + four 0.125 kerfs + 1 in trim = 84.5 of 96 in. Eight pieces in total make six N and two M.
Reject pieces with loose knots, because they would carry soil. Keep the two straightest pieces for M.
M — Notched end floor board
2 pieces
Untreated cedar 1 × 6; actual 0.75 × 5.5 in. Two of the eight 20.75-in pieces from the 1 × 6 boards. See N.
Notch both ends 3.625 × 3.5 in from the end-wall edge. Make one left and one right piece as mirror images.
S — Side stretcher
2 pieces
Untreated cedar 2 × 4; actual 1.5 × 3.5 in. One 2 × 4 × 8-ft board for both S and R: 42 + 45.75 = 87.75 + three 0.125 kerfs + 1 in trim = 89.125 of 96 in.
S laps the outer end faces of the leg pair. Keep S out of the front opening.
R — Rear stretcher
1 piece
Untreated cedar 2 × 4; actual 1.5 × 3.5 in. Cut from the same 2 × 4 as S. See S.
R laps the back faces of the back legs at 21.0 in above the ground. Cut R first from the straightest length.
Frame screws
32 items
#10 × 3 in stainless steel exterior wood screw (proposed exposure: outdoor, wet, in cedar) Buy at least 32 from one product line. Keep spares separate from the installed count.
F to P 12, E to P 8, S to P 8, R to P 4. Follow the maker's pilot, clearance and edge-distance instructions. No joint capacity is inferred.
Ledger screws
20 items
#10 × 2.5 in stainless steel exterior wood screw (proposed exposure: outdoor, wet, in cedar) Buy at least 20 from one product line. Keep spares separate.
G to F 14, H to E 6. Each point stops 0.5 in short of the wall outer face.
Floor screws
32 items
#8 × 1.5 in stainless steel exterior wood screw (proposed exposure: outdoor, wet, in cedar) Buy at least 32 from one product line. Keep spares separate.
N 24, M 8. Each point stops 0.75 in inside G or H.
Drainage liner
1 item
Permeable non-woven landscape fabric sold for use under soil One piece at least 60 × 36 in, cut to 58 × 33 in
Confirm the product suits edible growing. The liner holds the medium in place and is not a load-carrying part.
Liner staples
16 items
Stainless steel staples, 3/8 in leg, matched to the stapler One pack. Count only the installed staples.
5 per F and 3 per E, at 8.25 in above the wall bottom.
Cut list
| Piece | How many | Cut length | Note |
|---|---|---|---|
| P — Leg and corner post | 4 | 36.25 × 3.5 × 3.5 in | Finished length × width × thickness; square ends unless the detail says otherwise. |
| F — Front and back wall | 2 | 48.75 × 9.25 × 1.5 in | Finished length × width × thickness; square ends unless the detail says otherwise. |
| E — End wall | 2 | 21 × 9.25 × 1.5 in | Finished length × width × thickness; square ends unless the detail says otherwise. |
| G — Long floor ledger | 2 | 38.75 × 1.5 × 1.5 in | Finished length × width × thickness; square ends unless the detail says otherwise. |
| H — End floor ledger | 2 | 14 × 1.5 × 1.5 in | Finished length × width × thickness; square ends unless the detail says otherwise. |
| N — Plain floor board | 6 | 20.75 × 5.5 × 0.75 in | Finished length × width × thickness; square ends unless the detail says otherwise. |
| M — Notched end floor board | 2 | 20.75 × 5.5 × 0.75 in | Two notches 3.625 in across × 3.5 in along, on one long edge, leaving 1.875-in tabs. |
| S — Side stretcher | 2 | 21 × 3.5 × 1.5 in | Finished length × width × thickness; square ends unless the detail says otherwise. |
| R — Rear stretcher | 1 | 45.75 × 3.5 × 1.5 in | Finished length × width × thickness; square ends unless the detail says otherwise. |
Tools
- Tape, combination square, framing square, 24-in level and pencil
- Sawhorses, clamps and sacrificial backing
- Guarded saw able to cut 3.5-in posts, or a guarded circular saw used from two sides as its maker directs
- Guarded jigsaw or handsaw for the M notches
- Drill/driver with a depth stop, and bits matched to the selected screws
- Stapler matched to the staples, utility knife, abrasive and a dust brush
Protective gear
- Eye protection for cutting, drilling and stapling
- Hearing protection and a dust mask suited to cedar dust
- Closed footwear. Keep gloves and loose clothing away from rotating cutters.
- Gloves for handling growing medium
04 / Put it together
Build steps
- 01
Mock up the seated approach and reach
Do this before buying stock. Use a sturdy table and boards to set a temporary straightedge 36.25 in above the floor, with a clear underside at 27.0 in. Have the intended user approach seated and bring their knees under the edge. Have them reach 22.5 in back from the front face, which is where the inner face of the back wall F will be. Record any knee contact, the reach achieved and a comfortable working height.
Close-up · Whole model shows the complete part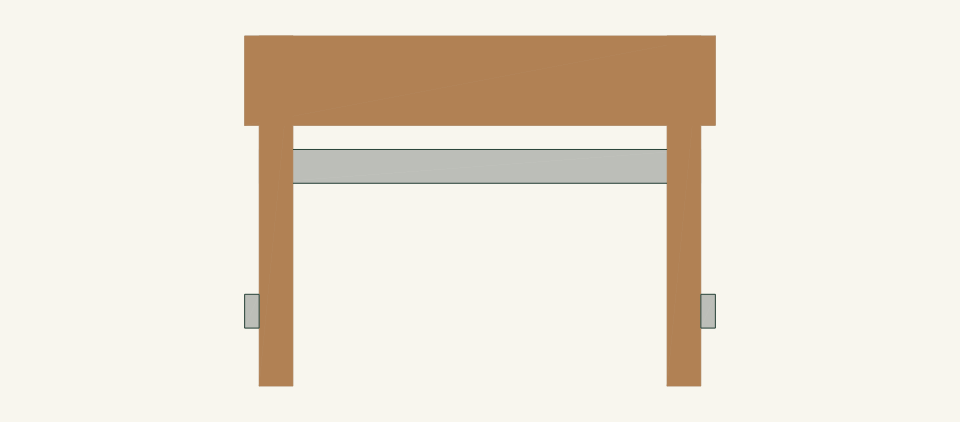
Loading the 3D view…
Drag to turn. Pinch or use + / − to zoom. The written step covers workholding and tool use.
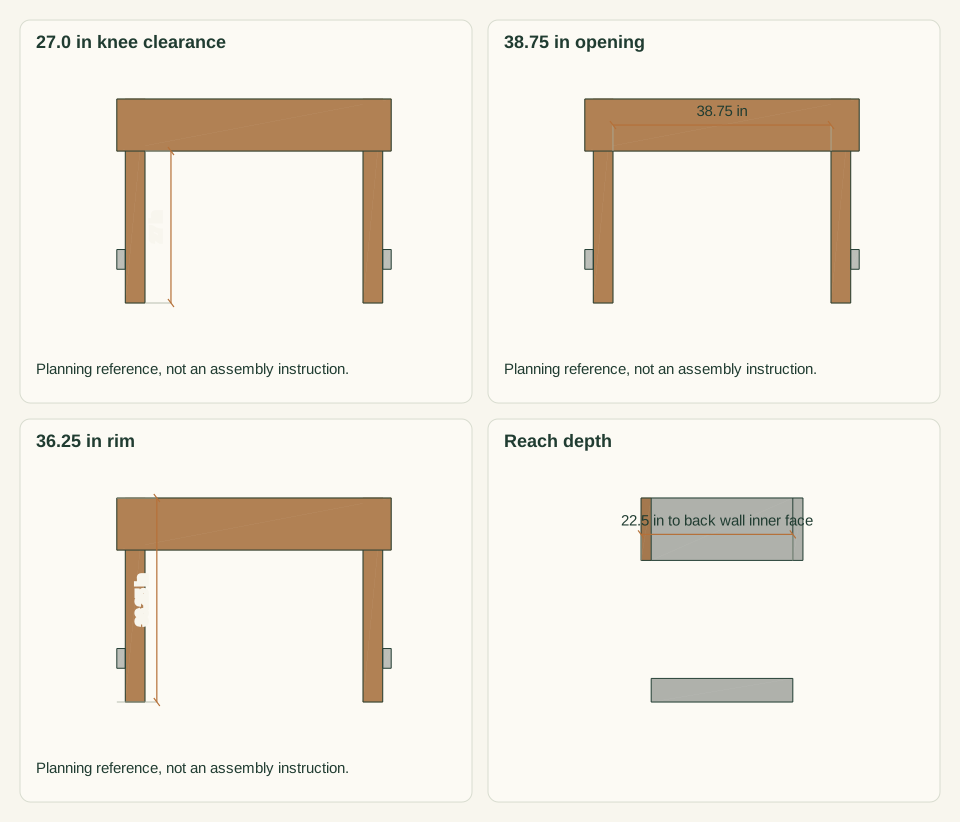
Scroll or swipe the enlarged drawing to read its dimensions. Choose Fit to see the whole drawing again.
Planning reference only: the clearances the mock-up must reproduce before any stock is bought.
Check: The user clears 27.0 in under the edge and reaches 22.5 in back without leaning on the edge. If not, stop before cutting.
- 02
Check the site and bearing surface
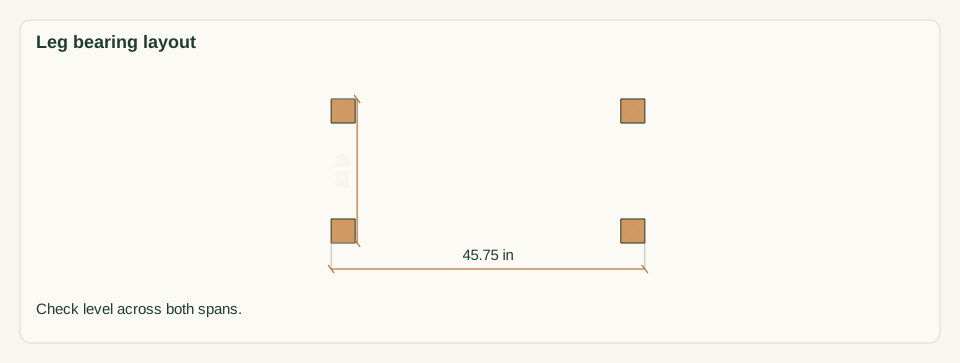
Choose firm, level, drained paving or compacted ground. It must fit the 48.75 × 24 in planter plus the seated approach space recorded in step 1. Check level across 45.75 in and 21 in, the outside leg spacing. Confirm sun and water access for the intended crops. Identify irrigation and utility lines before any ground work.
Close-up · Whole model shows the complete part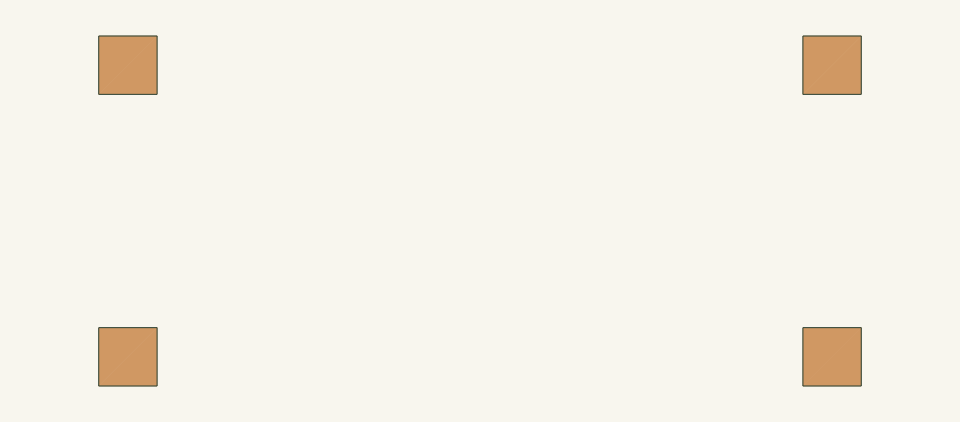
Loading the 3D view…
Drag to turn. Pinch or use + / − to zoom. The written step covers workholding and tool use.
Scroll or swipe the enlarged drawing to read its dimensions. Choose Fit to see the whole drawing again.
Planning reference: the four leg bearing points the surface must carry level.
Check: All four leg positions bear on one firm, level surface, and the approach is clear and flat.
- 03
Measure and record the stock
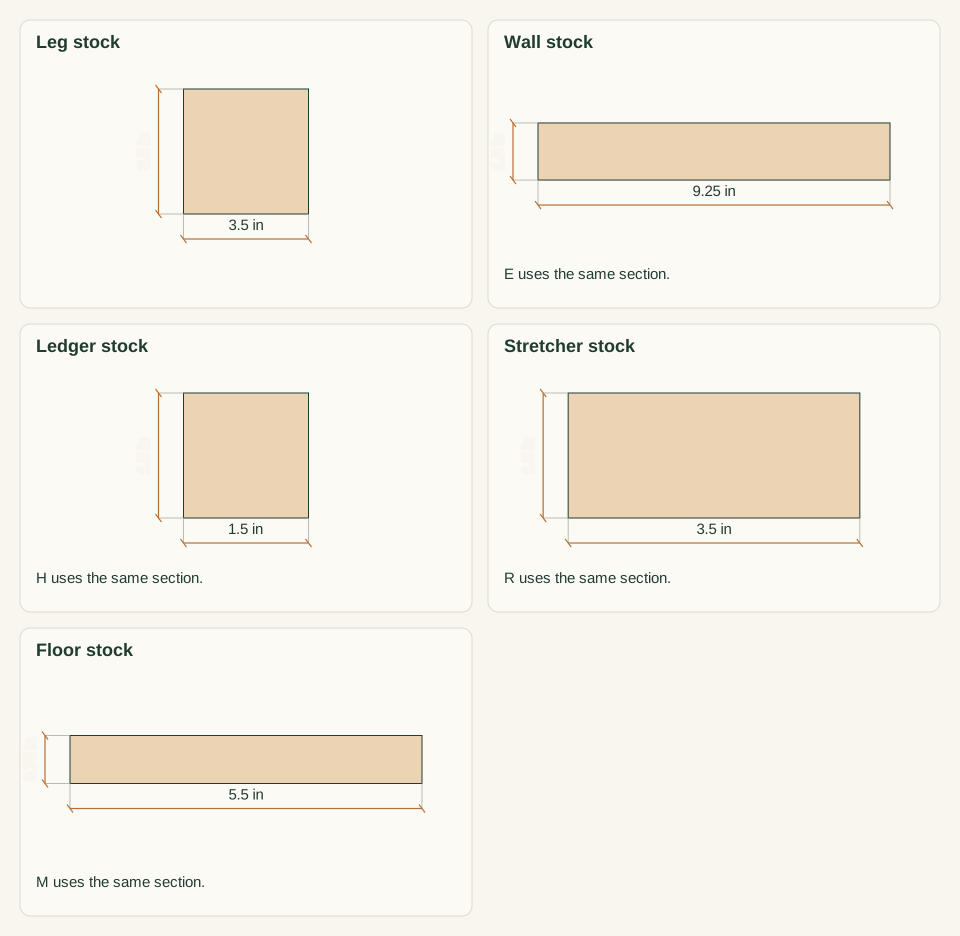
Measure every board at both ends and in the middle. Required actual sections: P 3.5 × 3.5 in, F and E 1.5 × 9.25 in, G and H 1.5 × 1.5 in, S and R 1.5 × 3.5 in, N and M 0.75 × 5.5 in. Mark splits, loose knots, twist and wane, and plan the cuts around them.
Close-up · Whole model shows the complete part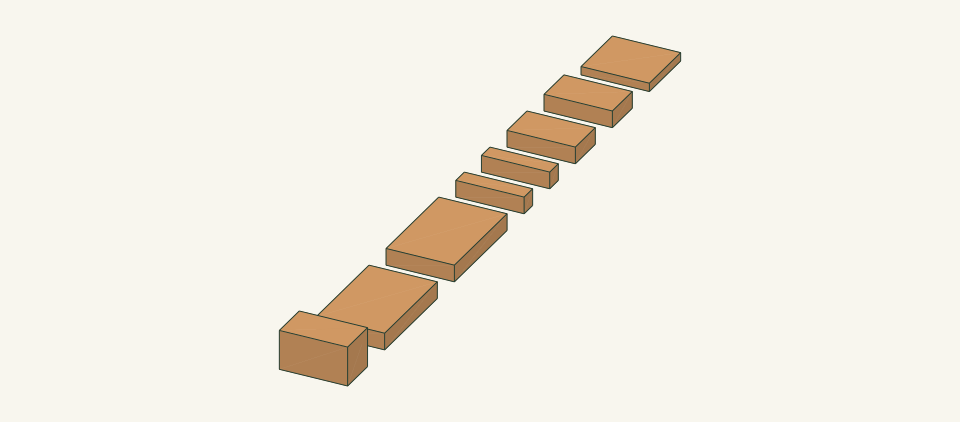
Loading the 3D view…
Drag to turn. Pinch or use + / − to zoom. The written step covers workholding and tool use.
Scroll or swipe the enlarged drawing to read its dimensions. Choose Fit to see the whole drawing again.
Compare each real board end with these actual sections before marking.
Check: Every section matches its listed actual size within 1/16 in. Reject or replace mismatched or split stock.
- 04
Cut the legs and walls
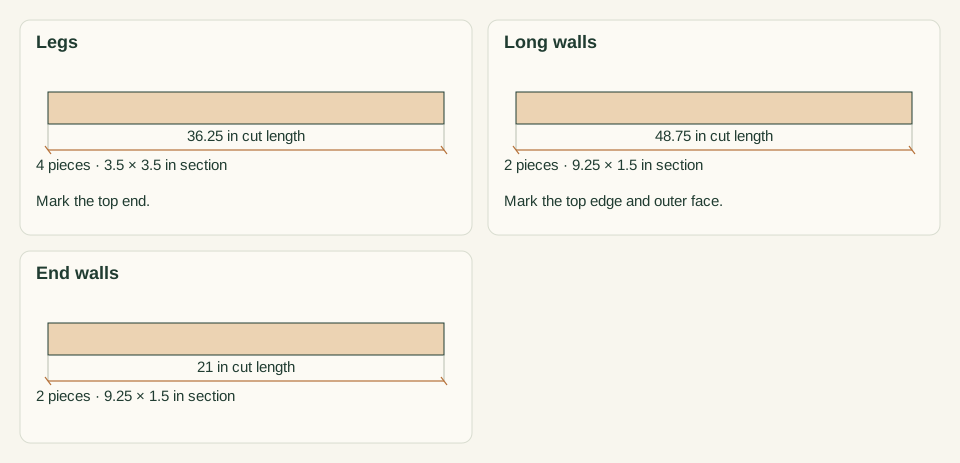
Clamp and support each board for every cut. From a squared end on each 4 × 4, cut two P legs at 36.25 in. From each 2 × 10, cut one F at 48.75 in and one E at 21 in, keeping the kerf on the waste side. Mark the top end of each P. Mark the top edge and outer face of each F and E.
Close-up · Whole model shows the complete part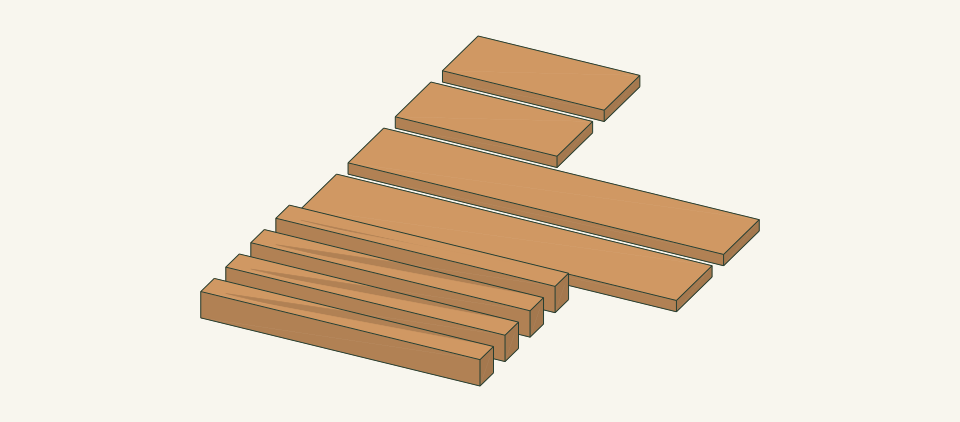
Loading the 3D view…
Drag to turn. Pinch or use + / − to zoom. The written step covers workholding and tool use.
Scroll or swipe the enlarged drawing to read its dimensions. Choose Fit to see the whole drawing again.
Legs and walls are cut first and kept in matched pairs.
Check: Four P at 36.25 in, two F at 48.75 in and two E at 21 in each match their pairs within 1/32 in and have square ends.
- 05
Cut ledgers, stretchers and plain floor boards
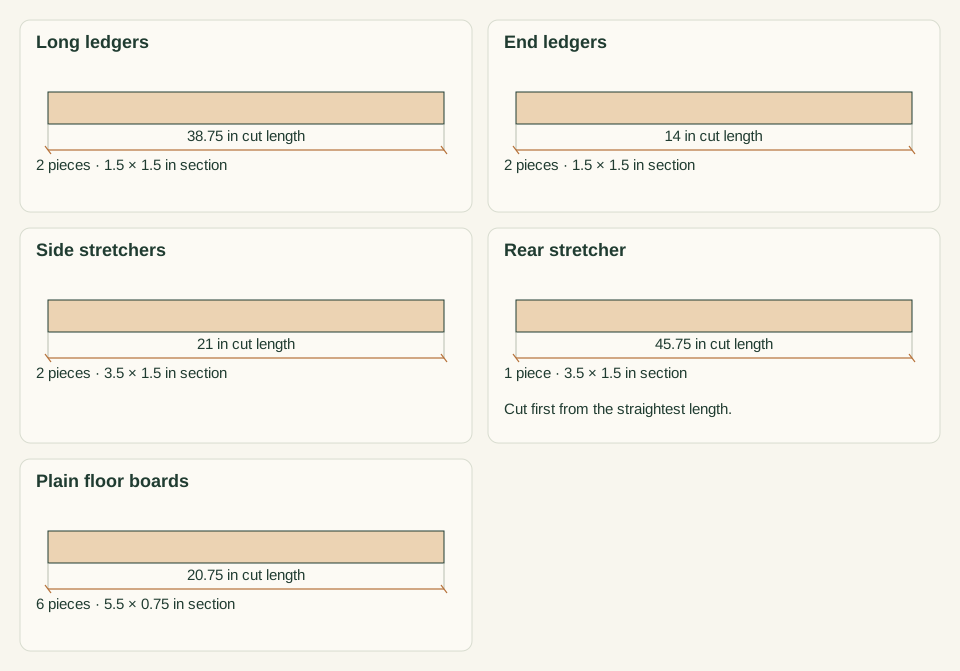
Cut two G at 38.75 in from the first 2 × 2. Cut two H at 14 in from the second 2 × 2. From the 2 × 4, cut R at 45.75 in first, then two S at 21 in. From the two 1 × 6 boards, cut eight pieces at 20.75 in. Set six aside as N and keep the two straightest for M.
Close-up · Whole model shows the complete part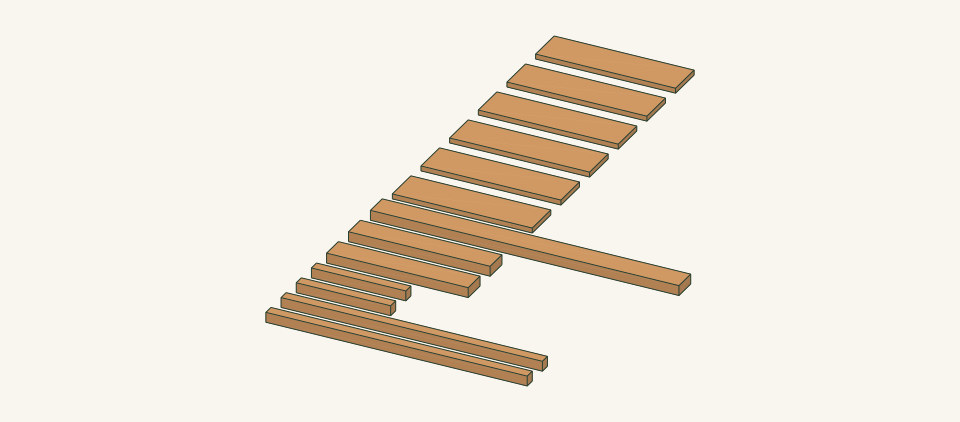
Loading the 3D view…
Drag to turn. Pinch or use + / − to zoom. The written step covers workholding and tool use.
Scroll or swipe the enlarged drawing to read its dimensions. Choose Fit to see the whole drawing again.
The small parts and plain floor boards come from five boards.
Check: Two G, two H, two S, one R and eight 20.75-in floor pieces are cut square and labeled.
- 06
Cut and notch the two end floor boards
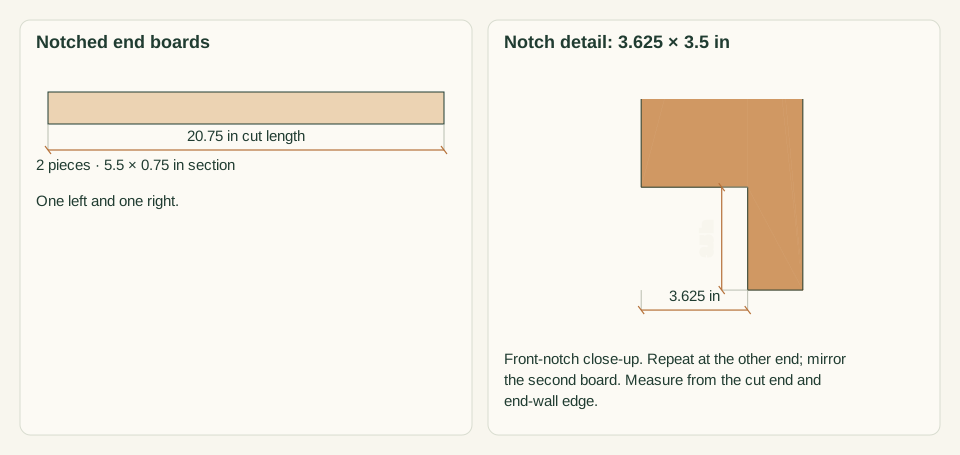
Choose one long edge of each M as the end-wall edge. At both ends of that edge, mark a notch 3.5 in along the length and 3.625 in across the width. Label one board left M and the other right M, as mirror pieces. Clamp each board over sacrificial backing. Cut each notch with a guarded jigsaw or a handsaw and square the inside corner.
Close-up · Whole model shows the complete part
Loading the 3D view…
Drag to turn. Pinch or use + / − to zoom. The written step covers workholding and tool use.
Scroll or swipe the enlarged drawing to read its dimensions. Choose Fit to see the whole drawing again.
The notches sit on the end-wall edge, and the two boards are mirror images.
Check: Each M has two notches of 3.625 × 3.5 in on the same long edge, leaving a 1.875-in tab at each end.
- 07
Mark the wall-to-leg screw layout
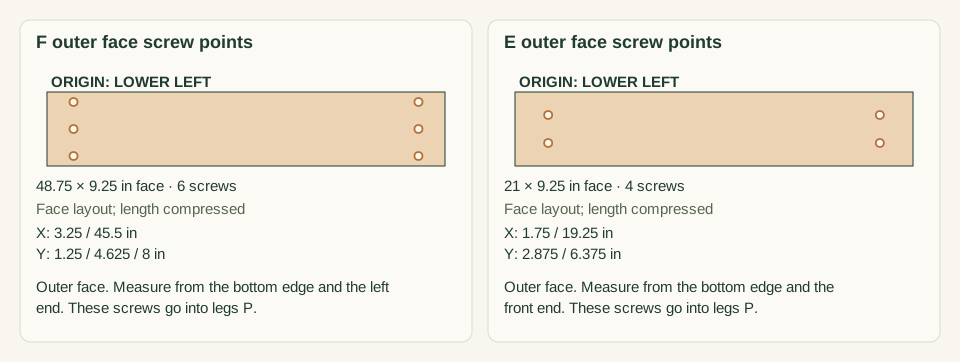
On each F outer face, mark screw lines 3.25 in from both ends. On each line, mark points at 1.25, 4.625 and 8.0 in above the bottom edge. On each E outer face, mark lines 1.75 in from both ends. On each line, mark points at 2.875 and 6.375 in above the bottom edge. Check every mark against the face-pattern panels.
Close-up · Whole model shows the complete part
Loading the 3D view…
Drag to turn. Pinch or use + / − to zoom. The written step covers workholding and tool use.
Scroll or swipe the enlarged drawing to read its dimensions. Choose Fit to see the whole drawing again.
Every point is measured from the wall bottom edge and the nearer end.
Check: Twelve F points and eight E points are marked, measured from the bottom edge and the ends.
- 08
Fasten the front and back walls to the legs
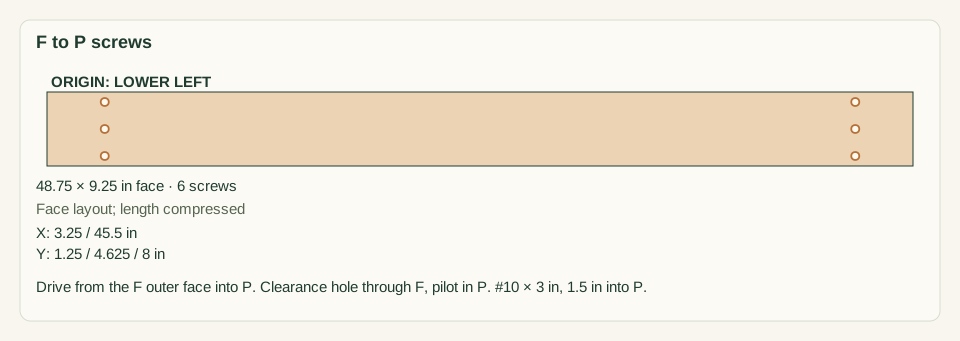
Lay two P on the bench and set one F across them, outer face up. Keep the F top edge flush with the P top ends. Use a 1.5-in offcut as a gauge to set each leg outer face 1.5 in in from the F end. That leaves 38.75 in between the leg inner faces. Clamp the joints. Drill clearance holes through F and maker-specified pilots into P, then drive six #10 × 3 in screws. Repeat for the second frame, for 12 screws in total.
Close-up · Whole model shows the complete part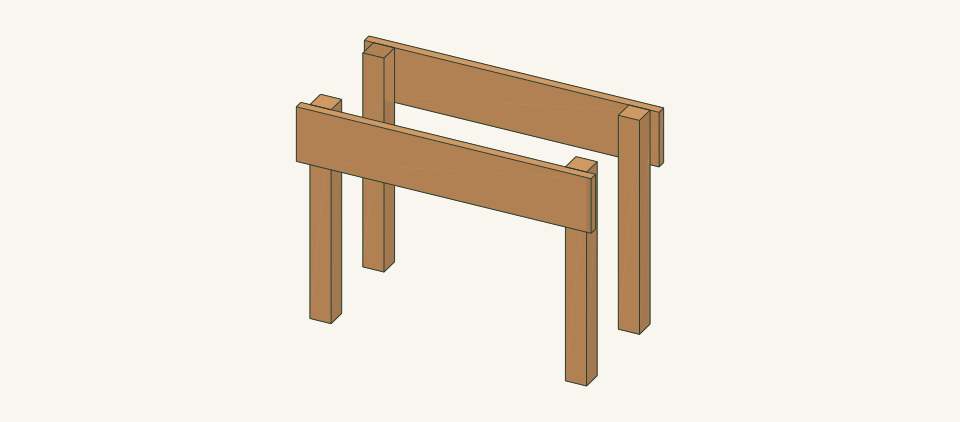
Loading the 3D view…
Drag to turn. Pinch or use + / − to zoom. The written step covers workholding and tool use.
Scroll or swipe the enlarged drawing to read its dimensions. Choose Fit to see the whole drawing again.
Each leg sits 1.5 in in from the wall end, leaving room for E.
Check: Both frames measure 38.75 in between leg inner faces at the top and at the leg bottoms, and no screw point shows.
- 09
Fasten the floor ledgers to the long walls
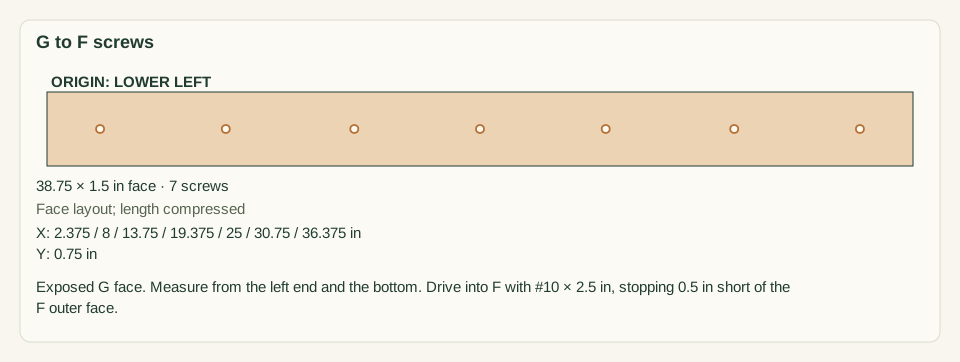
Turn each frame inner face up. Fit G on the F inner face between the legs, with the G bottom face flush with the F bottom edge. Clamp it. Drill clearance holes through G and pilots into F at 2.375, 8, 13.75, 19.375, 25, 30.75 and 36.375 in from the G left end, 0.75 in up. Drive seven #10 × 2.5 in screws per G, 14 in total.
Close-up · Whole model shows the complete part
Loading the 3D view…
Drag to turn. Pinch or use + / − to zoom. The written step covers workholding and tool use.
Scroll or swipe the enlarged drawing to read its dimensions. Choose Fit to see the whole drawing again.
The ledgers fit between the legs, flush with the wall bottom.
Check: Each G is flush with the F bottom edge and tight to both legs, and no screw point reaches the F outer face.
- 10
Join the frames with the end walls and ledgers
Stand both frames on their legs, with the legs on the inside. Fit each E between the F inner faces, outer face flush with the F ends and top edge flush with the rim. Clamp each E to the leg outer faces. Drive two #10 × 3 in screws per E end at the marks, 8 in total. Fit H on each E inner face between the legs, bottom face flush. Drive #10 × 2.5 in screws at 2, 7 and 12 in from the H front end, 0.75 in up, 6 in total.
Close-up · Whole model shows the complete part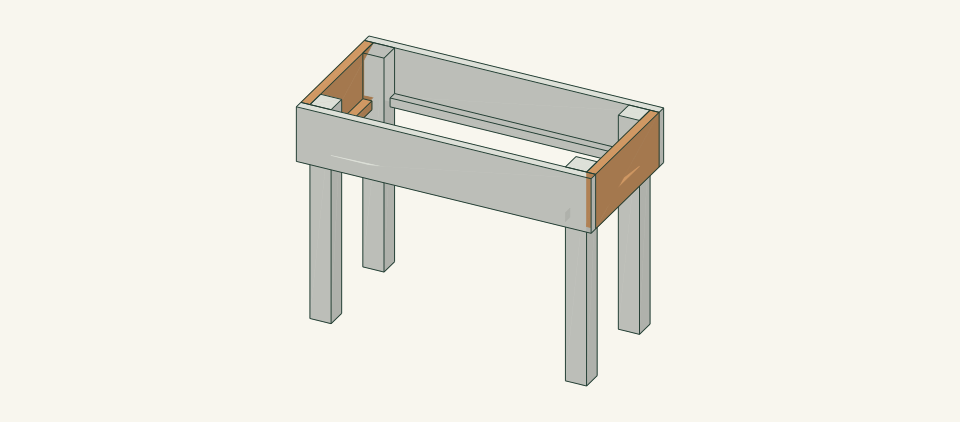
Loading the 3D view…
Drag to turn. Pinch or use + / − to zoom. The written step covers workholding and tool use.
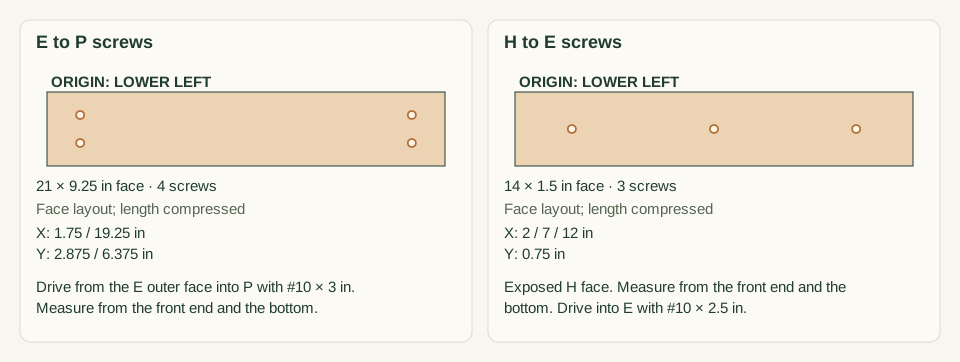
Scroll or swipe the enlarged drawing to read its dimensions. Choose Fit to see the whole drawing again.
The end walls close the box against the leg outer faces, and the end ledgers follow.
Check: The gap between the F inner faces is 21 in at both ends, and each H is flush with the E bottom edge.
- 11
Fasten the side and rear stretchers
Mark 6.0 in up from the bottom on the outer end face of each leg. Clamp each S across a leg pair, bottom on the mark and ends flush with the leg front and back faces. Drive #10 × 3 in screws 1.75 in from each S end, at 0.875 and 2.625 in above the S bottom, 8 in total. Mark 21.0 in up on the back faces of P2 and P3. Clamp R with its ends flush with the leg outer faces. Drive 4 screws in the same pattern.
Close-up · Whole model shows the complete part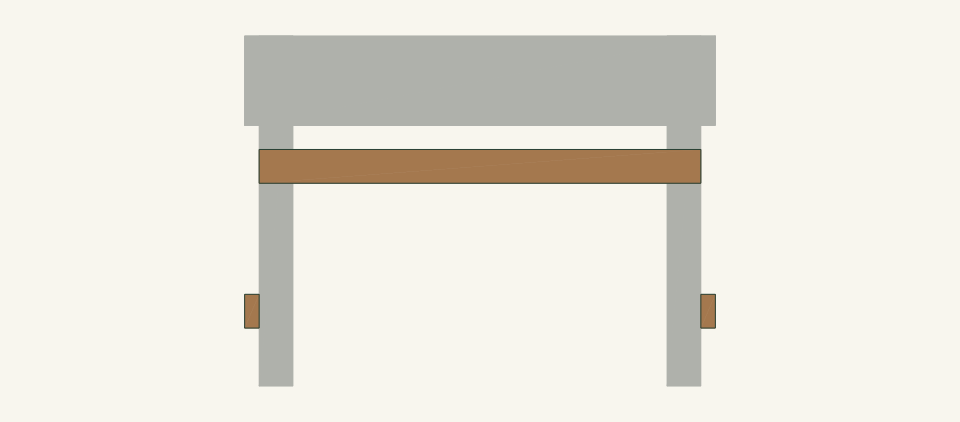
Loading the 3D view…
Drag to turn. Pinch or use + / − to zoom. The written step covers workholding and tool use.
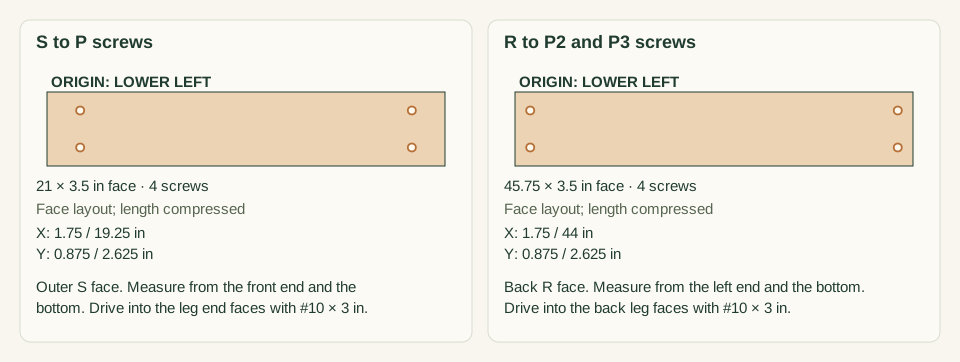
Scroll or swipe the enlarged drawing to read its dimensions. Choose Fit to see the whole drawing again.
The braces sit at the ends and high at the back, outside the front opening.
Check: S and R sit on their marks, and nothing crosses the front opening between P0 and P1 below 27.0 in.
- 12
Check square, level and knee clearance
Set the empty frame on a flat floor. Measure both outside rim diagonals against 54.34 in. Measure both leg-base outside diagonals against 50.34 in. A proposed target is a difference of 1/8 in or less. Level the rim in both directions. Measure 27.0 in from the floor to the F bottom at both front legs and at midspan, and 38.75 in between the front leg inner faces.
Close-up · Whole model shows the complete part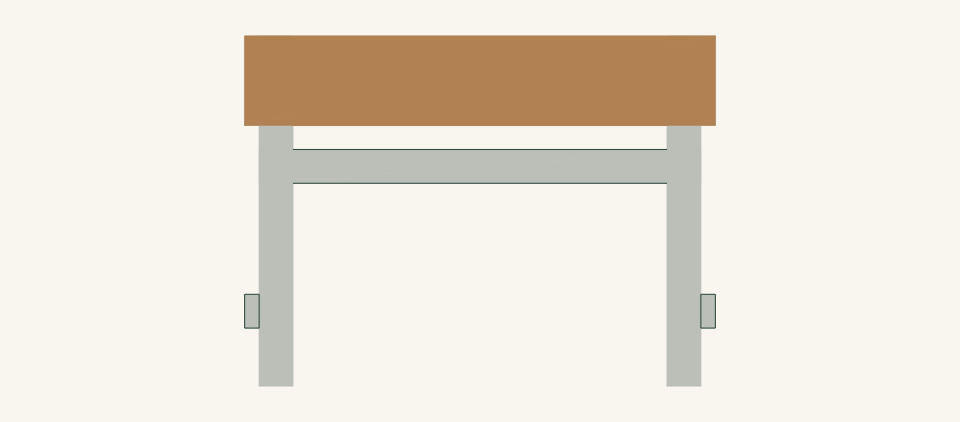
Loading the 3D view…
Drag to turn. Pinch or use + / − to zoom. The written step covers workholding and tool use.
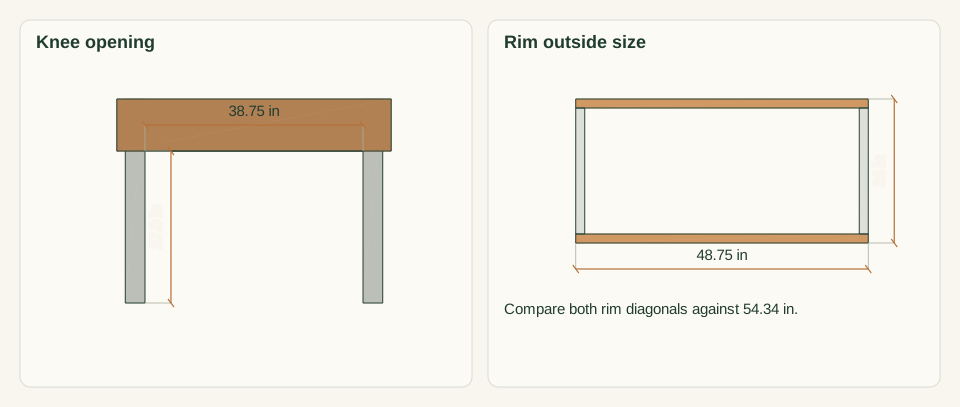
Scroll or swipe the enlarged drawing to read its dimensions. Choose Fit to see the whole drawing again.
Square, level and the knee opening are checked before the floor hides the ledgers.
Check: Each pair of diagonals matches, the frame does not rock, and the knee opening measures 38.75 × 27.0 in.
- 13
Lay and fasten the floor boards
Set the left M with its notches around P0 and P2, its end-wall edge against E and its tabs on G. Set the right M the same way as its mirror. Lay the six N between them with 0.25-in spacers, leaving a 0.125-in gap at each F. Drive #8 × 1.5 in screws. Each N gets four, at 0.6875 in from each end and 1.25 and 4.25 in from its left edge, 24 in total. Each M gets one per tab and two into H at 7 and 13.75 in from the front end, 8 in total.
Close-up · Whole model shows the complete part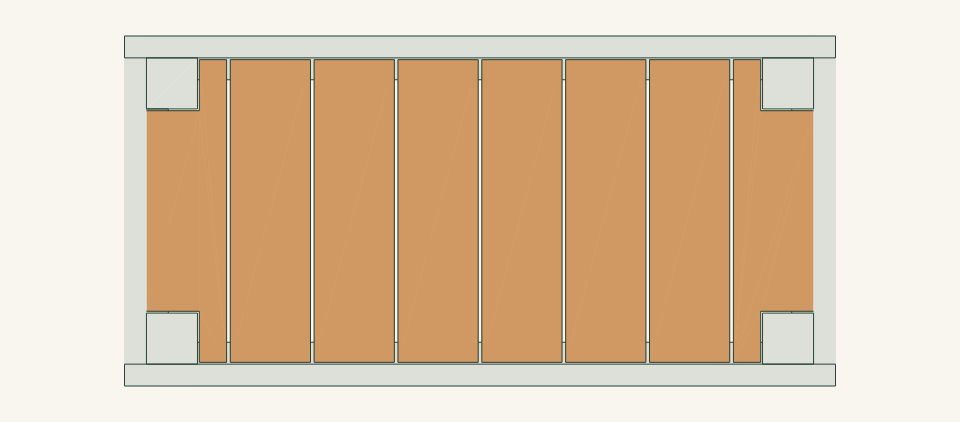
Loading the 3D view…
Drag to turn. Pinch or use + / − to zoom. The written step covers workholding and tool use.
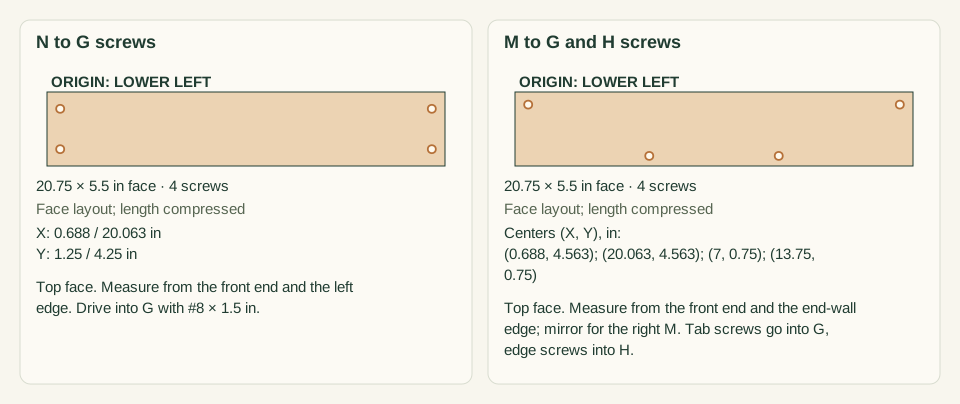
Scroll or swipe the enlarged drawing to read its dimensions. Choose Fit to see the whole drawing again.
The notched boards go in first, then six plain boards with 0.25-in gaps.
Check: All eight boards bear on the ledgers, seven 0.25-in gaps remain open and all 32 floor screws sit flush.
- 14
Fit the drainage liner and ease edges
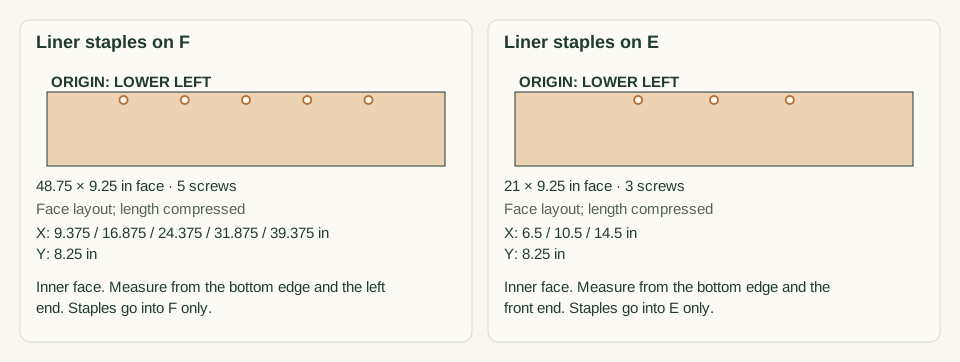
Cut the liner to 58 × 33 in. Lay it over the floor, fold the corners without cutting and run it up the walls to 1 in below the rim. Staple through the liner into the wall inner faces at 8.25 in above the wall bottom. On each F, staple at 9.375, 16.875, 24.375, 31.875 and 39.375 in from the left end. On each E, staple at 6.5, 10.5 and 14.5 in from the front end. That makes 16 staples. Ease the rim edges and leg tops with abrasive.
Close-up · Whole model shows the complete part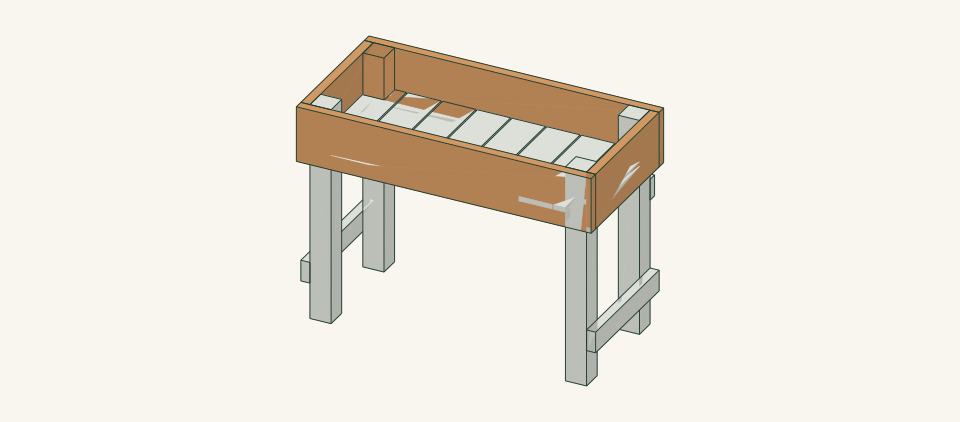
Loading the 3D view…
Drag to turn. Pinch or use + / − to zoom. The written step covers workholding and tool use.
Scroll or swipe the enlarged drawing to read its dimensions. Choose Fit to see the whole drawing again.
The liner is not drawn; staple points show where it is held 1 in below the rim.
Check: The liner covers every floor gap and corner, no staple point shows outside and the rim is splinter-free.
- 15
Place the planter and fill in stages
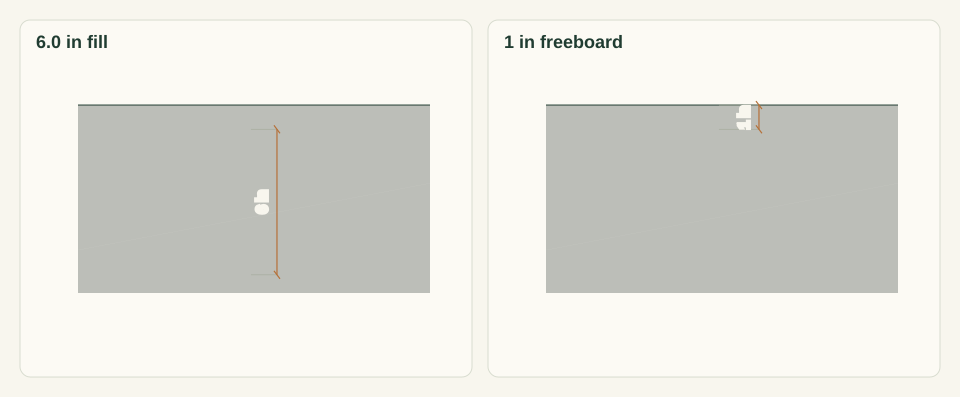
With two people, carry the empty planter by the legs and walls, not by S, R or the floor. Set all four legs on the checked surface and check level again. Fill with the selected growing medium in layers of about 2 in, and check the corners after each layer. Stop at 6.0 in above the floor, 1 in below the rim. Water slowly and watch for drainage through the floor gaps.
Close-up · Whole model shows the complete part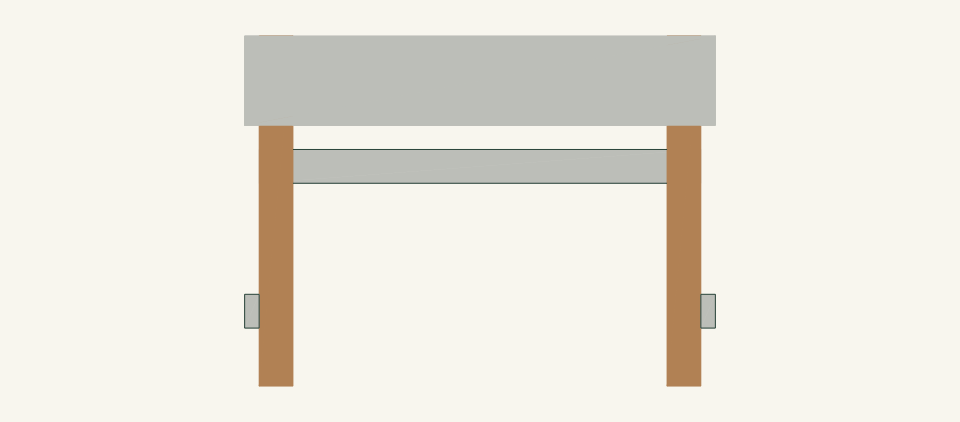
Loading the 3D view…
Drag to turn. Pinch or use + / − to zoom. The written step covers workholding and tool use.
Scroll or swipe the enlarged drawing to read its dimensions. Choose Fit to see the whole drawing again.
The fill line sits 6.0 in above the floor, leaving 1 in of freeboard.
Check: Water drains through the floor, no joint opens, no board sags and the frame stays level after the first watering.
- 16
Trial use and first inspection
Before planting, have the user approach seated and work across the full 45.75-in length and to the back wall. Confirm that their knees clear the 27.0-in front underside and their feet clear S and R. Inspect every screw head, the floor boards from below and the leg-to-wall joints. Repeat this inspection after one week and after heavy watering.
Close-up · Whole model shows the complete partLoading the 3D view…
Drag to turn. Pinch or use + / − to zoom. The written step covers workholding and tool use.
Scroll or swipe the enlarged drawing to read its dimensions. Choose Fit to see the whole drawing again.
The side view shows where knees and feet pass beneath the box.
Check: The user works without leaning on the rim, and all 84 screws and 16 staples are tight with no splits.


05 / Keep it sound
Care
After the build
- Place the planter only on the checked firm, level surface, and fill it in layers to 6.0 in above the floor. The fill figure is a volume, not a weight rating.
- Use it with crops suited to 6 in of medium. Confirm sun, water and crop needs with horticultural guidance. The OSU raised-bed guidance is site and crop context only and does not approve this elevated structure.
- Have the user work from a seated position facing the front. Keep pots, tools and people off the rim.
Check it each season
- Each month in the growing season, inspect the screw heads at the legs, the ledgers from below and the leg bottoms for splits, soft wood or movement.
- After heavy rain or watering, check that water drains through the floor gaps and does not pond on the liner.
- At season end, lower or empty the medium before tightening a screw, replacing a board or treating any joint. Replace split parts rather than adding screws beside a crack.
If something looks wrong
- Frame rocks on the site
- Empty it, find the high leg and correct the surface. Do not wedge loose scraps under a leg.
- A wall pulls away from a leg
- Stop filling, unload the medium and inspect for split wood or stripped screws. Replace the damaged part and have the joint reviewed before refilling.
- Water ponds on the surface
- Stop watering, check the liner for clogging and the floor gaps for blockage, and do not drill random holes in the walls.
- Knees or footrests touch the planter
- Confirm the 27.0-in underside and 38.75-in opening on the built object. If the user needs more space, stop using this version rather than cutting away a stretcher.
- Floor board sags between ledgers
- Unload that area, replace the board with sound 0.75-in stock and check the ledger screws.
Keep exploring