Wooden raised beds · Guide 29
Build a Low U-Shaped Cedar Bed with a Center Path
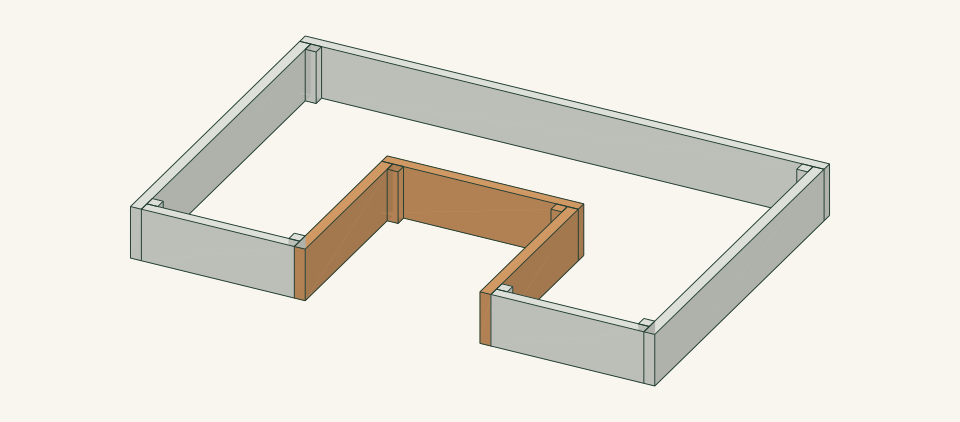
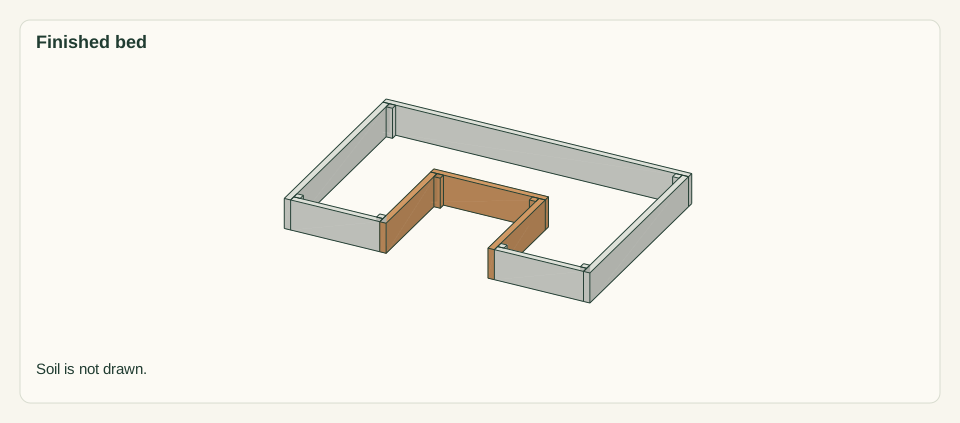
Build a 72 × 48-inch, 7.25-inch-tall open-bottom cedar bed with a 24 × 24-inch path notch, so you can reach all three planting bays without stepping on soil.
01 / See the shape
View the project
Loading the 3D view…
Drag to turn. Pinch or use + / − to zoom. The written step covers workholding and tool use.

Scroll or swipe the enlarged drawing to read its dimensions. Choose Fit to see the whole drawing again.
After watering, the path walls and their blocks are the first place to look for movement.
02 / Plan your build
Before you start
A 72 × 48-inch bed is too deep to reach across from the edges alone. This design cuts a 24-inch-wide, 24-inch-deep path into the front edge. That path splits the bed into two 21-inch arm bays and one 21-inch-deep rear bay, and every point is reachable from the path or the outside. The path is lined by its own small module: back wall P and inner walls I, joined by two corner blocks on the path side. That module is then tied into the outer frame by the front arm walls F. Inner walls I and P carry soil on one side and nothing on the other. They are restrained only at their ends by C blocks. The main failure is a split block, a stripped screw or a misaligned module. Any of these lets an inner wall lean into the path once wet soil is added. Inspect every joint before filling. Fill in shallow passes so a problem shows before the bed is full.
Where it goes
Level, well-drained native garden soil in good sun, with about 24 inches of working access outside the 72 × 48-inch frame. Do not place it on paving, a deck, a roof, a slope, a wall edge or against a building.
Footprint: 72 × 48 in outside, including the open 24 × 24-in path notch at the front center. Allow about 24 in of working access around the outside edges and a clear approach to the path opening
What to expect
Measure accurately, make supported square cuts and drive clamped screws. Plan 6–8 hours including the site mock-up, a trial joint, assembly and filling.
A planning estimate for the hands-on work, once the materials are bought and the tools are set up. It has not been timed on a finished build.
Check the spot
- Confirm that the location is level, well-drained native garden soil with no paving, deck, slope or building wall under or against the bed.
- Locate utilities, private irrigation and major roots before disturbing soil. Resolve any concern about past soil contamination first, because the open bottom does not separate roots from the soil below.
- Mock up the 24 × 24-inch path with string and confirm that the intended user can kneel, turn and reach every bay.
Stop and check first if…
- Stop if utilities, roots, contamination or drainage at the site are unresolved.
- Stop if the measured stock is not 1.5 × 7.25 for walls or 1.5 × 1.5 for blocks, or if the screw maker's edge and end distances cannot be met at the 0.75-inch screw lines.
- Stop if a C block or wall end splits, a screw strips, or an I or P wall moves into the path during filling. Unload the soil before repairing the joint.
- Do not raise, lengthen or stack this bed without a new parts and load review.
Work safely
- Follow the saw maker's instructions and keep guards in place. Clamp the 2 × 2 for every block cut, and never hold a 7.25-inch block by hand near the blade.
- Clamp each turn before drilling. A drill that catches can spin an unclamped block.
- Lift the empty frame with at least two people under B and both E walls, never by F or I alone. Never move the frame once it is filled.
- Keep the path clear of tools and protruding screw tips. Check C6 and C7 for sharp edges, because hands and knees contact them.
Budget
We have not put a price on this one yet. Lumber and hardware prices change by store and season, so price the list under What you need at your local supplier before you buy.
03 / Gather and cut
What you need
B — Back wall (runs through)
1 piece
Untreated western red cedar 2 × 8; actual 1.5 × 7.25 in measured. Board 1 of four 2 × 8 × 8-ft boards: 0.5 trim + 72 B + 0.125 kerf + 21 F + 0.125 kerf = 93.75 of 96 in.
Measure thickness and height at both ends and the middle before cutting. Reject a board with end splits within 3 in of a finished line. Label the bottom edge and the outside face.
E — End wall (runs through at front, fits against B at rear)
2 pieces
Untreated western red cedar 2 × 8; actual 1.5 × 7.25 in. Board 2: 0.5 trim + 46.5 + 0.125 + 46.5 + 0.125 = 93.75 of 96 in.
Label the front end, bottom edge and outside face of each E. The two E pieces must match face to face.
F — Front arm wall (fits between E and I)
2 pieces
Untreated western red cedar 2 × 8; actual 1.5 × 7.25 in. One F from board 1. The second F comes from board 4: 0.5 trim + 21 + 0.125 = 21.625 of 96 in. The 74.375-in offcut supplies the trial joint and spare stock.
F is short and screws land 0.75 in from each end. Reject any piece with end checks.
I — Inner path wall (runs through at front, fits against P at rear)
2 pieces
Untreated western red cedar 2 × 8; actual 1.5 × 7.25 in. Board 3: 0.5 trim + 27 P + 0.125 + 24 + 0.125 + 24 + 0.125 = 75.875 of 96 in. The 20.125-in offcut is spare.
Label the front end, the path face and the soil face. The front screw pair enters from the path face. The rear pair enters from the soil face.
P — Path back wall (runs through)
1 piece
Untreated western red cedar 2 × 8; actual 1.5 × 7.25 in. Cut from board 3 with the two I pieces; see I.
Use the straightest board for P and I. These walls hold soil with open path on the other side. Label the soil face.
C — Corner block
8 pieces
Untreated western red cedar 2 × 2; actual 1.5 × 1.5 in measured. One 2 × 2 × 8-ft board: 0.5 trim + 8 × 7.25 + 8 × 0.125 kerf = 59.5 of 96 in. The remainder supplies the trial block.
Reject blocks with knots or checks. Every block receives four screws from two directions and must be sound.
Corner screws
32 items
#10 × 2.5 in stainless steel wood screws for exterior wet-soil exposure; confirm the product's stated exposure suitability with cedar Buy at least 32 plus spares for the trial joint; keep spares separate from the installed count.
8 blocks × 2 walls × 2 screws = 32. Each screw passes 1.5 in of wall and engages 1.0 in of block. Use the screw maker's clearance, pilot and countersink instructions. No connection capacity is inferred.
Cut list
| Piece | How many | Cut length | Note |
|---|---|---|---|
| B — Back wall (runs through) | 1 | 72 × 7.25 × 1.5 in | Finished length × width × thickness; square ends unless the detail says otherwise. |
| E — End wall (runs through at front, fits against B at rear) | 2 | 46.5 × 7.25 × 1.5 in | Finished length × width × thickness; square ends unless the detail says otherwise. |
| F — Front arm wall (fits between E and I) | 2 | 21 × 7.25 × 1.5 in | Finished length × width × thickness; square ends unless the detail says otherwise. |
| I — Inner path wall (runs through at front, fits against P at rear) | 2 | 24 × 7.25 × 1.5 in | Finished length × width × thickness; square ends unless the detail says otherwise. |
| P — Path back wall (runs through) | 1 | 27 × 7.25 × 1.5 in | Finished length × width × thickness; square ends unless the detail says otherwise. |
| C — Corner block | 8 | 7.25 × 1.5 × 1.5 in | Finished length × width × thickness; square ends unless the detail says otherwise. |
Tools
- Tape measure, combination square, framing square and pencil
- Stakes, string and a 4-ft level
- Suitable guarded saw with supported work
- At least four clamps
- Drill/driver with bits and countersink matched to the selected screw
- Abrasive paper and a dust brush
- Shovel or rake and soil-handling containers
Protective gear
- Eye protection during cutting and drilling
- Hearing protection and dust control matched to the actual saw
- Closed footwear; keep loose clothing and gloves away from rotating cutters
- Gloves for handling rough stock and soil
04 / Put it together
Build steps
- 01
Mock up the U and the path notch
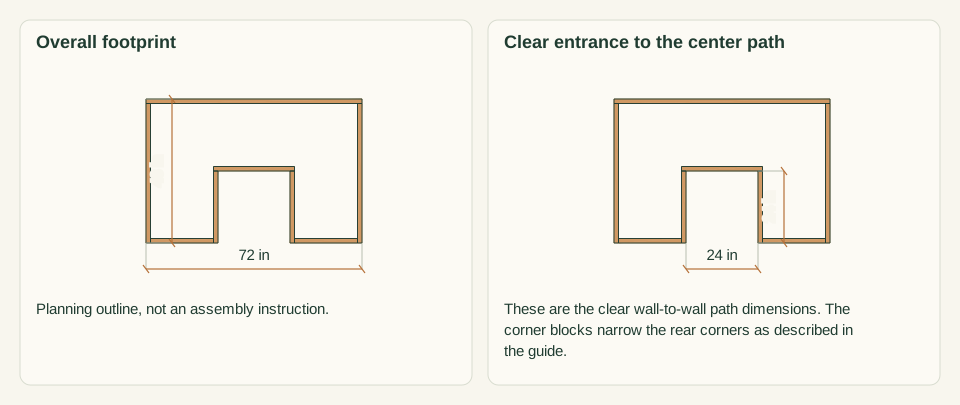
Mark a 72 × 48-inch rectangle on level native soil with stakes and string, with the 72-inch side as the front. Mark the path notch 24 inches wide, starting 24 inches in from each front corner and reaching 24 inches back from the front line. Kneel and turn inside the notch. Reach to the far side of each 21-inch arm bay and the 21-inch rear bay. Confirm the location of utilities, irrigation lines and roots, and any past soil contamination, before disturbing the ground.
Close-up · Whole model shows the complete part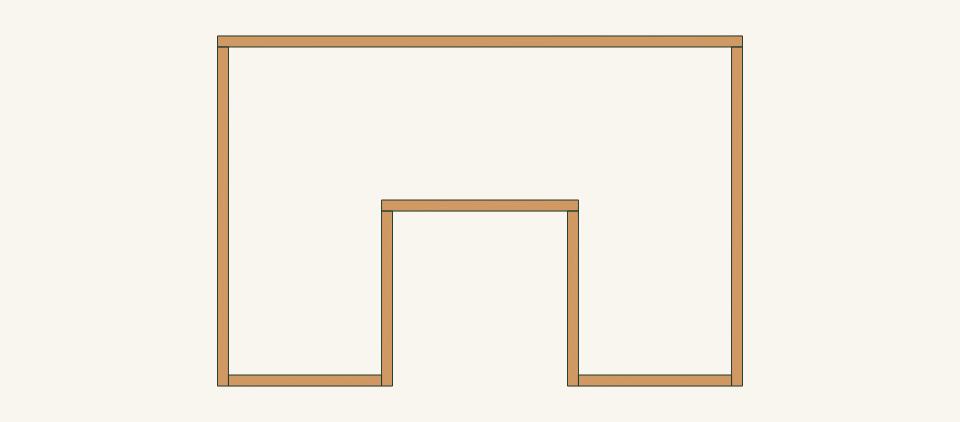
Loading the 3D view…
Drag to turn. Pinch or use + / − to zoom. The written step covers workholding and tool use.
Scroll or swipe the enlarged drawing to read its dimensions. Choose Fit to see the whole drawing again.
Planning reference only: the wall outline to string out on the ground, with the path notch open at the front.
Check: The intended user can enter, kneel and turn in the 24 × 24-inch notch and reach every bay without stepping in it.
- 02
Measure and record the stock
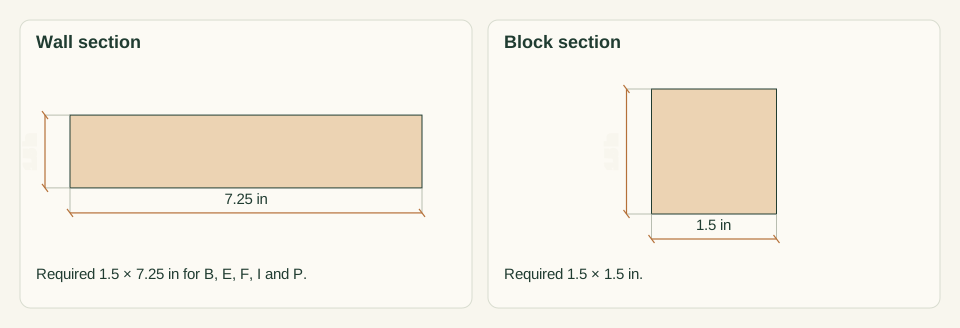
Measure each of the four 2 × 8 × 8-ft boards at both ends and the middle. This plan requires 1.5 × 7.25 inches. Measure the 2 × 2 at several points; C requires 1.5 × 1.5 inches. Reject split, twisted or cupped pieces. Measure your actual saw kerf. The board layouts assume a 0.125-inch kerf and a 0.5-inch end trim.
Close-up · Whole model shows the complete part
Loading the 3D view…
Drag to turn. Pinch or use + / − to zoom. The written step covers workholding and tool use.
Scroll or swipe the enlarged drawing to read its dimensions. Choose Fit to see the whole drawing again.
Compare the real wall and block sections with the required sizes before marking any cut.
Check: Wall stock measures 1.5 × 7.25 and block stock 1.5 × 1.5. Any other section stops the build until parts are reconciled.
- 03
Cut the eight wall pieces
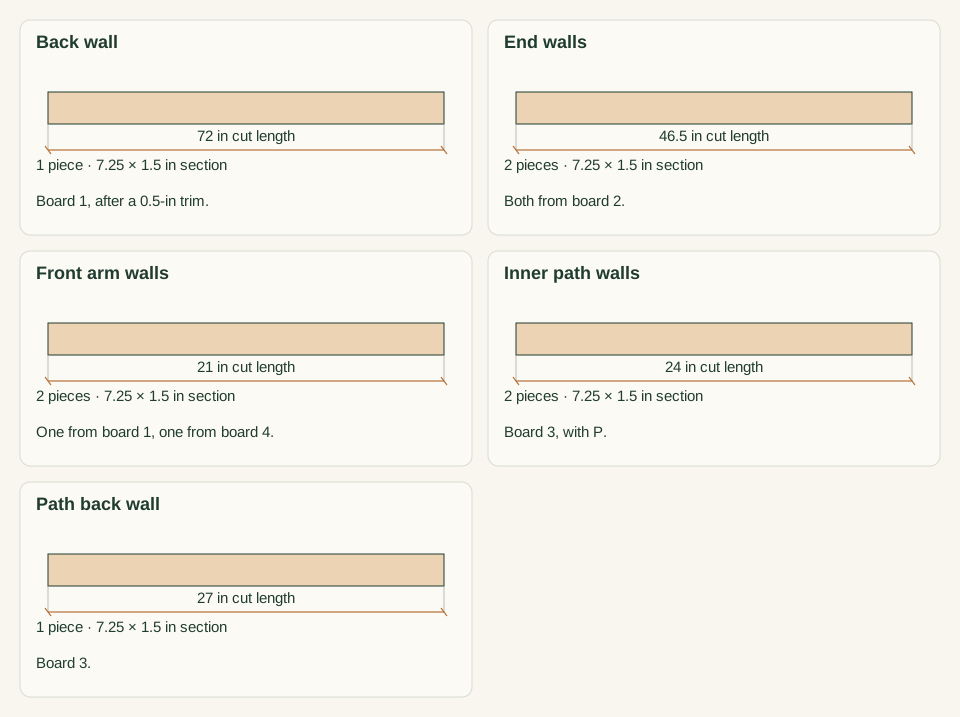
Square-trim 0.5 inch from one end of each wall board to make a datum. Cut the boards as follows. Board 1: B at 72 and one F at 21. Board 2: two E at 46.5. Board 3: P at 27 and two I at 24. Board 4: the second F at 21. Keep the kerf on the waste side. Label each piece with its letter, bottom edge, front end and outside or path face.
Close-up · Whole model shows the complete part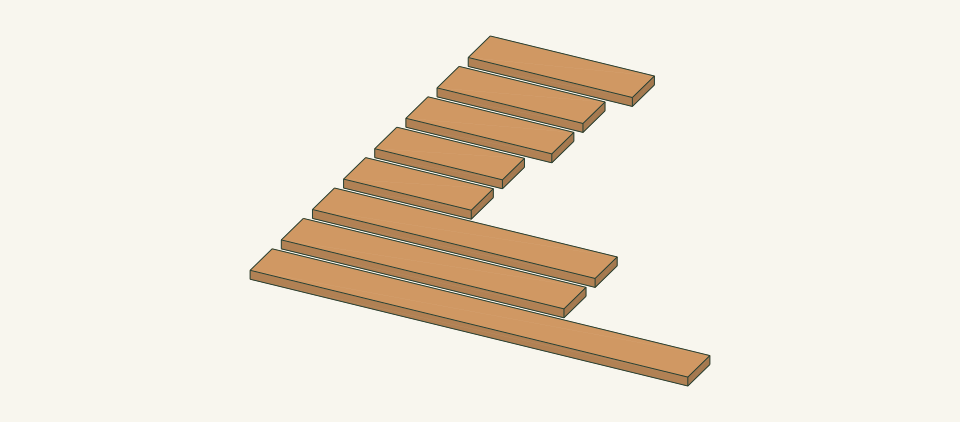
Loading the 3D view…
Drag to turn. Pinch or use + / − to zoom. The written step covers workholding and tool use.
Scroll or swipe the enlarged drawing to read its dimensions. Choose Fit to see the whole drawing again.
The eight wall pieces come from four boards, each labeled before the next cut.
Check: B is 72 and P is 27. Paired E, F and I pieces match face to face, and every end is square.
- 04
Cut the eight C blocks
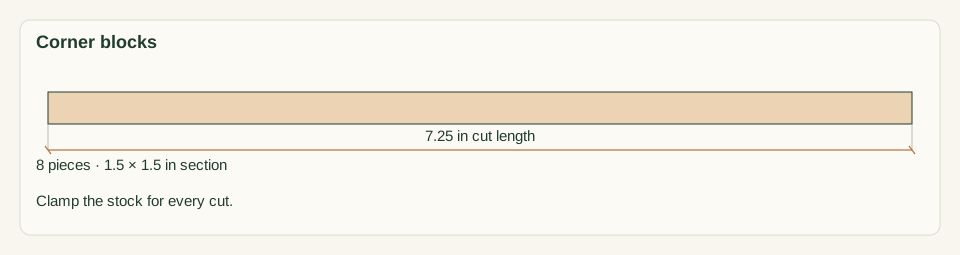
Square-trim 0.5 inch from one end of the 2 × 2. Cut eight C blocks at 7.25 inches, leaving the kerf on the waste side. Clamp the stock and keep the short block on the supported side of the cut. Never hold a block by hand beside the blade. Stand each C beside a wall piece to compare heights.
Close-up · Whole model shows the complete part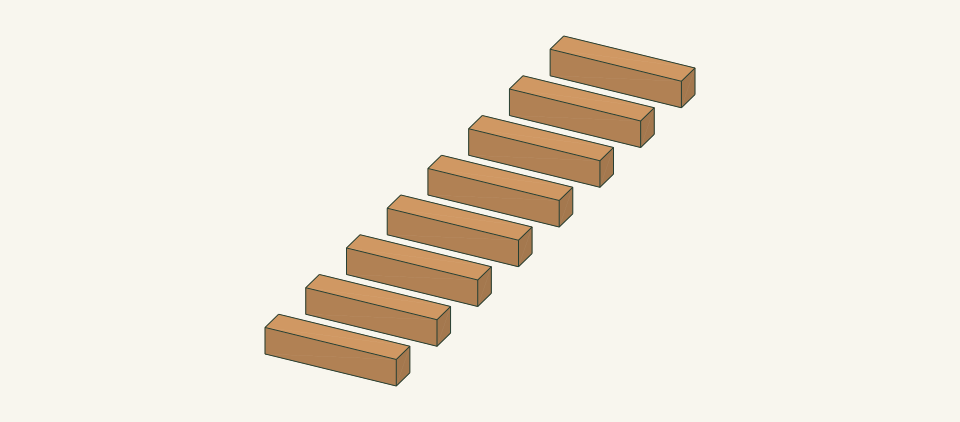
Loading the 3D view…
Drag to turn. Pinch or use + / − to zoom. The written step covers workholding and tool use.
Scroll or swipe the enlarged drawing to read its dimensions. Choose Fit to see the whole drawing again.
Eight identical blocks are cut from one clamped 2 × 2.
Check: Eight C blocks are cut, and each matches the 7.25-inch wall height without overhang.
- 05
Mark the screw points on every wall end
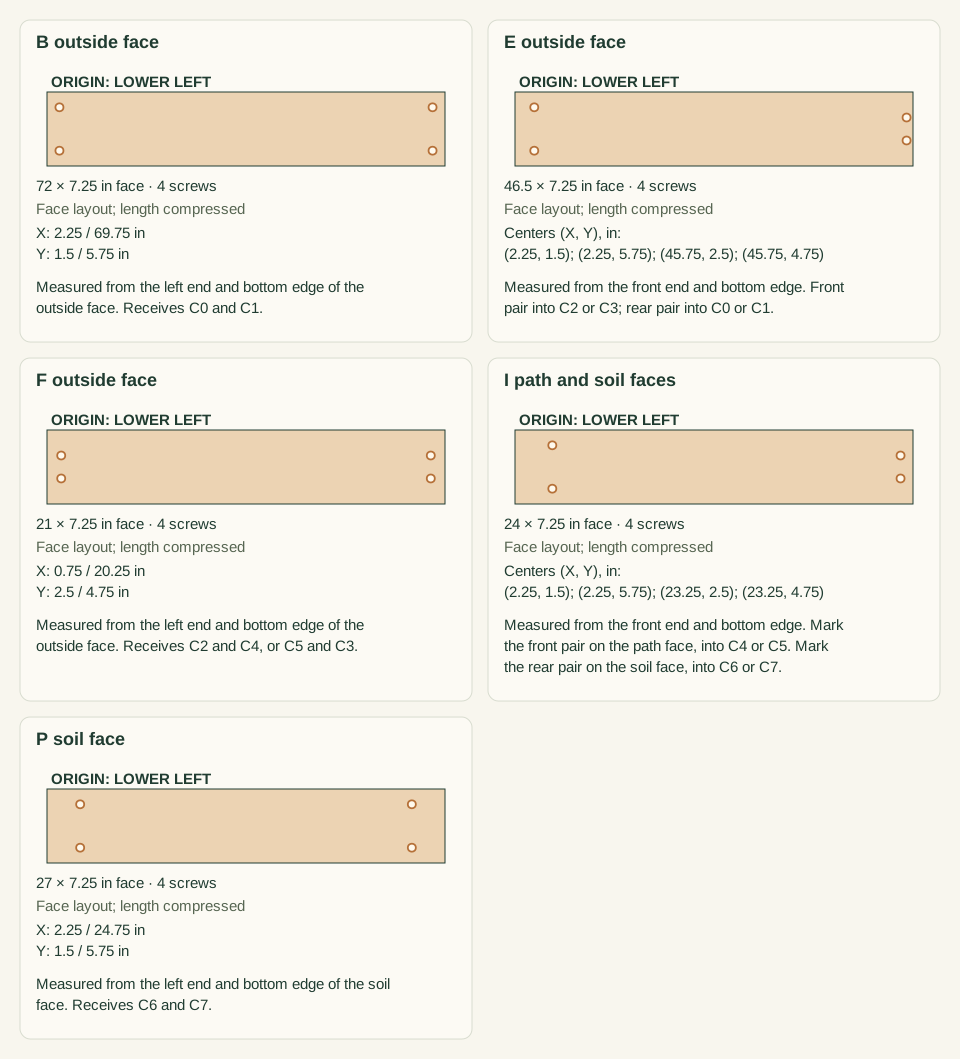
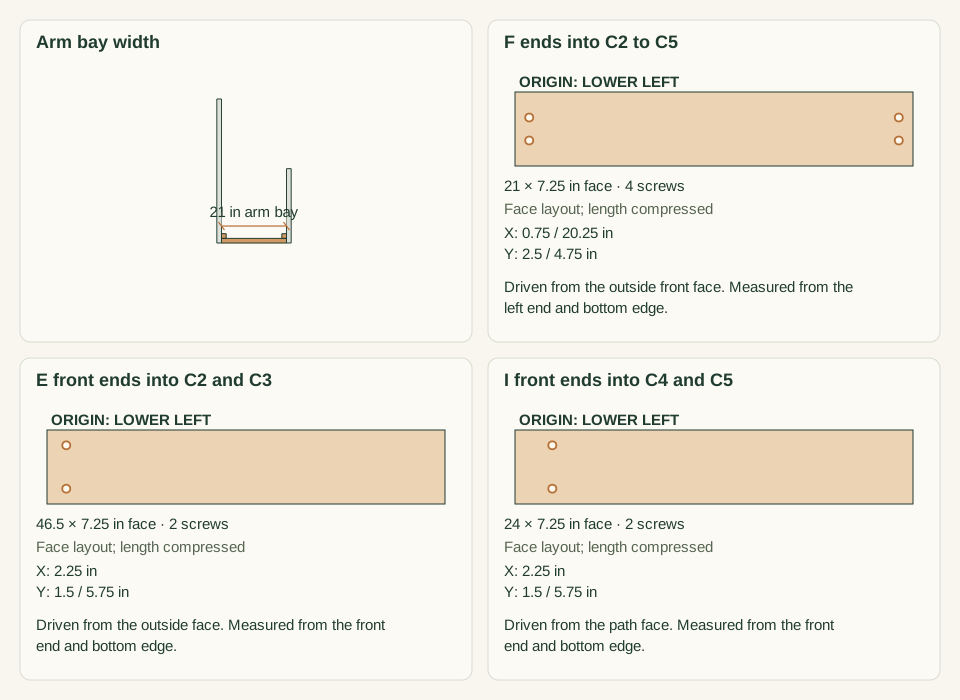
Use each wall's bottom edge as the height datum. Run-through ends are both ends of B and P and the front ends of E and I. On these, mark a line 2.25 inches from the end with points 1.5 and 5.75 inches up. Fit-between ends are both ends of F and the rear ends of E and I. On these, mark a line 0.75 inch from the end with points 2.5 and 4.75 inches up. Mark B, E and F on their outside faces. Mark the I front pair on the path face and the I rear pair on the soil face. Mark P on its soil face.
Close-up · Whole model shows the complete part
Loading the 3D view…
Drag to turn. Pinch or use + / − to zoom. The written step covers workholding and tool use.
Scroll or swipe the enlarged drawing to read its dimensions. Choose Fit to see the whole drawing again.
Run-through ends and fit-between ends use different lines and heights, so screws from the two walls never meet inside a block.
Check: There are 32 points: two on each of the 16 wall ends, each on the face the screw will enter.
- 06
Trial the joint and fasten the rear corners
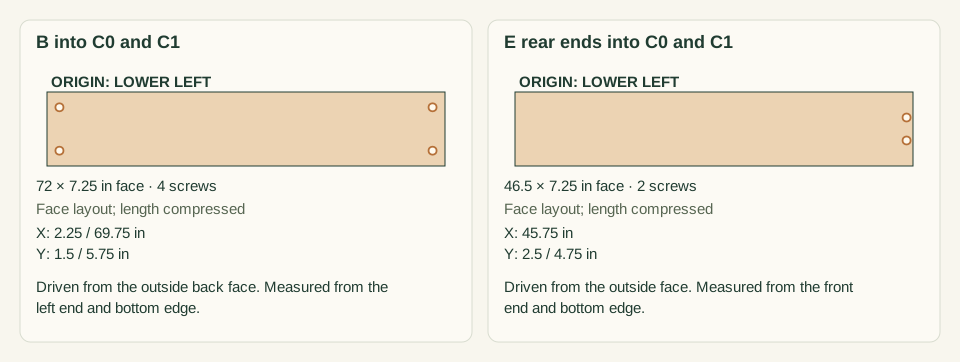
Build a test joint from the board 4 offcut and a 2 × 2 offcut. Follow the selected screw maker's clearance, pilot and countersink instructions. Stand B on its bottom edge. Butt the rear end of each E against the inside face of B, with the outside face of each E flush with an end of B. Clamp C0 and C1 into the two inside rear corners, flush top and bottom. Drill and drive two screws through B and two through each E rear end: 8 screws.
Close-up · Whole model shows the complete part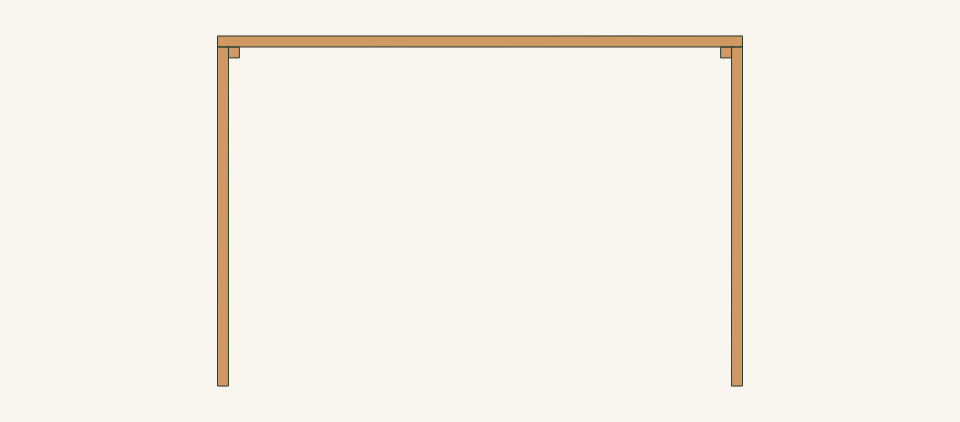
Loading the 3D view…
Drag to turn. Pinch or use + / − to zoom. The written step covers workholding and tool use.
Scroll or swipe the enlarged drawing to read its dimensions. Choose Fit to see the whole drawing again.
B runs through; each E stops against its inside face, with a block in the inside corner.
Check: The test joint shows no split. Both rear corners are closed and square, and no screw tip shows through C0 or C1.
- 07
Build the path module from P and two I walls
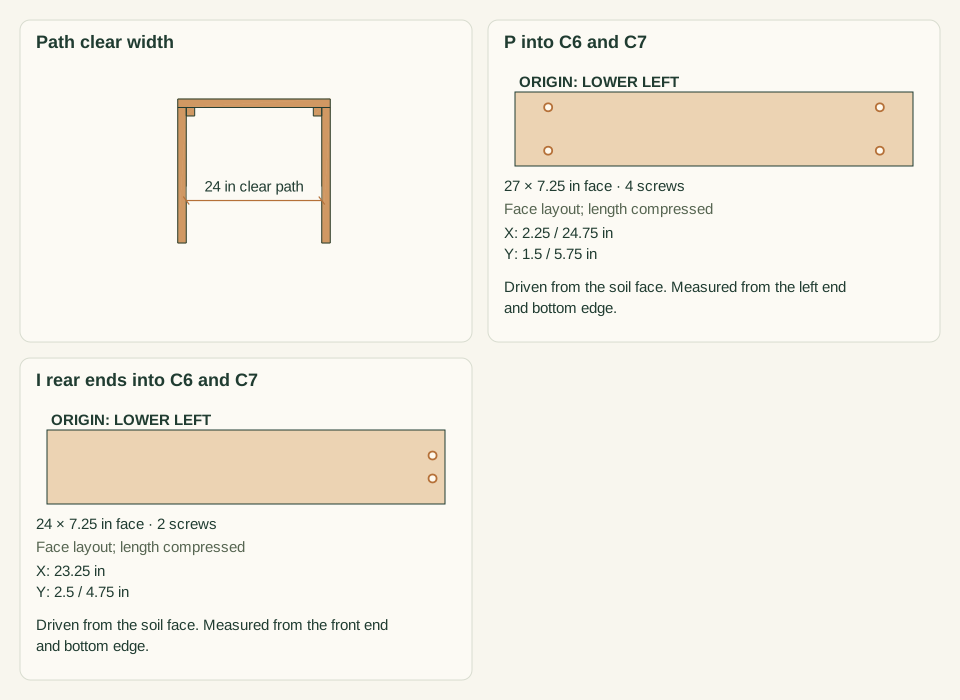
Stand P on its bottom edge with its soil face to the rear. Butt the rear ends of I0 and I1 against the front face of P, with the soil face of each I flush with an end of P. The path faces of I0 and I1 are then 24 inches apart. Clamp C6 and C7 into the two path-side corners, flush top and bottom. Drive two screws through each end of P and two through each I rear end, all from the soil faces: 8 screws.
Close-up · Whole model shows the complete part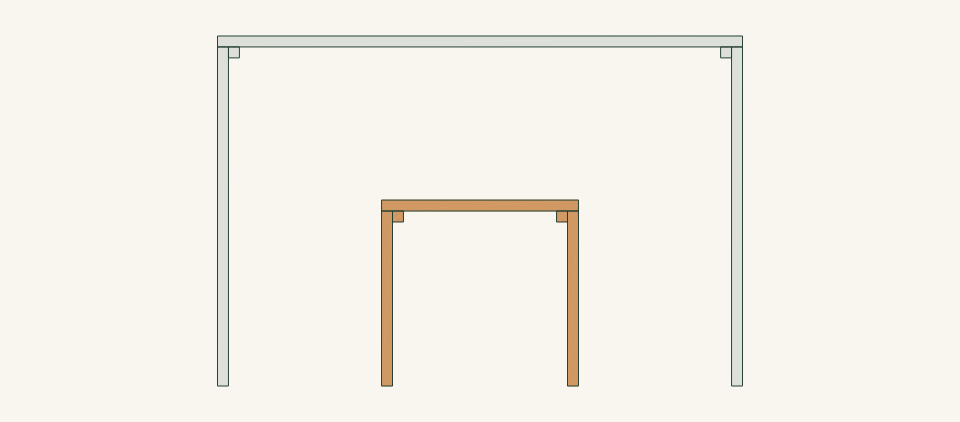
Loading the 3D view…
Drag to turn. Pinch or use + / − to zoom. The written step covers workholding and tool use.
Scroll or swipe the enlarged drawing to read its dimensions. Choose Fit to see the whole drawing again.
The path module is shown in its final position. It can be screwed together anywhere flat, then set in place.
Check: The clear gap between I0 and I1 measures 24 inches at the front and rear, and both I walls are square to P.
- 08
Fit the front arm walls F
Set the path module inside the rear frame. Place P's soil face 21 inches from B's inside face. Place each I soil face 21 inches from the inside face of the nearest E. Fit each F between E and I, with its outside face flush with the front ends of E and I. Clamp C2 and C3 in the outer front corners and C4 and C5 in the inner arm corners. Drive two screws through each F end, two through each E front end and two through each I front end from the path face: 16 screws.
Close-up · Whole model shows the complete part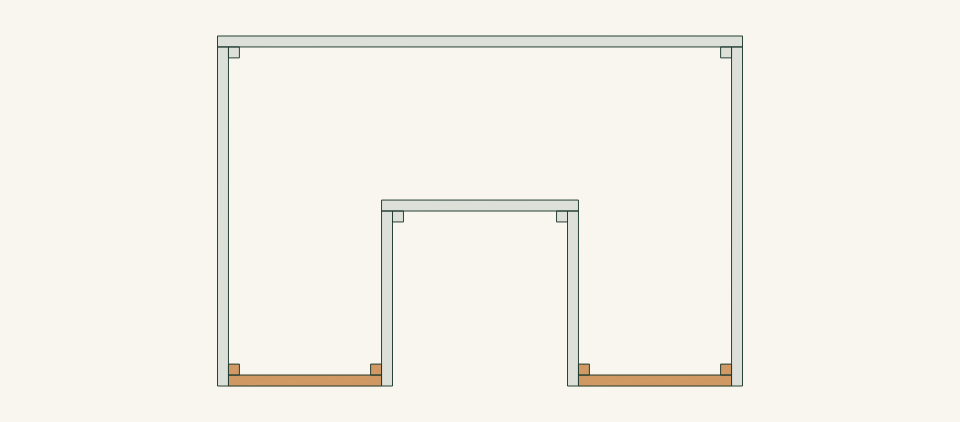
Loading the 3D view…
Drag to turn. Pinch or use + / − to zoom. The written step covers workholding and tool use.
Scroll or swipe the enlarged drawing to read its dimensions. Choose Fit to see the whole drawing again.
Each F wall fixes the 21-inch spacing between the outer frame and the path module.
Check: Each arm bay is 21 inches clear, the front line is straight across all four front walls, and all 32 screws are seated.
- 09
Square and inspect the empty frame
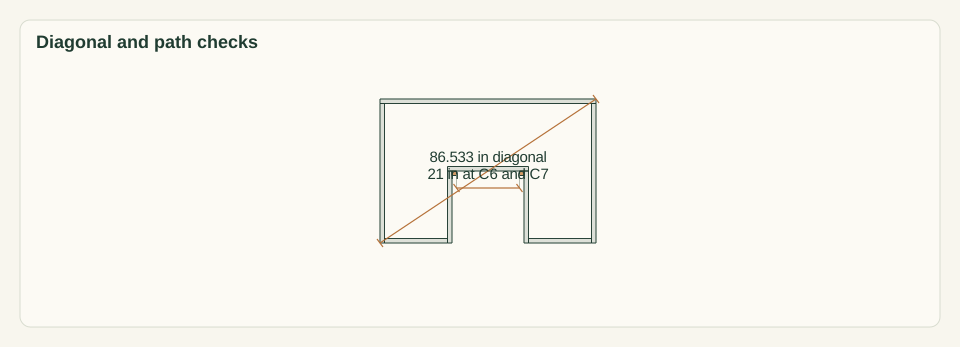
Measure 72 inches across the front and back and 48 inches at both ends. Measure both outside diagonals; the design value is 86.533 inches. Aim for a difference of 0.125 inch or less as a proposed target. Check that the path is 24 wide and 24 deep, narrowing to 21 at C6 and C7. Release all clamps. Inspect all eight C blocks for splits, stripped holes and protruding screw tips. Ease the rim edges.
Close-up · Whole model shows the complete part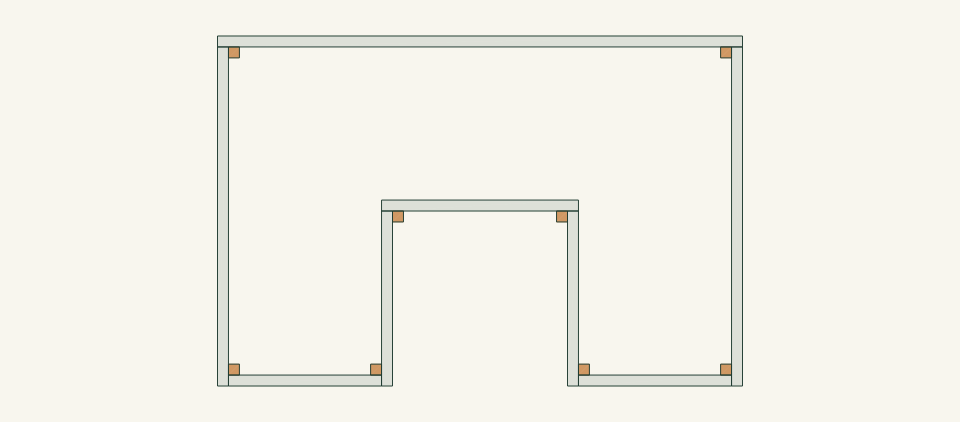
Loading the 3D view…
Drag to turn. Pinch or use + / − to zoom. The written step covers workholding and tool use.
Scroll or swipe the enlarged drawing to read its dimensions. Choose Fit to see the whole drawing again.
Square the whole frame and check all eight blocks while every joint is still visible.
Check: The diagonals match within target, every joint stays closed with the clamps off, and every block is sound.
- 10
Place the frame on the prepared ground
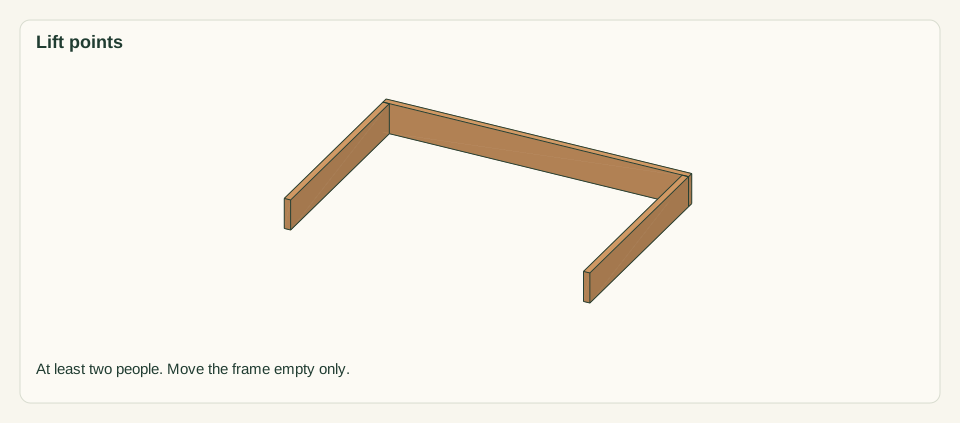
Remove the layout string. Move the empty frame with at least two people, lifting under B and both E walls. Never lift by an F or I wall alone. Set the front line on the marked front edge. Check that all eight walls bear on the soil with no gaps. Recheck the 86.533-inch diagonals after moving.
Close-up · Whole model shows the complete part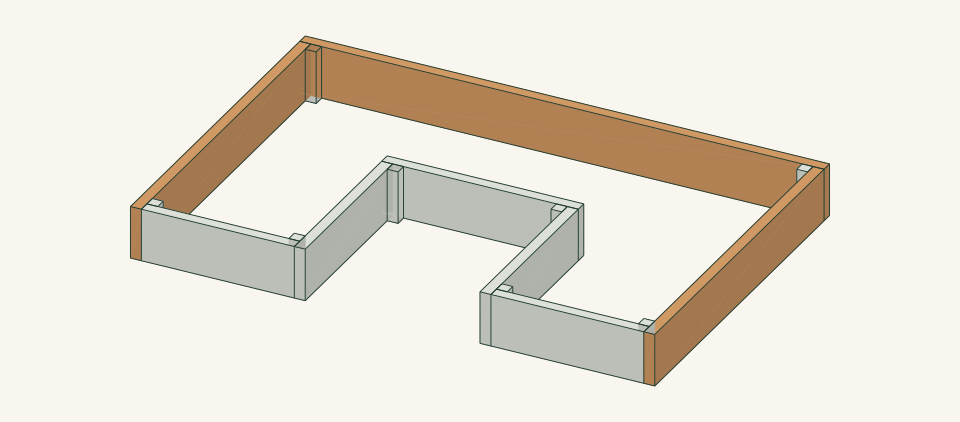
Loading the 3D view…
Drag to turn. Pinch or use + / − to zoom. The written step covers workholding and tool use.
Scroll or swipe the enlarged drawing to read its dimensions. Choose Fit to see the whole drawing again.
Lift points are the back wall and both end walls. Never lift by the short F or I walls.
Check: The frame sits without rocking, the path floor is level with the surrounding ground and the diagonals still match.
- 11
Mark the fill line and fill in passes
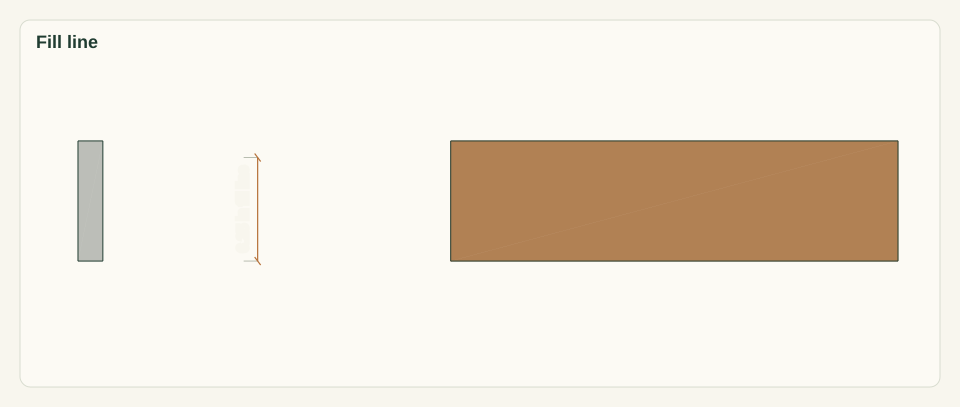
Mark a line 6.25 inches above the prepared ground on the inside of every wall, including the soil faces of I and P. The volume to the line is about 8.84 cubic feet. Add the selected raised-bed mix in passes of about 2 inches across all three bays. Do not dump a full load against I or P. Do not stand on any rim. Watch I0, I1 and P for any movement into the path after each pass.
Close-up · Whole model shows the complete part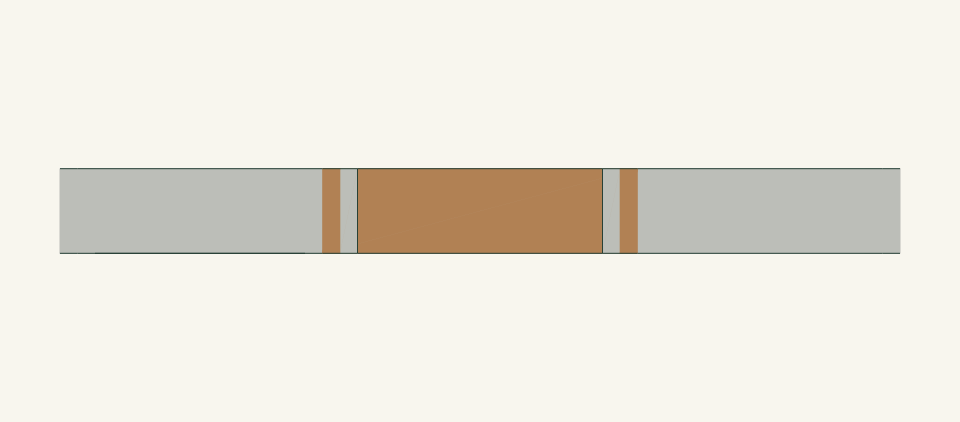
Loading the 3D view…
Drag to turn. Pinch or use + / − to zoom. The written step covers workholding and tool use.
Scroll or swipe the enlarged drawing to read its dimensions. Choose Fit to see the whole drawing again.
The fill line sits below the rim on every inside face, and the path walls are watched during each pass.
Check: The mix is level at the 6.25-inch line, leaving 1 inch of freeboard, and no wall has moved into the path.
- 12
Water and make the first inspection
Water gently and watch drainage into the native soil without flooding the path. Measure the path again at 24 inches between I0 and I1 at the front and rear. Measure the 21-inch width at C6 and C7. Check every visible C block and joint, and both outside diagonals. Top up settled mix only to the 6.25-inch line. Plant to crop-specific spacing, not to a fixed grid.
Close-up · Whole model shows the complete partLoading the 3D view…
Drag to turn. Pinch or use + / − to zoom. The written step covers workholding and tool use.
Scroll or swipe the enlarged drawing to read its dimensions. Choose Fit to see the whole drawing again.
After watering, the path walls and their blocks are the first place to look for movement.
Check: The path width, diagonals and joints are unchanged after watering. Record the result before planting.


05 / Keep it sound
Care
After the build
- Fill only after the inspection in step 9 passes. Use a raised-bed mix suited to the crop, and keep it 1 inch below the rim.
- Keep the path open as a working space. Do not store tools, pots or soil bags against I or P.
- Plant to crop-specific spacing. The 21-inch bays set your reach, not a planting grid.
Check it each season
- Each season, measure the path at 24 inches between I0 and I1 and at 21 inches at C6 and C7. A narrowing path shows that an inner wall is leaning.
- Inspect visible blocks, the rim and screw heads for rot, splits and corrosion. Unload the soil near a joint before replacing a block or screw.
- Replace a decayed wall or block as a complete part. Do not cover it with trim or add a screw beside a crack.
If something looks wrong
- Frame rocks before filling
- Find the high spot or debris and correct the prepared ground. Do not wedge walls with loose scraps.
- Path narrows during filling
- Stop filling, remove mix from behind the leaning I or P wall, and inspect C6, C7, C4 and C5 for splits or stripped screws before continuing.
- Block splits while driving
- Remove the screw, replace the C block and recheck the pilot against the screw maker's instructions on scrap.
- Water pools in a bay
- Stop watering and reassess the native soil and the mix. Do not drill outlet holes into the walls at random.
- Diagonals differ by more than 0.125 in
- Loosen the clamps, rack the frame back to square and recheck before driving any further screws.
Keep exploring